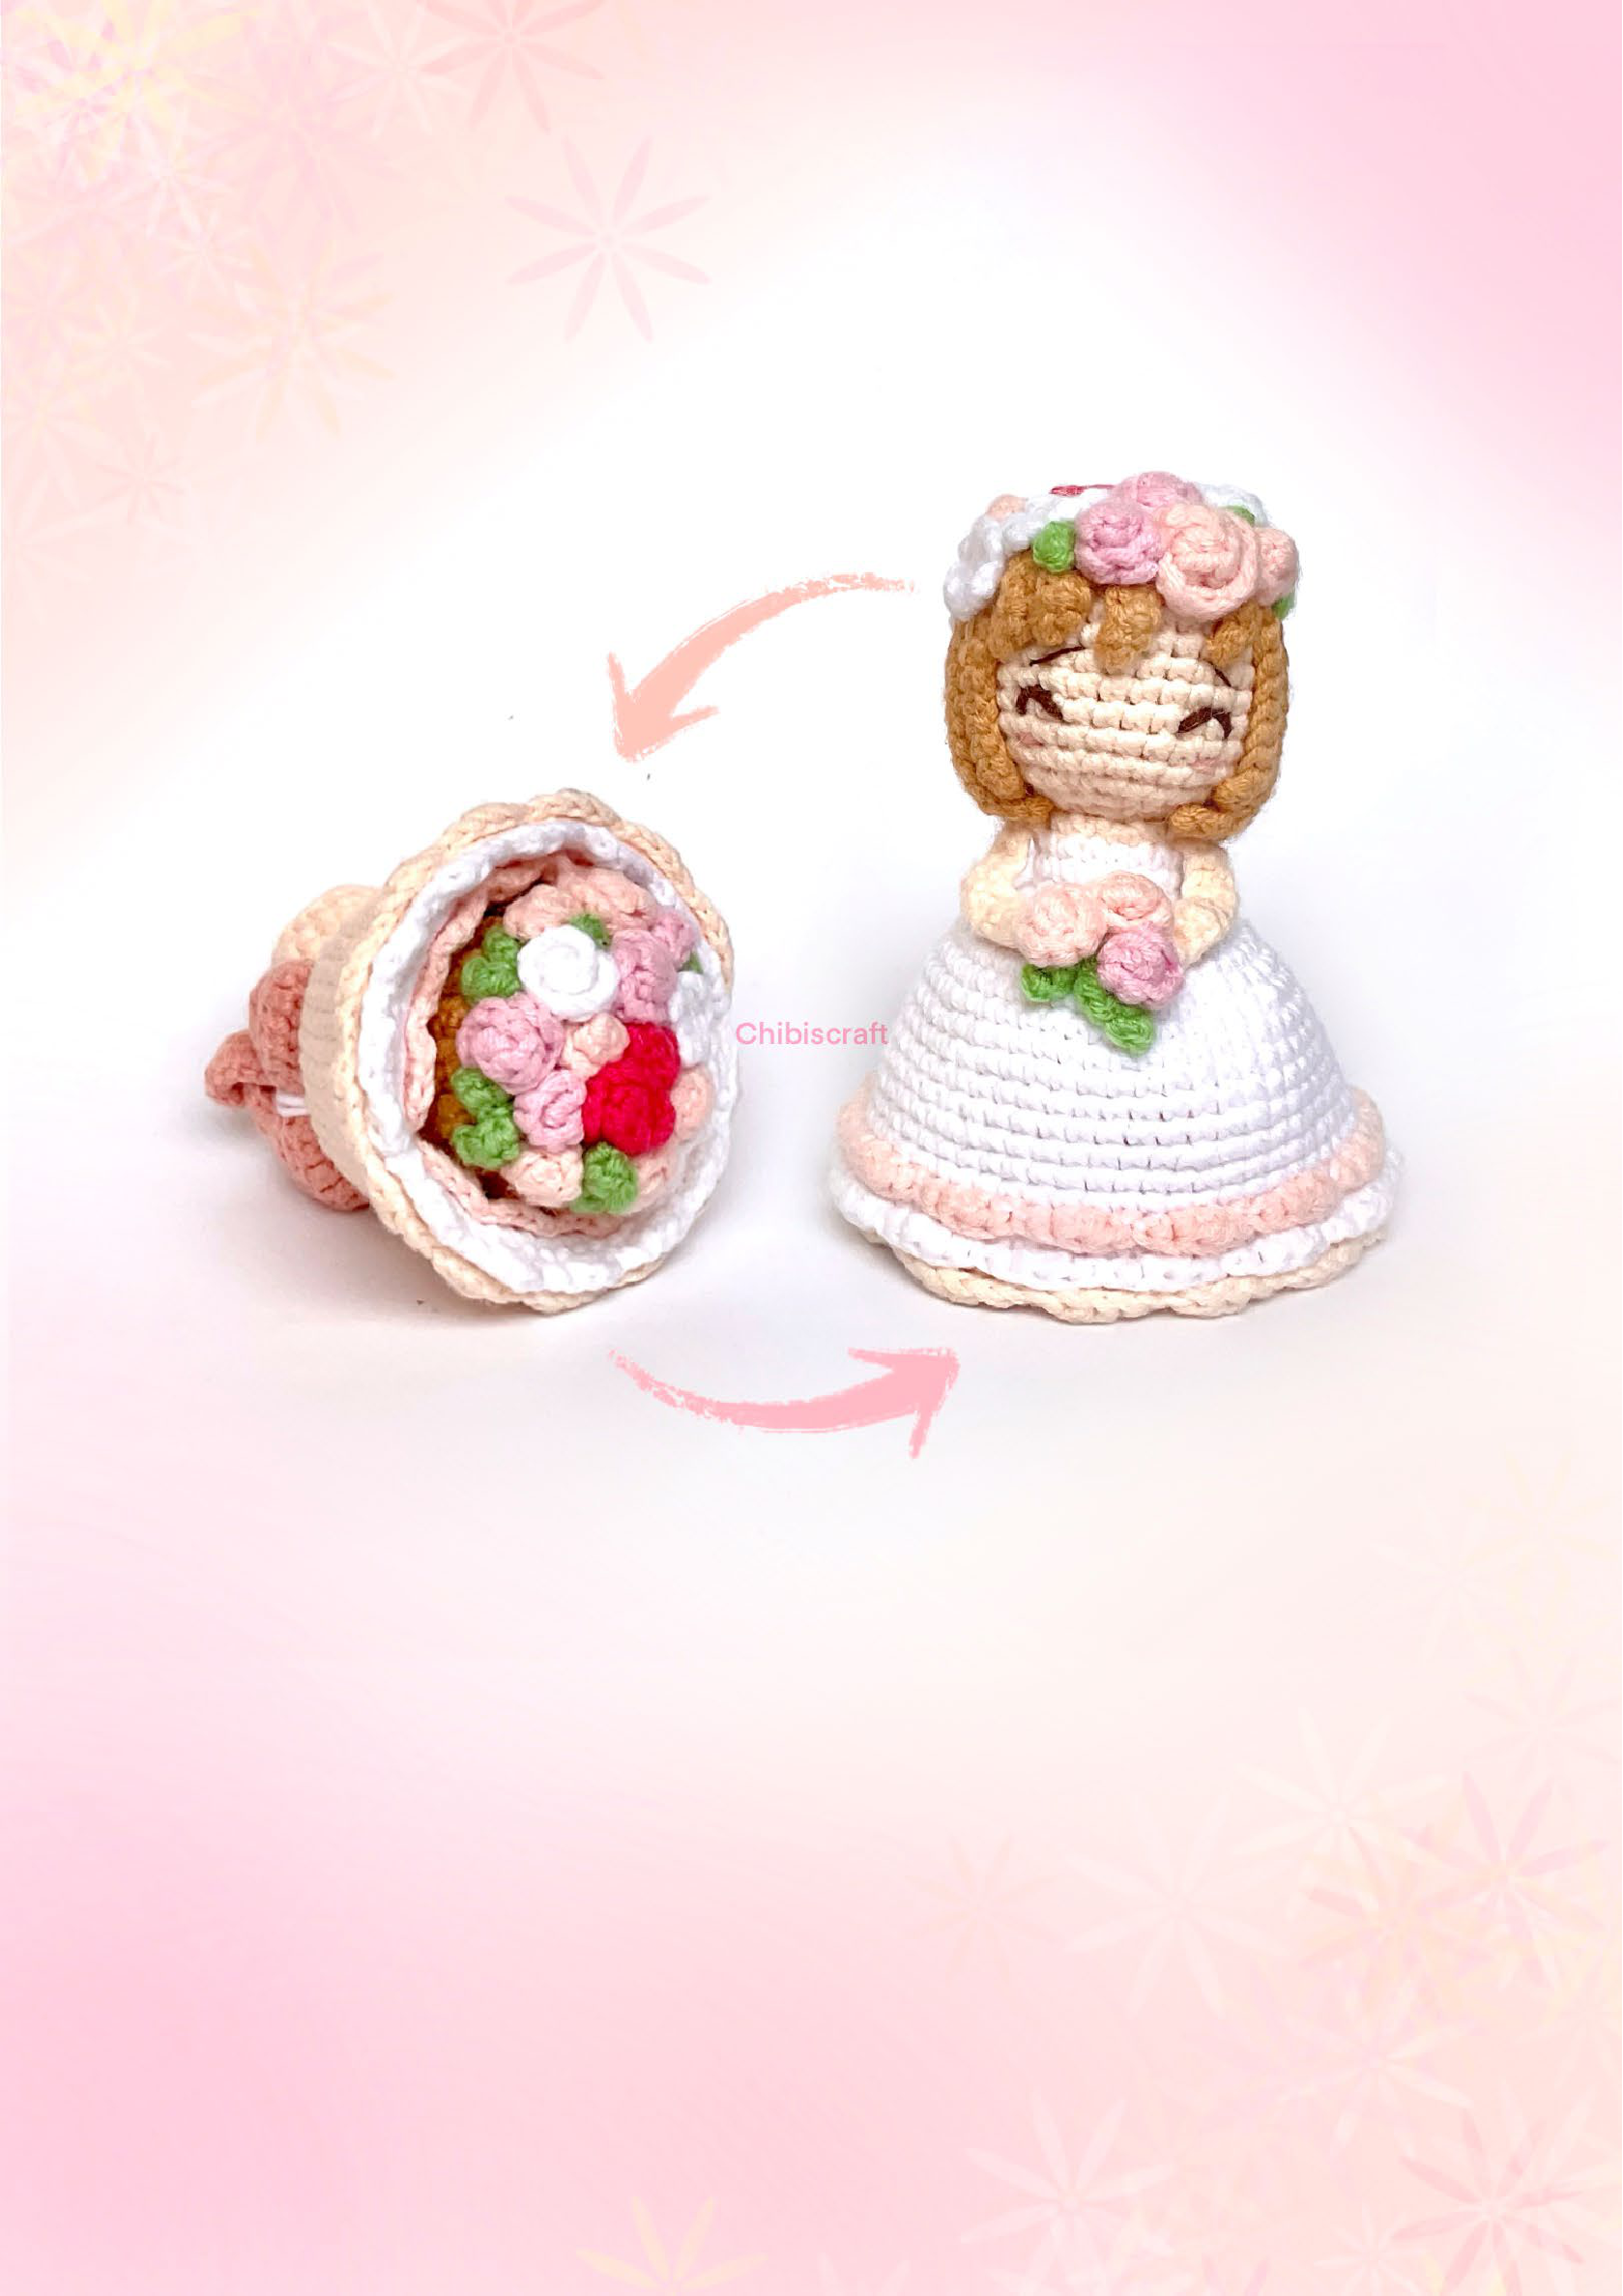
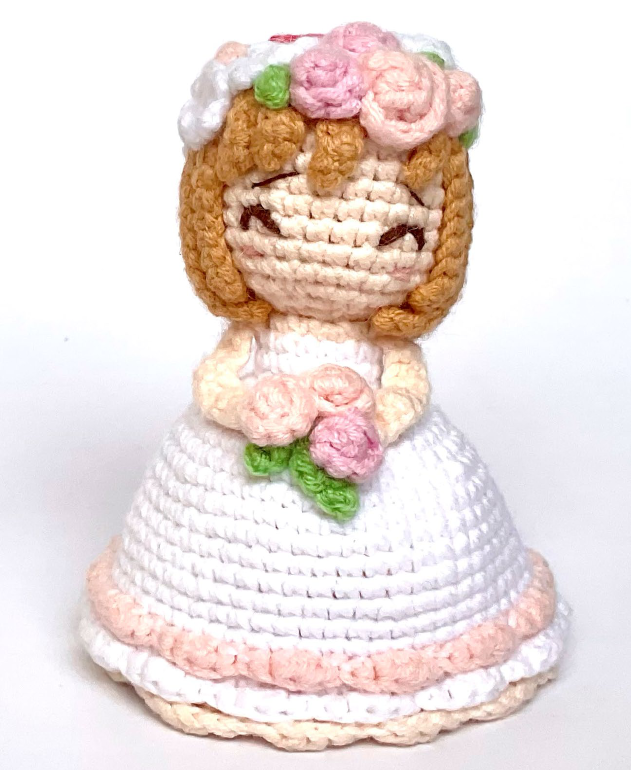
REVERSIBLE FLOWER BOUQUET & BRIDE AMIGURUMI
Difficulty Level: Intermediate – Advanced
Crochet pattern by Febby Pranajaya (@chibiscraft)
Hello! Thank you for choosing this pattern. This pattern is for your personal use only. Please do not reproduce, distribute, or resell it, in parts or in its entirety, in any format or translation. However, you may sell finished handmade items made from this pattern as long as they were made by yourself in a limited number. Please give credit to Chibiscraft as the pattern designer.
If you share pictures on Instagram, please remember to:
- Insert Pattern by @chibiscraft
- Use hashtag #chibiscraftpattern
Please do not hesitate to contact me if you need any clarifications:
- Email: chibiscraft@gmail.com
- Instagram: @chibiscraft
- Facebook: Chibiscraft
Materials
- 2.0 mm crochet hook (or size suitable for your chosen yarn)
- Tapestry needle, embroidery needle, pin needle
- Fiberfill for stuffing
- Yarn in the same size (e.g., 4 ply, cotton blend yarn) in the following colors:
- White
- Cream
- Skin color (Cream can also be used for skin)
- Light Pink
- Pink
- Light Peach
- Peach
- Green
- Light Brown (for hair)
- Dark Brown (for eyes/eyebrows)
- Scissors
- Multipurpose glue (optional)
- Stitch markers
Finished Dimensions
The size will vary depending on your yarn and hook. Using the recommended materials, your finished amigurumi will be about:
- Bride side: 10.5 cm (4.1″) tall
- Flower bouquet side: 7 cm (2.76″) tall
Important Tips for Success
- Stitch Tension: Try to work tight stitches for a neat finish, but not so tight that the plushie loses its stretch. Use a smaller crochet hook for better results. Maintain consistent tension across all parts.
- Count Your Stitches: Always count your stitches at the end of each round/row.
- Stitch Marker: Use a stitch marker or a piece of yarn to mark the beginning of each round.
- Continuous Spiral: Most rounds are worked in a continuous spiral. Do not join with a slip stitch or turn unless the pattern explicitly states to do so.
- Both Loops: Crochet through both loops unless the pattern specifies otherwise (e.g., FLO or BLO).
- Read Ahead: It’s highly recommended to read through the entire pattern before you begin crocheting.
Abbreviations (US Standard Crochet Terms)
- R = Row/Round
- MR = Magic Ring
- st = Stitch/Stitches
- sc = Single Crochet
- inc = Single Crochet Increase (2 sc in the same st)
- inc3 = 3 Single Crochets in the same st
- dec = Single Crochet Decrease (crochet 2 st together). Tip: Use an invisible decrease for a cleaner finish.
- hdc = Half Double Crochet
- hdc inc = Half Double Crochet Increase (2 hdc in the same st)
- dc = Double Crochet
- ch = Chain
- sl st = Slip Stitch
- FL = Front Loop/Loops
- BL = Back Loop/Loops
- BLO = Back Loop Only
- FLO = Front Loop Only
- S = Hair strand
- [ _ ]x_ = Repeat sequence between the square brackets for the indicated number of times
- ( ) = Stitch count at the end of the row/round
Invisible Finish Technique
To create a seamless finish:
- After completing your last stitch, cut the yarn, leaving a tail, and pull the loop to draw the tail through.
- Thread your tapestry needle with the yarn tail.
- Skip the next stitch, and insert your needle from front to back under both loops of the following stitch.
- Go back to the last stitch you made, and insert your needle through the back loop of that stitch.
- Pull the tail gently to create a faux stitch that blends seamlessly with the round.
Pattern Instructions
Bride’s Head and Body
Start with skin color yarn.
- R1: 6 sc in MR (6)
- R2: 6 inc (12)
- R3: [sc, inc] x6 (18)
- R4: [sc, inc, sc] x6 (24)
- R5: [5 sc, inc] x4 (28)
- R6-12: (7 rounds) 28 sc (28)
- R13: [5 sc, dec] x4 (24)
- R14: [sc, dec, sc] x6 (18)
- Start stuffing with fiberfill.
- R15: [sc, dec] x6 (12)
- R16: FLO [sc, inc] x6 (18)
Change to white yarn.
- R17-18: (2 rounds) 18 sc (18)
Fasten off, leave a long tail for sewing. Complete with an invisible finish.
Bride’s Hair
Start with light brown yarn.
- R1: 8 sc in MR (8)
- R2: 8 inc (16)
Sl st to the first stitch of R2. Then, continue to make the hair strands:
- Strand 1: Chain 14. Starting from the second chain from the hook: sl st, 12 sc. Sl st to the next st on R2.
- Strand 2-5: Chain 8. Starting from the second chain from the hook: sl st, 6 sc. Sl st to the next st on R2.
- Strand 6: Repeat Strand 1 instructions.
- Strand 7-16: Chain 16. Starting from the second chain from the hook: sl st, sc, 13 hdc. Sl st to the next st on R2.
Fasten off, leave a long tail for sewing.
Bride’s Arms (Make 2)
Start with skin color yarn.
- Chain 12.
- Starting from the second chain from the hook, make 11 sc.
Fasten off, leave a long tail for sewing.
Assembling the Bride’s Hair
Attach the hair to the head with the wrong side (the side where the stitches are less defined) facing outwards.
- You can sew the hair or use glue. If using glue, be aware that the area where it’s applied will become stiffer, which might make it harder to sew flowers later.
- If sewing, do not sew the strands all the way to the tip. Sew them about 5 stitches above the slip stitch join to create a nice curl and keep the hair close to the head.
Bride’s Skirt
Start with white yarn. Leave a long starting yarn tail (approx. 10 cm / 4″). This tail will be used later to join the bouquet and bride.
- R1: 6 sc in MR (6)
- R2: 6 inc (12)
- R3: [sc, inc] x6 (18)
- R4: [sc, inc, sc] x6 (24)
- R5: [3 sc, inc] x6 (30)
- R6: [2 sc, inc, 2 sc] x6 (36)
- R7: [5 sc, inc] x6 (42)
- R8: 42 sc (42)
- R9: [3 sc, inc, 3 sc] x6 (48)
- R10-13: (4 rounds) 48 sc (48)
- R14: [7 sc, inc] x6 (54)
- R15-16: (2 rounds) 54 sc (54)
- R17: BLO 54 sc (54)
- R18: 54 sc (54)
Do not cut the yarn yet! You will use this yarn tail later for a step on page 9 (or further down in this pattern).
Facial Features Embroidery
While holding the skirt, let’s embroider the face:
- Using dark brown yarn (use only 1 ply), embroider the eyes at R10 of the head.
- Embroider the eyebrows at R8.
- Embroider blush on the cheeks using pink yarn, between R11-12.
Skirt Ruffle Detail
Hold the skirt with its bottom facing you. Attach light peach yarn at the Front Loop (FL) of R16 (the round before R17, which was worked in BLO).
- Work: [sl st, sc, hdc inc, sc] x13, then 2 sl st.
Fasten off, secure, and hide the tail.
Bouquet Wrapper
Start with cream yarn. Leave a long starting yarn tail (approx. 10 cm / 4″). This tail will be used later to join the bouquet and bride.
- R1: 6 sc in MR (6)
- R2: 6 inc (12)
- R3: [sc, inc] x6 (18)
- R4: BLO [sc, inc, sc] x6 (24)
- R5: [3 sc, inc] x6 (30)
- R6: [2 sc, inc, 2 sc] x6 (36)
- R7: [5 sc, inc] x6 (42)
- R8: 42 sc (42)
- R9: [3 sc, inc, 3 sc] x6 (48)
- R10-13: (4 rounds) 48 sc (48)
- R14: [7 sc, inc] x6 (54)
- R15-18: (4 rounds) 54 sc (54)
Fasten off, leave a long tail for sewing (about 50 cm long).
Bouquet Wrapper Ruffle Detail
Hold the bouquet wrapper with its opening facing you. Attach cream yarn at the Front Loop (FL) left from R3 (the round before R4, which was worked in BLO).
- R1: Ch 1, [hdc, hdc inc] x9 (27)
- R2: [2 hdc, hdc inc] x9 (36)
- R3-4: (2 rounds) 36 hdc (36)
Fasten off. Complete with an invisible finish, secure, and hide the tails.
Ribbon
Work in rows. Start with peach yarn.
- Chain 25.
- R1: Starting from the second chain from the hook: [2 sc, 2 hdc, 4 dc, 2 hdc, 2 sc] x2 (24). Chain 1.
- R2: Turn, BLO [2 sc, 2 hdc, 4 dc, 2 hdc, 2 sc] x2 (24).
Fasten off, leave a long tail. Fold the ribbon so both ends meet in the middle. Use both yarn tails to make a knot and secure the folded position of the ribbon.
Ribbon Tail
Using the same peach yarn:
- Make a Magic Ring (MR).
- Work: [Chain 10. Starting from the third chain from the hook: 5 dc, 2 hdc, sc. Sl st to the MR] x2.
- Pull the MR tight and fasten off.
- Using the yarn tail, attach the ribbon’s tail to the center back of the bow, with its wrong side facing outwards.
- Using white yarn, wrap it around the center of the bow several times to create the central knot. Secure the ends and leave a long tail for sewing.
Sew the ribbon to the bouquet wrapper, near its bottom.
Flowers and Leaves
You can make as many as you like, but here are the recommended quantities:
Flower 1 (Make 6)
- Make 1 in pink and white.
- Make 2 in light pink and light peach.
- Chain 6.
- Starting from the second chain from the hook: hdc, hdc inc, hdc, ch 2.
- Then, hdc inc in the same stitch, ch 2.
- Hdc inc in the next stitch, ch 2.
- Hdc in the same stitch, hdc, ch 2.
- Hdc inc in the same stitch.
Fasten off, leave a long tail for sewing. Roll up the flower and sew it together so it holds its shape.
Flower 2 (Make 10)
- Make 6 in light peach.
- Make 3 in light pink.
- Make 1 in pink.
- Chain 6.
- Starting from the second chain from the hook: sc, inc, 3 inc3.
Fasten off, leave a long tail for sewing. Roll up the flower and sew it together so it holds its shape.
Flower 3 (Make 3)
Use white yarn.
- In a Magic Ring (MR), make: [Chain 4, sl st to the MR] x5.
- Tighten the MR.
Fasten off, leave a long tail for sewing.
Leaves 1 (Make 3)
Start with green yarn.
- Chain 5.
- Starting from the second chain from the hook: sl st, sc, hdc, sl st.
- Do not cut the yarn. Chain 4.
- Starting from the second chain from the hook: sl st, sc, sl st.
Fasten off. Leave a long tail for sewing.
Leaves 2 (Make 3)
Start with green yarn.
- Chain 4.
- Starting from the second chain from the hook: sl st, sc, sl st.
Fasten off. Leave a long tail for sewing.
Attaching Flowers and Leaves to the Bride’s Head
Attach the flowers (your choice of type and arrangement) and leaves on top of the bride’s head using the long tails for sewing.
Assembly: Combining the Bride and Bouquet
Step 1: Attach Bride’s Body to Skirt
Attach the bride’s body to the skirt between R3-4 of the skirt. You don’t need to stuff the body with fiberfill, or only stuff it slightly.
Step 2: Attach Arms, Leaves, and Flowers to Skirt
Attach the ends of the arms, the Leaves 1, and 3 pieces of Flower 2 (in light pink and light peach) to the skirt. These will be visible on the bride side when fully assembled.
Step 3: Prepare Bouquet Wrapper and Skirt for Joining
- Turn the bouquet wrapper back with the right/good side facing you.
- Leave the skirt intact at the wrong/ugly side.
- You do not need to stuff the bouquet wrapper with fiberfill.
- Gently push the skirt inside the bouquet wrapper.
Step 4: Join Bouquet Wrapper and Bride’s Body
Join the last rounds of the bouquet wrapper (R18) and the bride’s body (R18) together. Sew them using the light pink yarn tail from the bouquet wrapper through the Back Loops (BLO) of each piece.
To finish, make a knot and hide the tail.
Step 5: Join Bouquet Wrapper and Bride’s Skirt Bottoms
Turn both the bouquet wrapper and the bride’s skirt inside out (wrong/ugly sides facing you). Tie a knot with the yarn tails left from the magic rings of both the bouquet wrapper and the bride’s skirt. Leave a small space between them – this allows for the reversible action.
Step 6: Bouquet Side Finishing Detail
After joining the bouquet and the bride’s skirt, continue working on the bouquet side.
Hold the bouquet with its flowers facing you. Attach the cream yarn to the Front Loop (FL) of R18 (the last full round of the bouquet wrapper before joining).
- Work: [sl st, sc, hdc inc, sc] x13, then 2 sl st.
Fasten off, secure, and hide the tails.
Step 7: Bride Side Finishing Detail
Now, turn the entire piece inside out so the bride is facing outside. We will now work on the bride’s side.
Hold the bride with her skirt facing you.
Using the white yarn tail you left from the last round of the bride’s skirt (from page 4/earlier in this pattern):
- Work at the Front Loop (FL) of R18: Ch 1, sc in the same stitch.
- Then, [sl st, sc, hdc inc, sc] x13, sl st.
Fasten off, complete with an invisible finish, secure, and hide the tail.
Congratulations! Your reversible flower bouquet and bride amigurumi is now complete!
I hope you enjoyed crocheting them. If you like this pattern, please consider leaving a review. It would be my great pleasure to see your finished amigurumi with hashtag #chibiscraftpattern, or by adding a Ravelry project.
Have a nice day!
With love,
Febby Pranajaya
Special thanks to my pattern testers who helped me a lot in improving this pattern:
- Rahma @mercy_handmade
- Nani @geekoutthreads
- YP @mai.crochet