Create Your Own Pocket-Sized Pal: Mini Teddy Bear Crochet Pattern
Mini Crochet Teddy Bear Pattern: Step-by-Step Amigurumi Tutorial
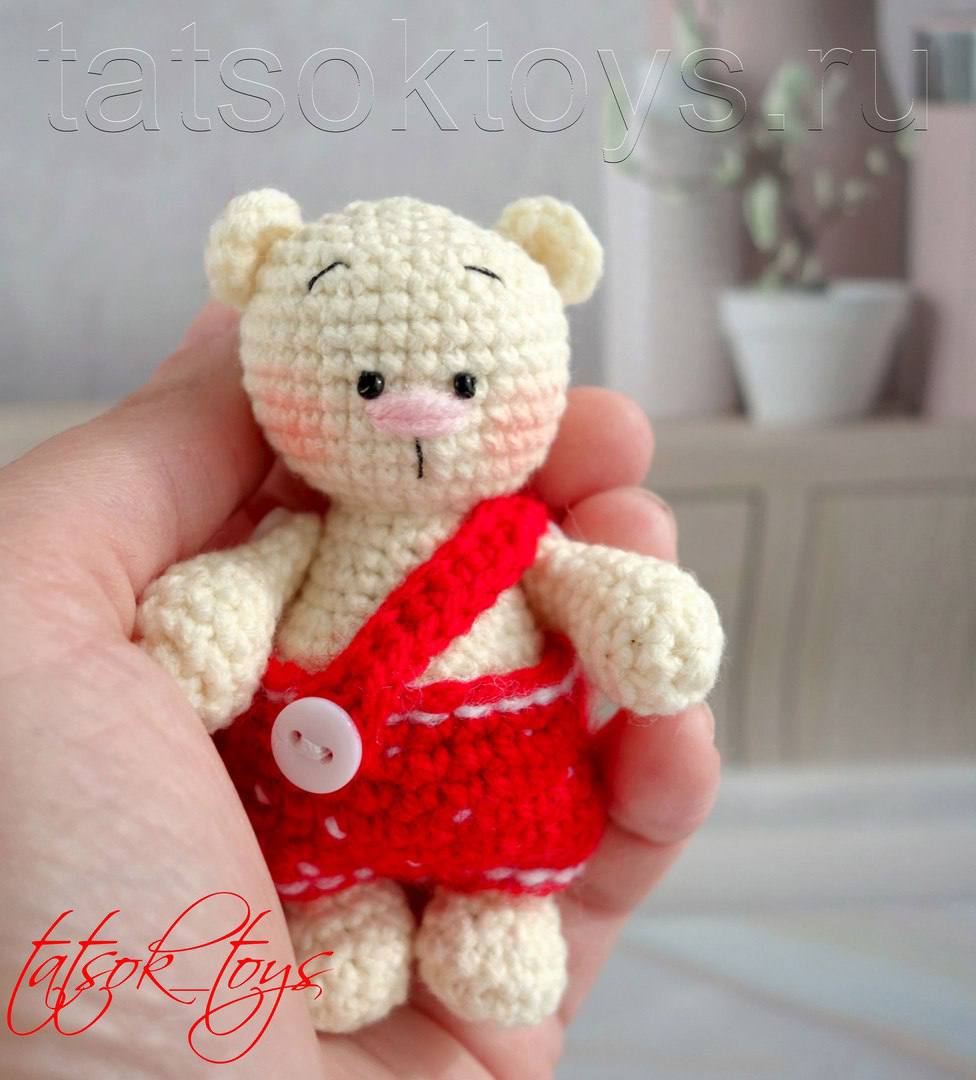
Create an adorable mini pocket teddy bear with this detailed, step-by-step amigurumi crochet pattern. Measuring approximately 3 inches (8 cm) tall when finished, this tiny bear makes a perfect doll companion, key chain charm, or sweet handmade gift. The pattern features an all-in-one body and head construction, cute button-jointed limbs, and removable tiny overalls.
Finished Size & Skill Level
- Finished Size: Approximately 3.15 inches (8 cm) tall using recommended materials.
- Skill Level: Easy to Intermediate.
Materials and Tools
- Main Yarn: Fine/Sport weight yarn (Cotton/Acrylic blend) in Cream or Off-White.
- Overalls Yarn: Fine/Sport weight yarn in Bright Red and a small amount of White.
- Crochet Hooks: US Steel Hook Size 6 (1.75 mm) for the bear, and Size 4 (1.9 mm or 2.0 mm) for the overalls.
- Eyes: 2 small black glass beads or safety beads.
- Embroidery & Sewing Thread: Black sewing thread (for attaching eyes and embroidering eyebrows/mouth), Pink yarn or embroidery floss (for nose embroidery).
- Notions: Fiberfill stuffing, tapestry needle, sewing needle, pink dry pastel or cheek blush, 1 small white decorative button.
Crochet Abbreviations (US Terms)
- MR: Magic Ring
- ch: Chain
- sc: Single Crochet
- inc: Increase (2 single crochet stitches in the same stitch)
- dec: Invisible Decrease (single crochet 2 stitches together)
- sl st: Slip Stitch
- st(s): Stitch(es)
- ( … )*X: Repeat instructions in parentheses X times
- [ … ]: Total stitch count at the end of the round
Pattern Notes
Work all parts in continuous spirals without joining rounds unless instructed otherwise. Use a stitch marker to keep track of the beginning of each round. The body and head are worked seamlessly as one continuous piece from the bottom up.
Step-by-Step Pattern Instructions
Body and Head (Worked as One Piece)
Using Cream/Off-White yarn and a 1.75 mm crochet hook:
Round 1: Work 6 sc into a MR [6]
Round 2: Work 6 inc [12]
Round 3: (1 sc, inc)*6 [18]
Round 4: 1 sc, inc, (2 sc, inc)*5, 1 sc [24]
Round 5: (3 sc, inc)*6 [30]
Rounds 6–10: sc in each st around [30] (5 rounds total)
Round 11: 9 sc, 6 dec, 9 sc [24] (The 6 decreases create the belly shape)
Rounds 12–13: sc in each st around [24]
Round 14: 1 sc, dec, (2 sc, dec)*5, 1 sc [18]
Round 15: sc in each st around [18]
Round 16: (1 sc, dec)*6 [12] (This completes the neck shaping)
Round 17: Work 12 inc [24] (Head portion begins here)
Round 18: (3 sc, inc)*6 [30]
Round 19: 2 sc, inc, (4 sc, inc)*5, 2 sc [36]
Rounds 20–25: sc in each st around [36] (6 rounds total)
Round 26: 2 sc, dec, (4 sc, dec)*5, 2 sc [30]
Round 27: (3 sc, dec)*6 [24]
Round 28: 1 sc, dec, (2 sc, dec)*5, 1 sc [18]
Stuff the body and head firmly with fiberfill. Continue adding stuffing as you finish closing the head.
Round 29: (1 sc, dec)*6 [12]
Round 30: (1 sc, dec)*4 [8]
Fasten off, weave the yarn tail through the front loops of the remaining stitches, pull tight to close the opening, and weave in the end securely inside the head.
Arms / Upper Paws (Make 2)
Using Cream/Off-White yarn and a 1.75 mm crochet hook:
Round 1: Work 6 sc into a MR [6]
Round 2: Work 6 inc [12]
Rounds 3–5: sc in each st around [12] (3 rounds total)
Round 6: 2 sc, 4 dec, 2 sc [8]
Rounds 7–10: sc in each st around [8] (4 rounds total)
Stuff the lower hand portion lightly. Leave the upper arm unstuffed. Fasten off, pull the hole closed, and hide the yarn tail inside.
Legs / Lower Paws (Make 2)
Using Cream/Off-White yarn and a 1.75 mm crochet hook:
Round 1: Ch 4. Starting in the 2nd ch from hook, work 2 sc, 3 sc in the last ch. Turn to work along the opposite side of the chain: 1 sc, inc [8]
Round 2: inc, 1 sc, 3 inc, 1 sc, 2 inc [14]
Round 3: sc in each st around [14]
Round 4: 4 sc, 2 dec, 6 sc [12]
Round 5: 3 sc, dec, 5 sc, dec [10]
Round 6: 3 sc, dec, 3 sc, dec [8]
Rounds 7–11: sc in each st around [8] (5 rounds total)
Stuff the foot lightly. Press the top opening flat, sew it closed with a tapestry needle, and fasten off.
Ears (Make 2)
Using Cream/Off-White yarn and a 1.75 mm crochet hook:
Round 1: Work 8 sc into a MR [8]
Cinch the magic ring tight, but do not join into a circle. Leave a long tail for sewing and fasten off.
Assembly and Facial Embroidery
- Attach Limbs: Attach the arms and legs to the body using thread-jointing or button-jointing so the limbs remain movable.
- Attach Ears: Sew the ears onto the sides of the head, counted down approximately 5 rounds from the top magic ring of the head.
- Eyes: Sew black beads onto the face using black sewing thread. Do not cut the thread immediately if you wish to use it for eyebrows and mouth.
- Nose: Embroider a small triangular nose using pink yarn or floss centered between the eyes.
- Eyebrows & Mouth: Using black thread, embroider short angled eyebrows above the eyes and a small vertical line underneath the nose for the mouth.
- Cheeks: Apply a small amount of dry pink pastel or blush to the cheeks using a soft brush or cotton swab for a soft glow.
Overalls Pattern
Using Red yarn and a 1.9 mm crochet hook:
Step 1 (Pants Base): Chain 26. Being careful not to twist the chain, join with a sl st to the first chain to form a ring.
Rounds 1–6: sc in each st around in continuous rounds [26] (6 rounds total)
Fasten off, leaving a tail. Fold the piece flat and sew a few stitches in the center of the bottom edge between the legs to separate the pants legs.
Step 2 (Strap): Attach Red yarn at the upper back waistband of the pants. Chain 20. Starting in the 5th ch from the hook (this creates the buttonhole), work 16 sc back along the chain toward the waist. Fasten off and weave in ends.
Step 3 (Decorations):
- Using White yarn/floss, embroider small French knots or tiny stitches across the red pants to create a polka dot pattern.
- Sew a tiny white decorative button onto the front of the overalls to secure the strap.
- Using White yarn, work a round of slip stitches from the wrong side along the top waist rim and leg openings for decorative contrast edging.
Dress your finished tiny teddy bear in its custom overalls, adjust the limbs, and your handmade miniature bear is complete!