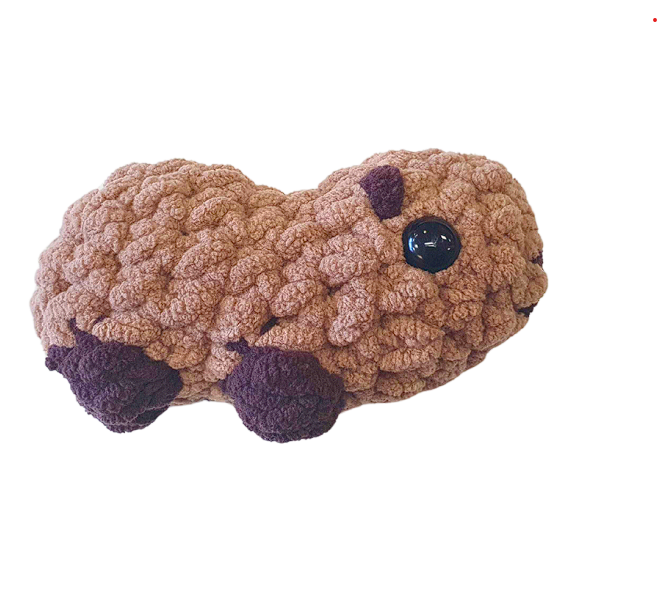
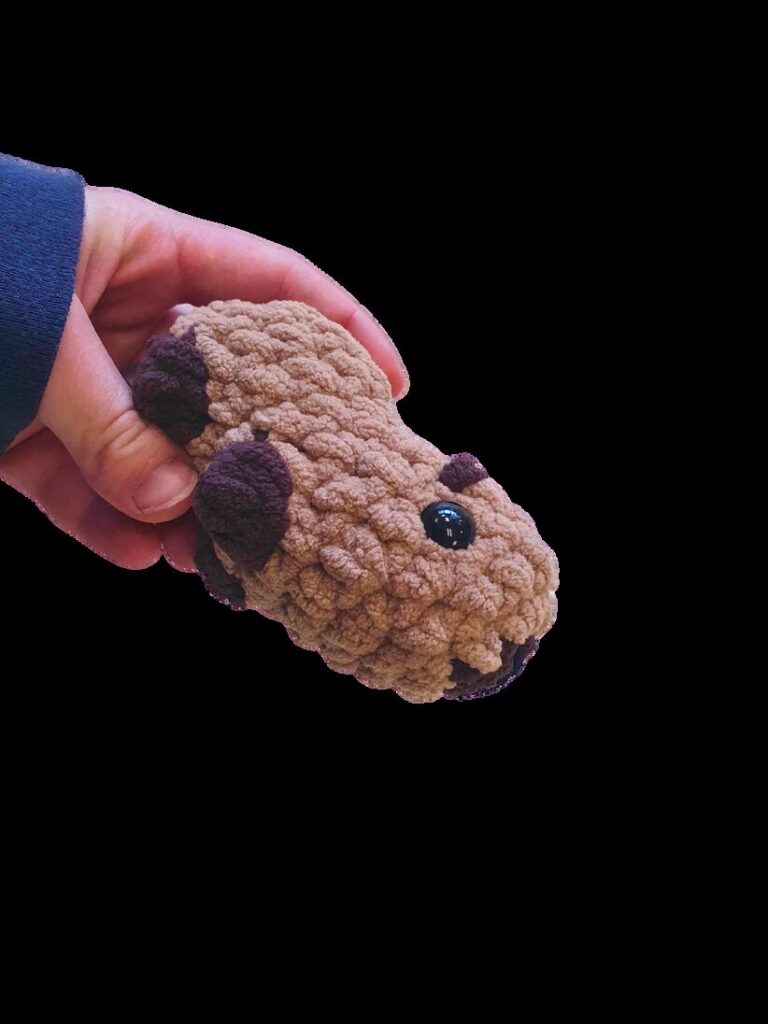
Baby Capybara Crochet Pattern
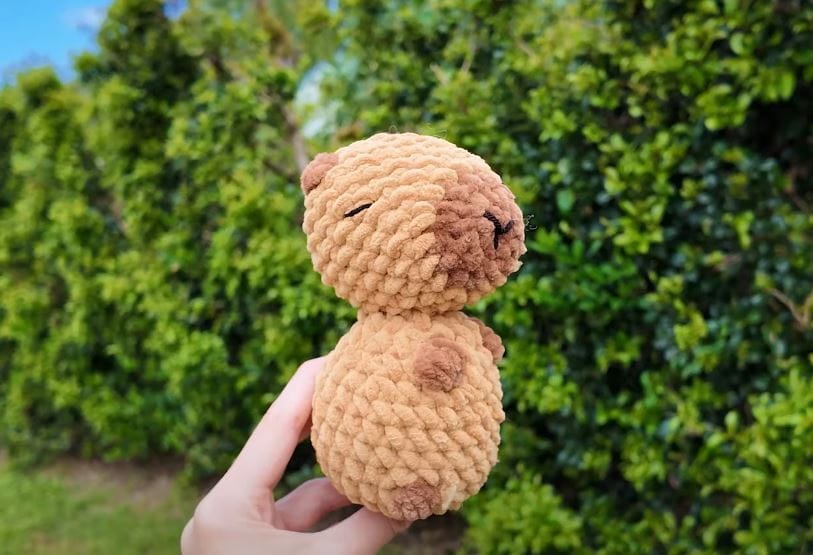
You know that feeling when you scroll past a crochet project and literally gasp out loud? That’s what happened the first time I spotted this crochet baby capybara pattern by Okey Dokeys. It’s squishy. It’s tiny. It fits in the palm of your hand and somehow has the most unbothered, serene little expression — just like a real capybara chilling in a hot spring. And the best part? You can make this adorable amigurumi in a single cozy afternoon.
Picture yourself settled on the couch, a warm mug of tea within reach, and that irresistible chunky chenille yarn gliding through your fingers. In just 12 rounds, a chubby little capybara takes shape — complete with dark chocolate brown ears, tiny bobble-stitch markings, and the glossiest safety-eye stare you’ve ever seen.
This free crochet baby capybara pattern is beginner-friendly, quick to finish, and dangerously giftable. By the end of this post, you’ll have everything you need to make this yourself — even if you’re still working on your gauge consistency.
Why You’ll Love This Baby Capybara Crochet Pattern
This easy crochet capybara tutorial checks every box. Here’s why it’s going straight into your project queue:
- 🐾 Beginner-friendly: You only need single crochet, increases, decreases, and a basic bobble stitch. If you’ve made a granny square, you can make this.
- ⏱️ Quick finish: The entire body crochets up in just 12 rounds — perfect for a lazy Sunday afternoon or a weeknight wind-down session.
- 🧸 Tiny and adorable: The finished capybara measures just 5.5 x 2 x 3.5 inches — small enough to tuck into a pocket or perch on your desk.
- 🎁 Incredible gifting potential: Know someone who’s obsessed with capybaras (and honestly, who isn’t these days)? This makes the most thoughtful, handmade gift.
- 🌿 Satisfying texture: Chunky chenille yarn gives this little guy that ultra-plush, velvety finish that’s pure joy to hold.
- 🎨 Minimal color changes: Just two yarn colors for the body with a tiny touch of black for the nose — no complicated color-work drama here!
Materials & Tools You’ll Need
Gather these supplies before you start, and you’ll be ready to hook in minutes:
Yarn
- ☑ Toasted Almond Beige chenille yarn — chunky weight (approx. 13g) (main body color)
- ☑ Cocoa Dream Brown chenille yarn — chunky weight (approx. 5g) (ears, feet, and markings)
- ☑ Phantom Black chenille yarn — chunky weight (approx. 1g) (nose)
💡 Yarn Note: The pattern calls for chunky polyester chenille yarn — that’s the velvety, velour-style yarn that makes amigurumi look ultra-plush and soft. Look for anything labeled “chenille” or “velvet” in a chunky (size 5) weight. Great substitutes include Lion Brand Thick & Quick Chenille, Bernat Blanket yarn in coordinating earthy browns, or any polyester chenille you love. Gauge isn’t critical for amigurumi, but a tighter gauge will give you a firmer, neater finish.
Tools & Notions
- ☑ Crochet hook appropriate for your yarn (a 5.0 mm / H-8 or 5.5 mm / I-9 works well with chunky chenille)
- ☑ Scissors
- ☑ Yarn needle (for weaving in ends and sewing pieces together)
- ☑ Polyester fiberfill stuffing
- ☑ 1 pair of black safety eyes (9–12mm works well for this size)
⚠️ Safety Note: If this capybara is for a child under 3, skip the safety eyes entirely and embroider the eyes with black yarn instead.
Abbreviations & Stitch Guide
All stitches are written in US crochet terms. Here’s your quick reference guide:
| Abbreviation | Full Name | What It Means |
|---|---|---|
| sc | Single Crochet | Your classic, everyday crochet stitch — insert hook, yarn over, pull through, yarn over, pull through both loops. |
| inc | Increase | Work 2 single crochets into the same stitch to add a stitch and expand your work. |
| dec | Decrease | Work 1 single crochet across 2 stitches at once (invisible decrease method recommended) to reduce your stitch count. |
| bo | Bobble Stitch | A cluster stitch that creates a raised “bump” on the surface — see tip below! |
| ch | Chain | The foundational stitch: yarn over and pull through the loop on your hook. |
🧶 Bobble Stitch (bo) — Explained!
The bobble stitch is what gives this capybara its adorable dark markings. Here’s how to work it:
Yarn over, insert hook into stitch, yarn over and pull up a loop, yarn over and pull through 2 loops (you have 2 loops on hook). Yarn over again, insert hook into the same stitch, yarn over and pull up a loop, yarn over and pull through 2 loops (you have 3 loops). Yarn over and pull through all 3 loops to close — that’s your bobble!
💡 Bobble Tip: Bobble stitches naturally pop to the back (wrong side) of your work. Since amigurumi is worked with the “wrong” side facing out, your bobbles will pop outward — exactly where you want them! Just keep going; it’ll look right when you flip it.
Step-by-Step Crochet Baby Capybara Pattern Instructions
Ready to make your new favorite squishy friend? Let’s go! Work in continuous rounds unless noted. Use a stitch marker to track the beginning of each round.
The Capybara Body
Rnd 1: Chain 3.
Rnd 2: Skip the first stitch, then inc in the next 2 stitches. On the other side of the chain, inc in the next 2 stitches. — [8 sts]
💡 Pro Tip: Working across a foundation chain like this creates an oval shape — the classic amigurumi body starting point! It can feel a little fiddly at first, but once those 8 stitches are in, you’ll see the shape click into place.
Rnd 3: (sc, inc) repeat 4 times. — [12 sts]
Rnd 4: sc 5, inc twice, sc 5. — [14 sts]
Rnd 5: sc 12, dec. — [13 sts]
💡 Pro Tip: Count your stitches at the end of Rnd 5 — you should have exactly 13. This is a great spot to double-check before the color changes in the next round start!
Rnd 6: dec twice, sc 3, inc twice, sc 4. — [13 sts]
Rnd 7: sc 5, then change to your dark brown yarn and work 1 bo (bobble stitch). Switch back to light brown and sc 2. Change to dark brown again and work 1 bo. Finish with light brown, sc 4. — [13 sts]
💡 Color Change Tip: When switching colors mid-round for the bobble, leave a 6-inch tail of the dark brown yarn each time. You’ll use these tails to secure the color changes when you weave in ends later. Don’t pull too tight — chenille yarn is forgiving!
Rnd 8: inc twice, sc 11. — [15 sts]
Rnd 9: sc all 15 stitches around. — [15 sts]
💡 Pro Tip: This is a great round to pause and stuff your capybara lightly. You don’t want to stuff too firmly — a moderate, even fill gives that satisfying squishy feel. Add more stuffing just before you close up in Rnd 12.
Rnd 10: sc 8, then with dark brown yarn work 1 bo, with light brown yarn sc 1, with dark brown yarn work 1 bo, then with light brown yarn sc 4. — [15 sts]
Rnd 11: (sc, dec) repeat 5 times. — [10 sts]
Rnd 12: dec 5 times. — [5 sts]
Add your final bit of stuffing now if needed, then close off: cut yarn leaving a 6-inch tail, thread through remaining 5 stitches, pull tight, and secure. Weave in the end.
Making the Ears (Make 2)
The pattern calls for the ears to be sewn on with dark brown yarn. To create simple bobble-style ear shapes, work a small flat circle or bobble cluster in dark brown yarn — approximately 2–3 stitches wide. You want them to have a plump, rounded shape that sits naturally just above the eyes. A simple 3-stitch bobble or tiny magic ring with a few single crochets works perfectly.
Finishing & Assembly
You made it! The hardest part is officially behind you. Now let’s bring this little capybara to life.
Attaching the Safety Eyes
Before closing the body completely, insert your safety eyes through the fabric in Rnd 7 (roughly where the bobble markings sit). Position them symmetrically on either side of the body — the bobble markings in Rnd 7 and Rnd 10 serve as great visual guides for placement. Click the washers firmly onto the posts from the inside.
⚠️ Important: Safety eyes must be attached before you fully stuff and close the body. Once you close up, you can’t get back in there!
Sewing On the Ears
Thread a yarn needle with dark brown yarn. Position each ear just above and slightly behind the eyes on the top of the head. Use a whipstitch or a few secure anchoring stitches to attach each ear firmly. Give them a little tug to make sure they’re set — you don’t want a capybara losing an ear mid-cuddle.
Embroidering the Nose
Thread a yarn needle with a small length of phantom black yarn. Using simple straight stitches, embroider a small oval or U-shaped nose on the front center of the face, just below eye level. Keep it small and sweet — capybaras have that calm, understated energy.
Weaving In Your Ends
Thread all remaining yarn tails through your yarn needle and weave them in securely through the interior of the stuffed body. With chenille yarn, the fuzzy fibers grip each other beautifully, so your ends won’t need knotting — just a few back-and-forth passes through the stuffing and you’re done.
You did it! 🎉 Give your little capybara a gentle squeeze — feel how satisfyingly squishy that chenille stuffing is? You just made something genuinely adorable from scratch. That’s not nothing. That’s everything.
Styling & Usage Ideas
Your baby capybara is crocheted. Now what? Oh, the possibilities.
Desk companion: Perch your capybara next to your monitor for maximum “calm and unbothered” energy during work calls. Honestly, they have the right idea.
Gift for a capybara obsessive: Know someone who sends you capybara memes on a weekly basis? Wrap this up with a bow. They will lose their mind.
Kids’ room décor: Nestle a little crew of capybaras on a shelf or windowsill. Make a few in slightly different browns and beiges for a whole capybara family vibe.
Stocking stuffer or party favor: This little guy is small enough to tuck inside a holiday stocking, a gift bag, or even a card envelope (okay, maybe a big envelope). Perfect for the crafter who likes to give handmade.
Save This Crochet Baby Capybara Pattern!
If you made it all the way here — first of all, you’re a legend. Second, I would absolutely love to see your finished capybara! 🐾
📌 Pin this post so you can find it again when you’re ready to make another one (because you will make another one — possibly an entire herd).
📸 Share your finished capybara on Instagram and tag @okeydokeyscrochet — the designer behind this pattern genuinely loves seeing your makes, and your finished object might just end up inspiring the next crocheter who stumbles across this post.
💬 Drop a comment below with your favorite part of the pattern, or let me know if you have any questions! Did you swap yarns? Make it a different color? I want to hear all about it.
🧶 Subscribe to the blog for more quick, beginner-friendly amigurumi patterns, crochet tips, and the occasional yarn haul you definitely didn’t need but absolutely required.
Happy hooking, friend. Your capybara awaits. 🐾