Brontosaurus Crochet Pattern: Fast and Easy to make
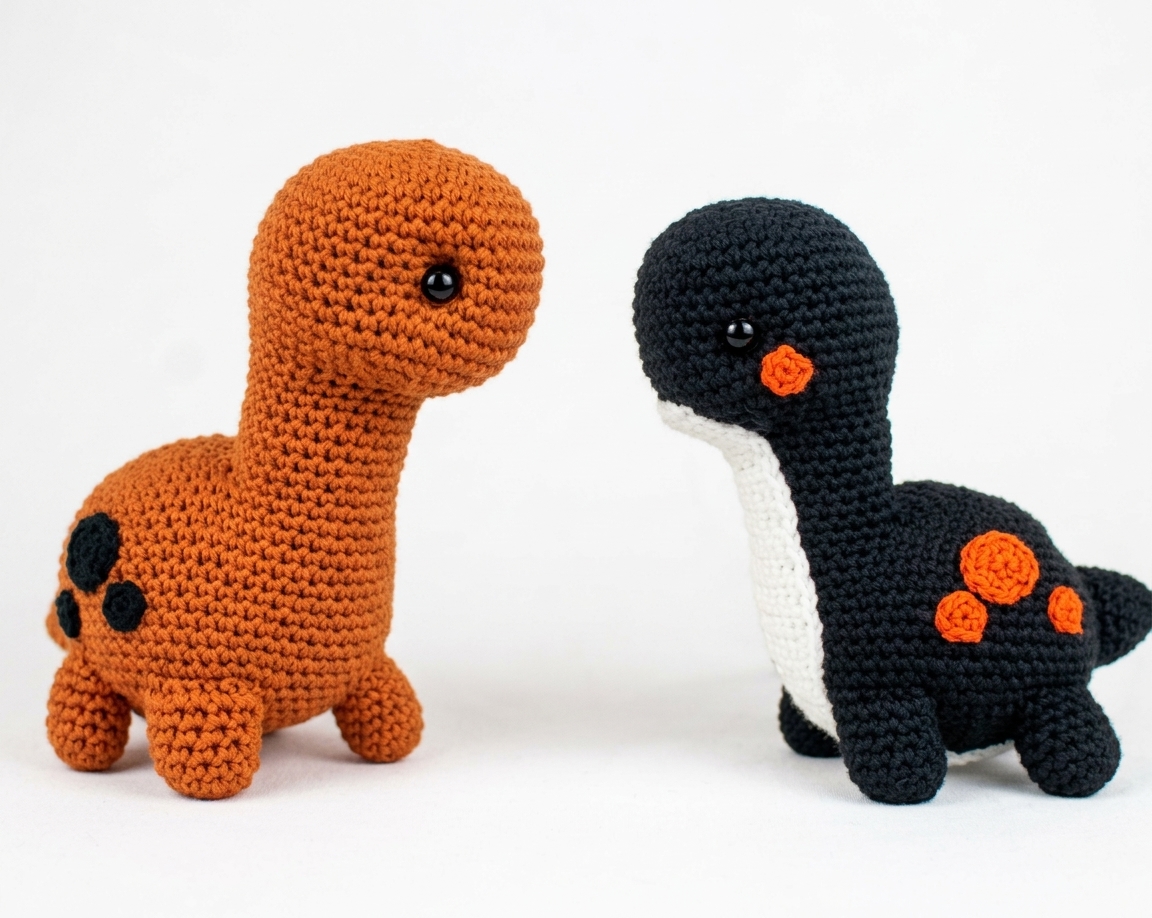
Long neck, tiny head, four stubby legs and a whole lot of personality — a brontosaurus is one of the most satisfying amigurumi shapes to crochet because every part is simple on its own. This brontosaurus crochet pattern breaks the dinosaur down into five easy pieces (body, head, neck, legs, and tail) that you sew together at the end, so there’s no tricky continuous-piece counting to keep track of as you go.
Whether you’re making this for a nursery shelf, a dinosaur-obsessed kid, or your own amigurumi shelf, this pattern is written for confident beginners. If you’ve made a basic amigurumi ball before (a bear head, a fruit, anything worked in a spiral), you’re ready for this one.
Table of Contents
Difficulty & What You’ll Need
Difficulty: Easy–Intermediate (the neck and leg placement take a little patience, but every individual piece is beginner-level)
Materials:
- Worsted weight (medium, #4) yarn in a main body color, plus a small amount of a contrast color for optional spots
- 3.5mm–4mm crochet hook
- Two 9mm–12mm safety eyes
- Stuffing (polyester fiberfill)
- A small pouch of poly pellets or dried rice, plus a scrap of fabric or an old sock (optional — for counterbalancing the neck so your dinosaur stands upright)
- Yarn needle and stitch markers
- Scissors
Stitches used: magic ring (MR), single crochet (sc), increase (inc = 2 sc in same stitch), decrease (dec = invisible decrease or standard sc2tog)
Note on repeats: Anything inside asterisks or parentheses with an “x” number after it means repeat that sequence that many times in the round. For example, (inc, sc 2) x6 means you’ll do “increase, single crochet in the next 2 stitches” a total of six times before moving to the next round.

Body
Work in a continuous spiral (don’t join rounds) using your main color.
- Round 1: 6 sc in magic ring (6)
- Round 2: inc in every stitch around (12)
- Round 3: (inc, sc 1) x6 (18)
- Round 4: (inc, sc 2) x6 (24)
- Round 5: (inc, sc 3) x6 (30)
- Round 6: (inc, sc 4) x6 (36)
- Round 7: (inc, sc 5) x6 (42)
- Rounds 8–18: sc around, no increases (42) — this is the long middle section, so take your time here
- Round 19: (dec, sc 5) x6 (36)
- Round 20: (dec, sc 4) x6 (30)
Start stuffing firmly now, adding more as you close the body.
- Round 21: (dec, sc 3) x6 (24)
- Round 22: (dec, sc 2) x6 (18)
- Round 23: (dec, sc 1) x6 (12)
- Round 24: dec x6 (6)
Fasten off, leaving a long tail for sewing. Weave the tail through the last 6 stitches and pull closed.
Head
Also worked in a continuous spiral, main color.
- Round 1: 6 sc in magic ring (6)
- Round 2: inc in every stitch around (12)
- Round 3: (inc, sc 1) x6 (18)
- Round 4: (inc, sc 2) x6 (24)
- Round 5: (inc, sc 3) x6 (30)
- Round 6: (inc, sc 4) x6 (36)
- Rounds 7–11: sc around, no increases (36)
On Round 9 (roughly the halfway point of the straight rounds), place two stitch markers about 10 stitches apart, centered on the front of the head — this is where your safety eyes will go later.
- Round 12: (dec, sc 4) x6 (30)
- Round 13: (dec, sc 3) x6 (24)
Insert your safety eyes into the marked stitches now, then stuff the head firmly.
- Round 14: (dec, sc 2) x6 (18)
- Round 15: (dec, sc 1) x6 (12)
- Round 16: dec x6 (6)
Fasten off, leaving a long tail. Add extra stuffing if needed, then close the opening.
Neck
The neck is a simple tapered tube, made separately and stuffed lightly so it can be posed once assembled.
- Round 1: 6 sc in magic ring (6)
- Round 2: inc in every stitch around (12)
- Round 3: (inc, sc 1) x6 (18)
- Rounds 4–15: sc around, no increases (18) — this makes a neck about 4–5 inches long depending on your tension; work fewer or more rounds here if you want a shorter or longer neck
Fasten off, leaving a long tail on both ends. Stuff the neck loosely — just enough that it holds its shape but can still bend.
Tip: For a neck that holds a pose (looking up, looking down), slide a pipe cleaner or a short length of florist wire inside before stuffing around it.
Legs (make 4)
Main color, worked in a spiral.
- Round 1: 6 sc in magic ring (6)
- Round 2: inc in every stitch around (12)
- Rounds 3–8: sc around, no increases (12)
Fasten off, leaving a long tail for sewing. Stuff each leg only about two-thirds full — a slightly firm-but-flat bottom will help the dinosaur stand.
Tail
Main color, worked in a spiral, tapering from narrow to wide.
- Round 1: 5 sc in magic ring (5)
- Round 2: sc around, no increases (5)
- Round 3: inc in every stitch around (10)
- Round 4: sc around, no increases (10)
- Round 5: (inc, sc 1) x5 (15)
- Round 6: sc around, no increases (15)
Fasten off, leaving a long tail. Stuff lightly.
Spots (optional, make 6)
Contrast color.
- Round 1: 6 sc in magic ring (6)
Fasten off, leaving a short tail for sewing flat (don’t stuff these — they’re sewn on as flat circles).
Assembly
- Attach the neck to the body. Position the wide end of the neck at the front-top of the body and whipstitch it in place, going through both layers for a secure hold.
- Attach the head to the neck. Sew the head’s opening to the free end of the neck the same way. Angle it slightly downward or forward for a friendlier expression.
- Attach the legs. Space the four legs evenly on the underside of the body — two toward the front, two toward the back — and sew each one on firmly enough to bear weight. Sew through the top few stitches of the leg into the body, then back down through the leg again, so the leg doesn’t wobble or splay outward.
- Attach the tail. Sew the wide end of the tail to the back of the body, opposite the neck.
- Add the spots (if using) in two loose rows along the back, spacing them evenly.
- Balance check. Long-necked amigurumi like this one can be front-heavy. If your dinosaur tips forward, tuck a small pouch of poly pellets or dried rice into the back of the body before you finish stuffing it — this counterweights the head and neck so he stands on his own.
Troubleshooting Tips
- My dinosaur tips over. This is almost always the neck-to-head ratio being heavier than the body. Add the counterweight pouch described above, or shorten the neck by working fewer straight rounds.
- My decreases are leaving visible gaps. Switch from a standard sc2tog decrease to an invisible decrease (worked through the front loops only of the next two stitches) for a smoother, gap-free finish.
- My leg placement looks uneven. Before sewing, pin all four legs in place with locking stitch markers or safety pins and stand the body up to check balance from every angle before you commit to sewing.
- The neck looks floppy instead of posed. Make sure you’re using a stiffer, thicker fiberfill stuffing packed tightly, and consider the pipe-cleaner trick above for extra support.
Frequently Asked Questions
How long does this brontosaurus crochet pattern take to make? Most confident beginners finish all the pieces and assembly in one to two evenings, roughly 4–6 hours total depending on your gauge and how much you stuff and sew.
What size will my finished brontosaurus be? With worsted weight yarn and a 4mm hook, expect a finished dinosaur roughly 9–11 inches long from nose to tail tip, including the neck.
Can I make this with bulkier yarn for a bigger dinosaur? Yes — chunkier yarn and a larger hook (5.5mm–6mm) will produce a bigger, softer dinosaur using the same stitch counts, though you may need slightly more stuffing and a heavier counterweight to keep him standing.
Is this pattern safe for a baby or toddler? Skip the plastic safety eyes and embroider the eyes with yarn instead, and leave out any poly pellets, since small pellets and hard eye backings aren’t appropriate for very young children.
Can I sell dinosaurs made from this pattern? Yes — go ahead and sell the finished toys you make. Just don’t resell or republish the written pattern itself.
Final Thoughts
This brontosaurus crochet pattern is proof that a long-necked dinosaur doesn’t have to be a complicated project — once you’ve made one basic amigurumi sphere, you already know most of the skills you need. Piece it together, stuff him firmly, weigh down that tail, and you’ll have a dinosaur ready for a shelf, a gift, or a very lucky kid’s toy box.
If you make one, I’d love to see how he turned out — tag your photos so other crocheters trying this pattern can see your version too.