Beautiful Cow Blanket Crochet Pattern 2024
Make a Cow Blanket Crochet Pattern
Hey there, fellow crochet enthusiast!
Premium Crochet Yarns
If you purchase through these links, I'll receive a small commission at no extra cost to you. Your support means the world to me and helps me continue creating crochet content. Thank you! đź’–
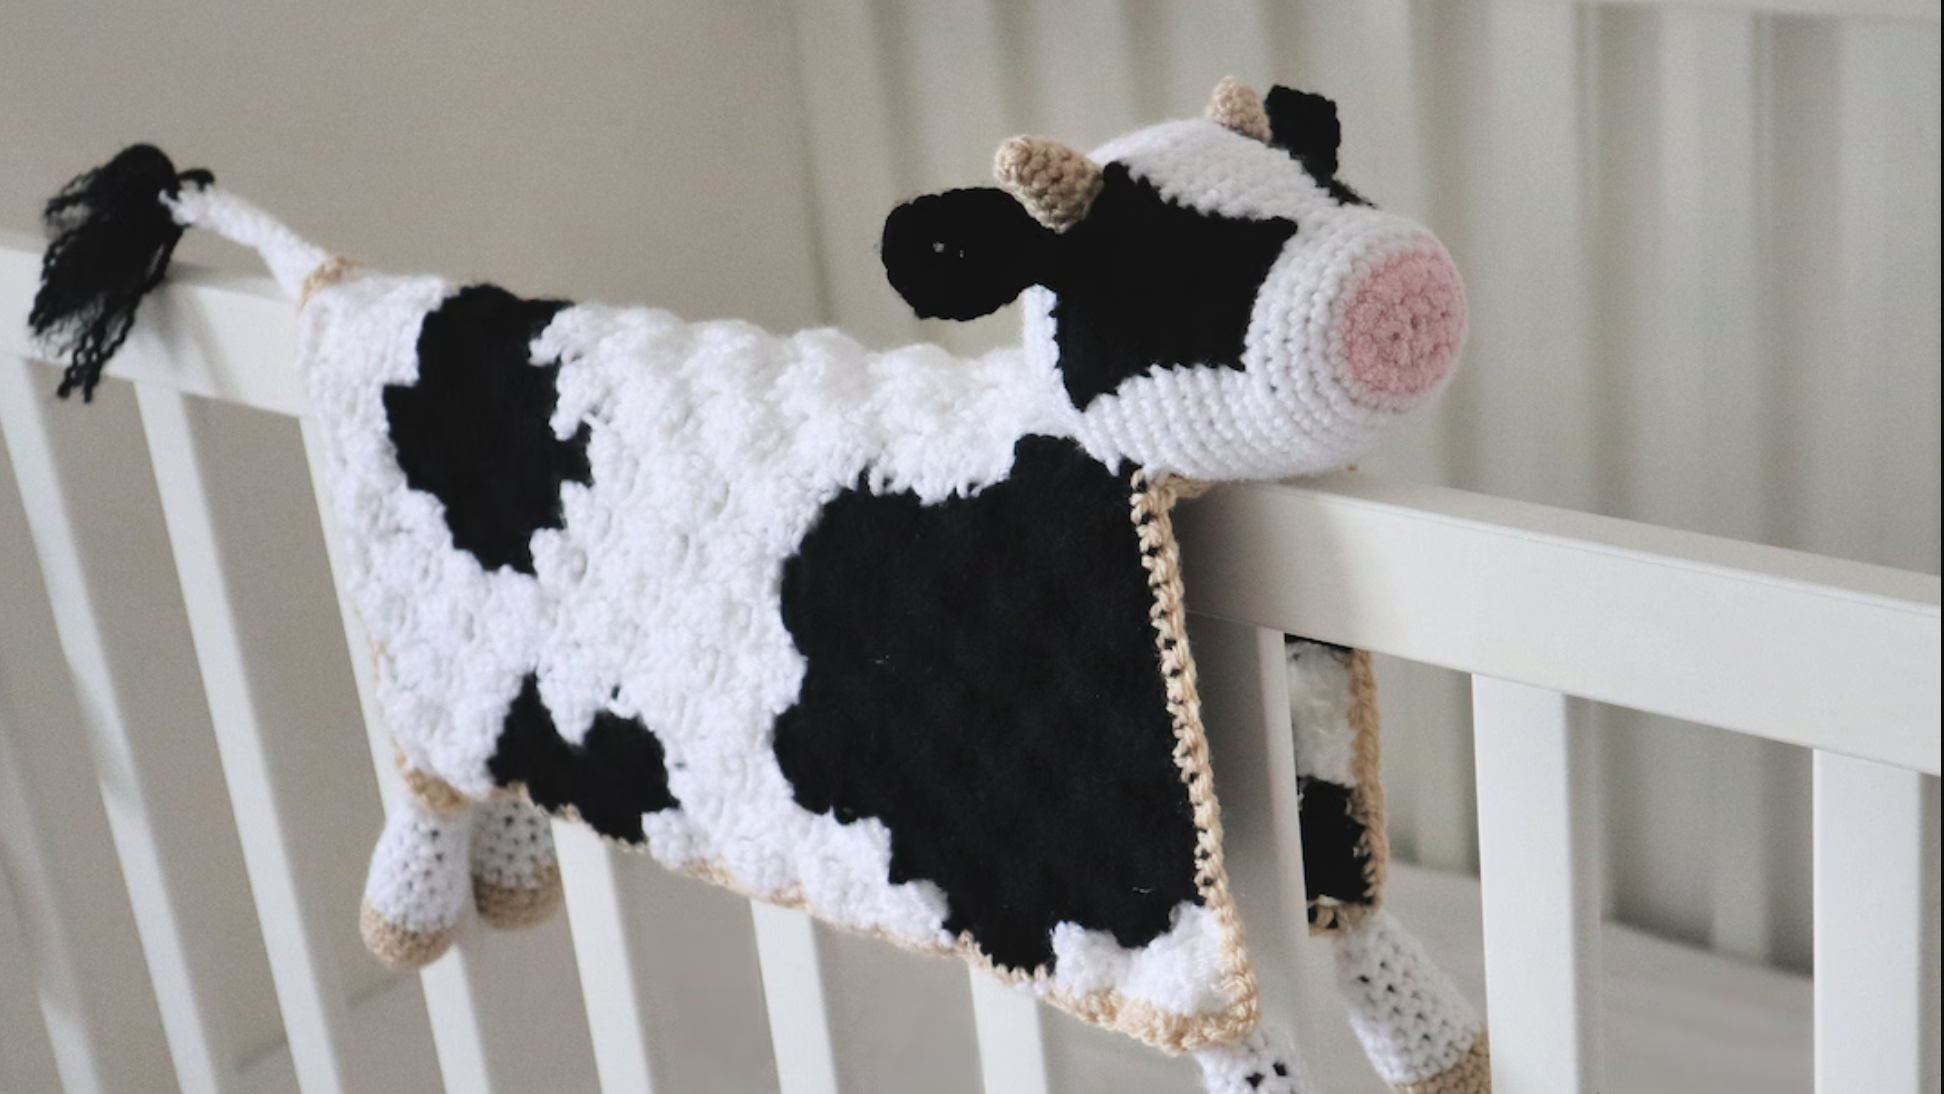
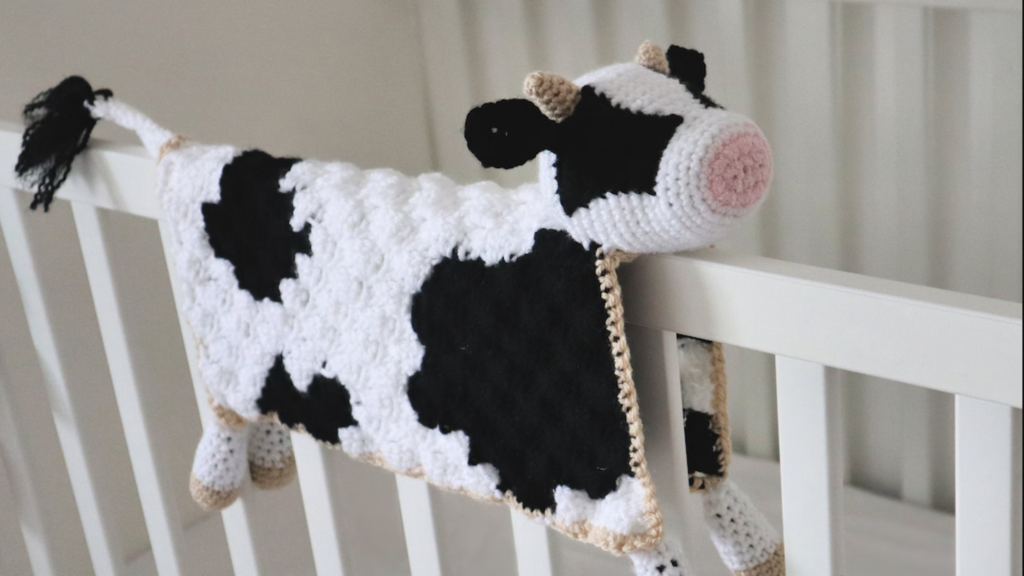
I just have to share this adorable project with you—it’s a super cute cow blanket that I’ve absolutely fallen in love with making. It’s not just fun; it’s the perfect blend of cozy and whimsical, and I think you’ll enjoy every stitch as much as I did.
Why a Cow Blanket?
Well, who doesn’t love cows? They’re charming, and adding a cow design to a blanket brings a playful touch that’s perfect for kids and adults alike. Plus, it’s a delightful way to spend some creative time, especially if you’re looking for a new project to dive into.
Let’s Get Started!
I’ll walk you through each step, just like we’re sitting together with our yarn and hooks, chatting and crafting. So grab your materials, and let’s make this cute cow blanket together!
What You’ll Need:
I may earn a small commission for purchases made through links in this post at no extra cost to you ,Purchasing from my links will be a great help for me 🙂
- Yarn:
- White (Color A): For the main part of the blanket.
- Black (Color B): For the cow spots.
- Pink (Color C): For the border and cow’s nose.
- Beige: For the cow’s head, arms, horns, and inner ears.
- Crochet Hook: Size 5 mm (U.S. H or 8)
- Stuffing: Polyester fiberfill for the cow’s head and arms.
- Safety Eyes: For the cow’s eyes (or you can embroider them).
- Tapestry Needle: For sewing pieces together.
A Few Crochet Terms We’ll Use:
Don’t worry if some of these terms are new to you—I’ll explain them as we go!
- Ch: Chain
- Sc: Single Crochet
- Sl st: Slip Stitch
- Rnd: Round
- St(s): Stitch(es)
- Magic Ring: A way to start crocheting in the round.
Part 1: Making the Blanket
Step 1: Starting the Blanket Base
We’re going to start with the main blanket piece.
Chain 36 stitches with your white yarn (Color A). This will be the width of your blanket.
- First Row (Right Side):
- Switch to black yarn (Color B).
- Starting in the second chain from the hook, make 1 single crochet in each of the next 11 chains.
- Switch back to white yarn (Color A).
- Single crochet in each of the next 12 chains.
- Switch to black yarn (Color B).
- Single crochet in the next 7 chains.
- Switch back to white yarn (Color A).
- Single crochet in the last 5 chains.
- You should have 35 single crochets in total.
Tip: When you need to change colors, work up to the last two loops on your hook of the stitch you’re working on. Then, yarn over with the new color and pull through to complete the stitch. This makes the color change look neat.
Step 2: Continuing the Pattern
- Rows 2 to 32:
- Follow the same color pattern as the first row.
- Carry the yarn color you’re not using across the top of the previous row. Simply crochet over it as you go. This prevents having loose strands on the back of your work, and it keeps everything tidy.
By the end of Row 32, you’ll have a lovely square that’s approximately 9.5 inches (24 cm) on each side, with a charming cow pattern emerging from the alternating black and white stitches.
Adding a Pretty Border
Now, let’s give your blanket a nice finishing touch with a pink border.
Step 3: Crocheting the Border
- First Round:
- Join the pink yarn (Color C) in any corner of your blanket with a slip stitch.
- Chain 1, and make 2 single crochets in the same corner stitch.
- Single crochet evenly along each side of the blanket. You’ll want about 33 single crochets along each side, but it’s okay if it’s not exact. The main thing is to keep it even so your blanket lays flat.
- When you reach a corner, make 3 single crochets in the corner stitch. This helps the blanket turn nicely without curling.
- Join with a slip stitch to the first single crochet.
- Second Round:
- Chain 1.
- In the next stitch, work the following all in one stitch:
- Single crochet, chain 5, single crochet, chain 7, single crochet, chain 5, single crochet.
- Chain 4, skip the next 5 stitches.
- Repeat this pattern around the entire blanket.
- Join with a slip stitch and fasten off.
Now your blanket has a lovely pink border with a decorative edge!
Part 2: Making the Cow Features
Now for the fun part—adding the cow’s head and arms to make your blanket extra adorable.
Step 4: Crocheting the Cow’s Head
We’ll start with the cow’s head using beige yarn.
- Begin with a Magic Ring:
- Make a magic ring, chain 1, and work 10 single crochets into the ring.
- Pull the ring tight and join with a slip stitch to the first single crochet.
- Chain 1.
- Building Up the Head:
- Round 2: Make 2 single crochets in each stitch around (you’ll have 20 stitches). Join and chain 1.
- Round 3: Single crochet in each stitch around. Join and chain 1.
- Round 4: Increase Round – Make 2 single crochets in the first stitch, then 1 single crochet in the next stitch. Repeat this pattern around. Join and chain 1.
- Rounds 5 and 6: Continue increasing as per the pattern, with more single crochets between increases, until you have a total of 30 stitches.
- Creating the Face:
- Rounds 7 to 10: Single crochet in each stitch around. This builds up the face.
- Switch to White Yarn:
- On the last stitch of Round 10, switch to white yarn.
- Rounds 11 to 15: Single crochet in each stitch around with the white yarn.
- Adding the Eyes and Nostrils:
- Insert Safety Eyes: Between Rounds 13 and 14, place your safety eyes about 10 stitches apart.
- Embroider Nostrils: With a bit of black yarn, stitch two little nostrils onto the front of the cow’s nose.
- Shaping the Head:
- Rounds 16 to 22: Begin decreasing to shape the head.
- Round 16: Decrease by single crocheting two stitches together (sc decrease), then single crochet in the next two stitches. Repeat around.
- Continue with single crochet rounds and decrease rounds as per the pattern.
- Stuff the Head: Before the opening gets too small, fill the head with stuffing. Make it firm but still soft and cuddly.
- Closing the Head:
- Continue decreasing until the head is closed.
- Rounds 16 to 22: Begin decreasing to shape the head.
Step 5: Making the Cow’s Arms (Make 2)
- Starting the Arms:
- With beige yarn, make a magic ring.
- Chain 1 and make 12 single crochets into the ring. Join and chain 1.
- Shaping the Arms:
- Round 2: Increase in every other stitch.
- Rounds 3 to 6: Single crochet in each stitch around.
- Rounds 7 to 9: Begin decreasing slightly to give the arms a bit of shape.
- Rounds 10 to 20: Single crochet in each stitch around to make the arms the desired length.
- Stuff the Arms: Lightly stuff the arms as you go or at the end.
Step 6: Crafting the Cow’s Horns (Make 2)
- With Beige Yarn:
- Make a magic ring, chain 1, and make 6 single crochets into the ring. Join and chain 1.
- Rounds 2 to 5: Single crochet in each stitch around to form the horn shape.
- Attach the Horns: Sew the horns onto the top of the cow’s head.
Step 7: Creating the Ears
We’ll make two ears—one with a black outer ear and one with a white outer ear, for that cute cow look.
- Outer Ears:
- Make One Black and One White:
- Start with a magic ring, chain 1, and make 10 single crochets into the ring. Join and chain 1.
- Round 2: Increase in each stitch around.
- Round 3: Increase in every other stitch.
- Round 4: Single crochet in each stitch around. Fasten off.
- Make One Black and One White:
- Inner Ears (Make 2 in Beige):
- Follow the same pattern as the outer ears but only work up to Round 3.
- Fasten off, leaving a long tail for sewing.
- Assembling the Ears:
- Place the inner ear onto the outer ear, but not centered—offset it to give the ear some character.
- Sew the inner ear to the outer ear.
- Attach the Ears: Pinch the ear slightly at the base and sew it onto the side of the cow’s head.
Part 3: Bringing It All Together
Step 8: Attaching the Cow to the Blanket
Now that all your pieces are ready, it’s time to assemble your adorable cow blanket.
- Positioning:
- Decide where you’d like to place the cow’s head and arms. You can put the head in the center of the blanket or at one of the corners—it’s up to you!
- If you made extra arms or even legs, you can attach them to the corners or sides for added cuteness.
- Sewing the Pieces:
- Use your tapestry needle and matching yarn to sew the head and arms securely onto the blanket.
- Make sure everything is attached firmly, especially if the blanket will be used by little ones.
- Finishing Touches:
- Weave in any loose ends.
- Give your blanket a gentle stretch to make sure everything lays nicely.
And voila! Your super cute cow blanket is all done!
Final Thoughts
I hope you had as much fun making this cow blanket as I did. There’s something so satisfying about seeing a project come together, especially when it’s as adorable as this. Whether you’re keeping it for cozy nights on the couch or gifting it to someone special, it’s sure to bring a smile to anyone’s face.
Feel free to get creative! Maybe add some little spots to the blanket, or perhaps a tiny bell around the cow’s neck. The possibilities are endless, and that’s the beauty of crafting.
Share Your Creation!
I’d love to see how your cow blanket turned out! Feel free to share a picture or any tips you discovered along the way. Happy crocheting, and until next time, keep those hooks moving!