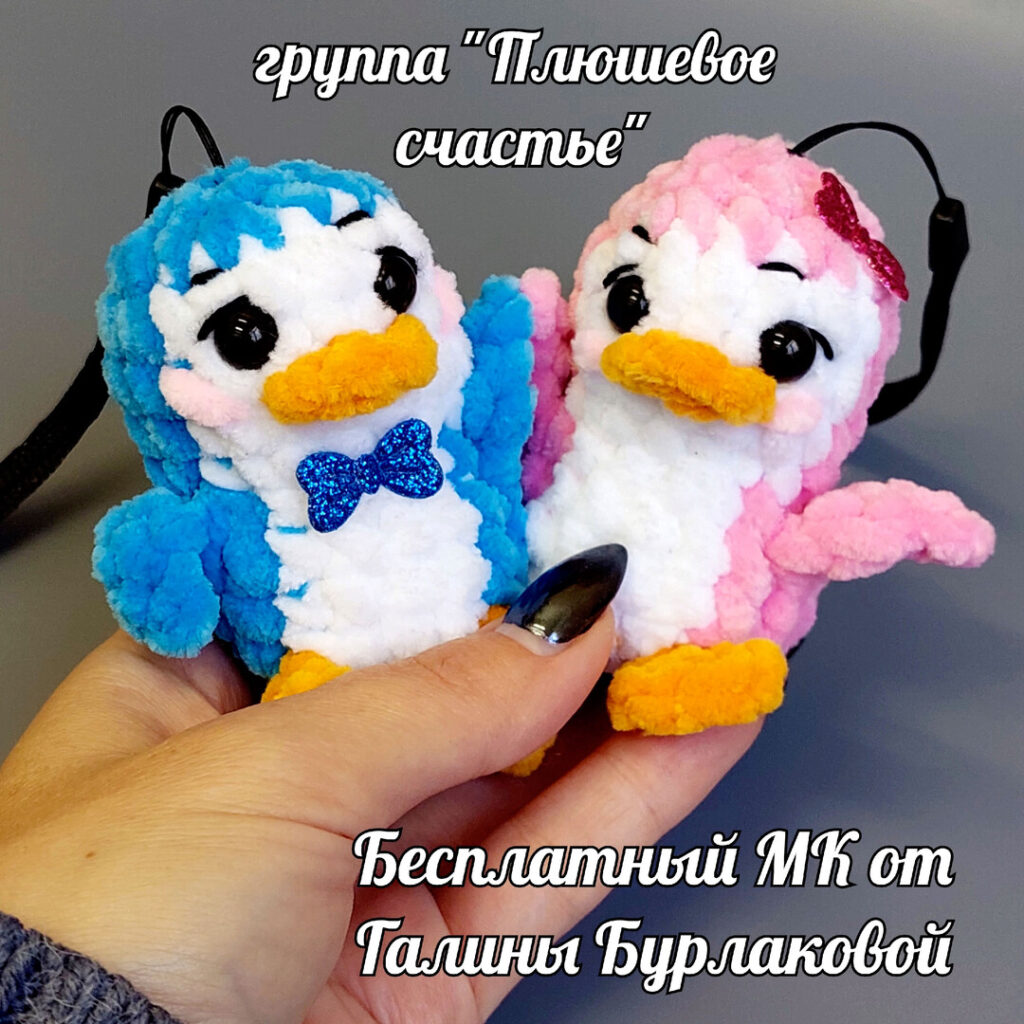
Crochet Adorable Penguin Keychain: Free Pattern
Get ready to create the cutest little penguin keychain with this easy-to-follow free crochet pattern designed by Galina Burlakova from the “Plush Happiness” group! Perfect for beginners and experienced crocheters alike, these adorable penguins make fantastic gifts, bag charms, or even tiny desktop companions.
Materials You’ll Need:
- Plush yarn (e.g., Himalaya Dolphin Baby, YarnArt Dolce) with a density of 120m/100g. Colors: Main Color (MC), White (W), Orange (O).
- Crochet Hook: 3.75 mm
- Stuffing (polyester fiberfill)
- Tapestry needle
- Stitch marker
- Safety eyes: 8 mm
Abbreviations:
- sc: single crochet
- inc: increase (2 single crochet in one stitch)
- dec: decrease (single crochet two stitches together)
- ch: chain stitch
- sl st: slip stitch
- hdc: half double crochet
- (MC): Main Color
- (W): White color
- (O): Orange color
- (#): Total number of stitches at the end of the round
- x#: Repeat instruction # times
Special Parts Instructions:
These smaller parts are crocheted and attached as you go into the main body. Once attached, you continue crocheting the body stitches as indicated in the pattern.

Tail:
- Chain 2.
- Make 1 hdc in the second chain from the hook.
- Slip stitch into the base of the stitch where the tail will be attached.
Paw (Option 1 – more defined toes):
- Chain 3.
- Make 1 sl st in the 2nd chain from the hook.
- Chain 2, then sl st into the same second chain.
- Chain 2, then sl st into the same second chain again.
- Slip stitch into the first chain (the very first chain you made).
- Slip stitch into the base of the stitch where the paw will be attached.
Paw (Option 2 – simpler, more rounded):
- Chain 2.
- Make 1 hdc in the second chain from the hook.
- Chain 2 into the *same stitch* where you made the hdc.
- Make 1 sl st into the same stitch.
- Slip stitch into the base of the stitch where the paw will be attached.
Wing:
- Chain 4.
- Make 1 sl st in the 2nd chain from the hook.
- Make 1 sc in the next chain.
- Make 1 hdc in the next chain.
- Make 1 hdc into the base of the stitch where the wing will be attached.
Penguin Body and Head (One Piece):
We’ll be working in continuous rounds unless otherwise specified. Use a stitch marker to keep track of your first stitch in each round.
Round 1: (MC) 8 sc in an amigurumi ring. (8 stitches)
Round 2: (MC) (inc) x3, then (O) crochet a Paw (choose Option 1 or 2), then (W) (inc) x2, then (O) crochet another Paw, then (MC) (inc) x3, then crochet a Tail. (16 stitches)
Round 3-4: (Work 2 rows) (MC) 6 sc, then (W) 4 sc, then (MC) 6 sc. (16 stitches)
Round 5: (MC) 5 sc, then crochet a Wing, then 1 sc, then (W) 4 sc, then (MC) 2 sc, then crochet another Wing, then 4 sc. (16 stitches)
Keep going, your penguin is taking shape!
Round 6: (MC) 2 sc, dec, 2 sc, then (W) dec, 2 sc, then (MC) dec, 2 sc, dec. (12 stitches)
Round 7: (MC) (sc, inc) x2, then (W) (sc, inc) x2, 1 sc, then (MC) inc, 1 sc, inc. (18 stitches)
Round 8: (MC) 6 sc, then (W) 7 sc, then (MC) 5 sc. (18 stitches)
Round 9: (MC) 6 sc, then (W) 2 sc, then 3 sc *working into the back loop only* (note: this leaves front loops for the beak later), then 2 sc, then (MC) 5 sc. (18 stitches)
Round 10: (MC) 6 sc, then (W) 7 sc, then (MC) 5 sc. (18 stitches)
You no longer need the white yarn after Round 10. Cut the white yarn, fasten it off, and weave in the end. Continue with the Main Color.
Round 11: (sc, dec) x6. (12 stitches)
Now is a good time to start stuffing your penguin firmly with fiberfill, especially if it’s going to be a keychain. Ensure an even shape.
Head Shaping Options:
Choose your desired head shape for your penguin:
Option A (Flatter Head – like the blue penguin in example photos):
Round 12: (dec) x6. (6 stitches)
Option B (More Rounded Head – like the pink penguin in example photos):
Round 12: (2 sc, dec) x3. (9 stitches)
Round 13: (sc, dec) x3. (6 stitches)
Observe the difference in head shaping for your penguin.
After completing the last round (either R12 or R13), cut the yarn, leaving a long tail for closing. Thread the tail onto your tapestry needle and weave it through the front loops of the remaining 6 stitches. Pull tight to close the opening completely. Weave in any remaining yarn end securely.
Finishing Touches:
Crochet the Beak:
Refer back to Round 9 where you crocheted 3 sc into the back loop only. You should have 3 visible front loops remaining from those stitches on the front of the penguin.
- Attach orange yarn into the first of these 3 remaining front loops. You can do this by making a slip knot and inserting your hook, then working into the loop, or by tying it securely.
- Chain 1.
- Make 1 hdc into the next (middle) front loop.
- Chain 1.
- Make 1 sl st into the last (third) front loop.
- Cut the yarn, fasten it off, and carefully hide the ends inside the head with your tapestry needle.
Eyes and Embellishments:
- Insert or glue 8mm safety eyes on the sides of the beak, typically aligned horizontally between Rounds 9 and 10 of the body-head section. Make sure they are evenly spaced.
- Using black embroidery floss, embroider small eyelashes or subtle eyebrows above the eyes if desired, adding personality.
- Using pink or red embroidery floss, embroider small cheek blush dots below the eyes for extra cuteness.
- You can further decorate your penguin with a tiny bow, a small hat, or other accessories to make it unique!
Congratulations! You’ve successfully crocheted your adorable penguin keychain. We hope you enjoyed this pattern from Galina Burlakova. Don’t forget to share your finished creations!