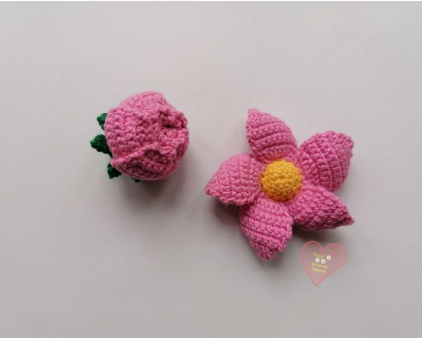
Crochet Beautiful Daisy Flower & Bud FREE
Brighten up any project with this adorable crochet daisy flower and matching bud! This free pattern, created by Evgeniya Kokina, is perfect for embellishing hats, bags, blankets, or creating a lovely bouquet. Follow these easy, step-by-step instructions to create your own handmade blossoms.

Materials
- Yarn:
- Alize Cotton Gold (Color 33 – Bright Pink)
- Alize Cotton Gold (Color 216 – Dark Yellow)
- Gazzal Jeans (Color 1146 – Green)
- Hook: 2.20 mm
- Filler: Holofiber or any polyester fiberfill
- Other: Knitting needle for weaving in ends, scissors
Abbreviations (US Terms)
- CH: Chain Stitch
- SC: Single Crochet
- HDC: Half Double Crochet
- Sl st: Slip Stitch
- Inc: Increase (2 sc in the same stitch)
- Dec: Decrease (sc 2 stitches together)
Part 1: The Daisy Flower
Step 1: Center of the Flower
Using dark yellow yarn (Alize cotton gold 216) and a 2.20 mm hook.

- Round 1: Into an amigurumi ring (magic circle), crochet 8 sc. (8)
- Round 2: 7 inc, 1 sc. (15)
- Round 3: 15 sc around. (15)
- Round 4: 15 sc around. (15)
Fasten off, leaving a short tail. Turn the piece inside out so the neat side faces forward.


Step 2: Flower Petals (Make 5)
Attach the bright pink yarn (Alize cotton gold 33) to the front loops of the flower center. You will create 5 petals, each worked over 3 stitches.
- Row 1: [In front loops only] Inc, 1 sc, inc. (5 sc)
- Row 2: CH 1, turn. 1 sc, inc, inc, inc, 1 sc. (8 sc)
- Row 3: CH 1, turn. 1 sc, inc, 4 sc, inc, 1 sc. (10 sc)
- Rows 4-8 (5 rows): CH 1, turn. 10 sc across. (10 sc)
- Row 9: CH 1, turn. 1 sc, skip a stitch, 6 sc, skip a stitch, 1 sc. (8 sc)
- Row 10: CH 1, turn. 1 sc, skip a stitch, 4 sc, skip a stitch, 1 sc. (6 sc)
- Row 11: CH 1, turn. 3 sc, skip a stitch, 2 sc. (5 sc)
- Row 12: CH 1, turn. Skip a stitch, HDC, sl st, HDC, sl st.
After finishing the first petal, slip stitch back to the base and start the next petal in the next 3 stitches of the flower center. Repeat until you have 5 petals.


To finish, secure the thread (the author suggests making 2 CH and pulling the thread tight) and hide the ends within the petals.
Step 3: Flower Calyx (Back of the Flower)
Using green yarn (Gazzal Jeans 1146).
- Round 1: Into an amigurumi ring, crochet 8 sc. (8)
- Round 2: 7 inc, 1 sc. (15)
- Round 3: 15 sc around. (15)
Do not cut the yarn. Place the calyx against the back of the flower. To attach it, work around the edge, joining the calyx to the back loops of the flower center:
- (sl st into a stitch on the calyx and a back loop of the flower center, CH 1). Repeat this all the way around.
Stuff with a bit of holofiber before you fully close the opening. Secure and cut the thread.


Part 2: The Daisy Bud
The bud is constructed from three separate pieces: the petals (made as a flower), the center, and the calyx.
Step 1: Flower for the Bud
First, crochet a complete flower exactly as described in Part 1 (Steps 1 & 2).
Step 2: Calyx for the Bud
Using green yarn (Gazzal Jeans 1146).
- Round 1: Into an amigurumi ring, crochet 8 sc. (8)
- Round 2: 7 inc, 1 sc. (15)
- Rounds 3-5 (3 rounds): 15 sc around. (15)
Do not cut the yarn. To attach the calyx and create the leafy points:
- (sl st, CH 1, sl st) into the next two stitches of the flower back.
- Then, CH 4. Working back down the chain: sc in the 2nd ch from hook, HDC in the next, HDC in the last.
- Repeat this pattern around the base: (sl st, CH 1, sl st, create leafy point). You should have about 8 points.


Step 3: Center of the Bud
Using bright pink yarn (Alize cotton gold 33).
- Round 1: Into an amigurumi ring, crochet 8 sc. (8)
- Round 2: Inc in each st around. (16)
- Round 3: (1 sc, inc) x 8. (24)
- Round 4: (3 sc, inc) x 6. (30)
- Rounds 5-7 (3 rounds): 30 sc around. (30)
- Round 8: (1 sc, dec) x 10. (20)
- Round 9: Dec in each st around. (10)
Stuff firmly with holofiber.
- Round 10 (Ruffle): Working in the front loops only: (CH 3, sl st into the next st). Repeat all the way around to create a small ruffle.
Fasten off, leaving a long tail for sewing.


Step 4: Bud Assembly
- Use a separate piece of yarn to weave through the back loops of Round 9 on the bud’s center and pull tight to close the remaining hole.
- Place the pink center inside the flower petals.
- Use the long yarn tail from the center piece to sew the top edge of the petals to the center, securing them in a “bud” shape.


Thank You & Happy Crocheting!
You’ve completed your beautiful crochet daisy and bud. We hope you enjoyed this pattern!


When sharing your finished work, please credit the designer.
Pattern Author: Evgeniya Kokina (Handmade knitted toys «Daisy»)
*If you find any inaccuracies in the pattern, please let the author know. She would be grateful.