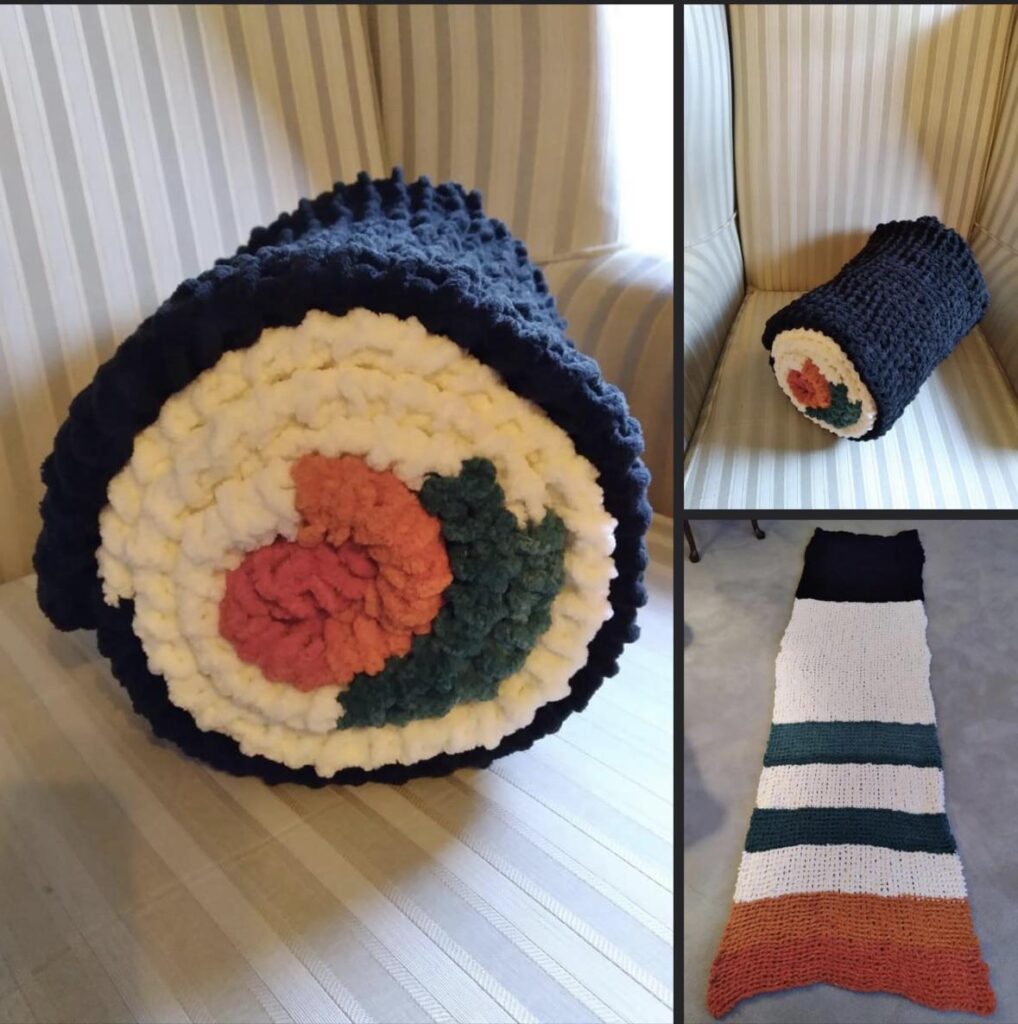
Crochet Sushi Blanket free Pattern
Craving a project that’s as fun to make as it is snuggly to cuddle up with? Look no further! This delightful Sushi Roll Blanket pattern transforms fluffy yarn into a whimsical and wonderfully warm creation. Perfect for adding a playful touch to your living room, bedroom, or even as a unique and unforgettable gift, this project is easier than it looks and oh-so-satisfying to complete. Get ready to roll into a world of crochet fun!
What Makes This Project Awesome?

- Beginner-Friendly: Master basic crochet stitches (chain and double crochet) and create something truly impressive.
- Customizable & Creative: Play with yarn colors and textures to make your sushi roll uniquely yours.
- Super Snuggly: Imagine wrapping yourself in a giant, soft sushi roll! Perfect for movie nights, reading nooks, or just adding a touch of playful comfort to any space.
- Conversation Starter: Prepare for compliments! This blanket is guaranteed to spark joy and curiosity wherever it goes.
- Therapeutic & Relaxing: The repetitive nature of crochet is wonderfully calming, and watching your sushi roll take shape is incredibly rewarding.
Materials You’ll Need to Get Rolling:
- Yarn: Prepare for maximum fluffiness!
- “Nori” (Dark Green): Approx. 600-800 yards of a super bulky, chenille-style yarn in a deep, rich green. Consider Bernat Blanket Yarn in “Dark Teal” or Premier Yarns Sweet Roll in “Evergreen” for a luxurious feel.
- “Rice” (White): Approx. 800-1000 yards of the same super bulky chenille yarn in a bright, clean white. Bernat Blanket Yarn in “White” is a classic choice.
- “Salmon” (Pink): Approx. 400-600 yards of the same super bulky chenille yarn in a lovely shade of pink. Think Bernat Blanket Yarn in “Baby Pink” or “Blush” for a realistic salmon hue.
- “Ginger/Wasabi” (Light Green): Approx. 200-300 yards of the same super bulky chenille yarn in a vibrant, lighter green. Try Bernat Blanket Yarn in “Grass Green” or “Lime” for a pop of color.
- Crochet Hook: Size appropriate for your chosen yarn. Start with the hook size recommended on your yarn label (likely a size L/8mm or larger) as a starting point. You may need to adjust based on your tension.
- Scissors: Sharp scissors for clean yarn cuts.
- Tapestry Needle (Yarn Needle): For neatly weaving in those yarn ends and giving your blanket a professional finish.
- (Optional) Stitch Markers: Helpful for marking the beginning of rows, especially for beginners.
- (Optional) Measuring Tape: To ensure consistent width and length as you go.
Let’s Get Hooked: Step-by-Step Sushi Roll Blanket Pattern
Step 1: Yarn & Hook – The Perfect Match for Cozy Stitches
Choosing the right yarn is key to achieving that plush, huggable sushi roll texture! Super bulky chenille yarn is ideal for this project because it’s incredibly soft, works up quickly, and creates that wonderful, squishy feel.
- Yarn Exploration: Visit your local yarn store or browse online to explore the super bulky chenille yarn options available. Feel the yarn – you want something that’s soft and inviting!
- Hook Size Experiment: The yarn label will suggest a hook size, but it’s just a starting point. Crochet tension varies from person to person.
Step 2: The Tension Tango – Mastering Your Swatch
Before diving into the full blanket, creating a test swatch is your secret weapon for crochet success! This small practice piece helps you:
- Gauge Your Tension: Tension is how tightly or loosely you crochet. For this blanket, slightly looser stitches are better to maintain the softness and drape.
- Hook Size Fine-Tuning: Using your pink yarn and the recommended hook size, crochet a small square (around 4 inches by 4 inches). Refer to your yarn label for swatch instructions (it might specify stitch count and row count for a 4-inch square).
- Tension Check – The Hook Test: While working your swatch, try inserting your hook into previous stitches.
- Too Tight? If it’s difficult to insert your hook, your tension is likely too tight. Try going up a hook size (e.g., from an L/8mm to an M/9mm).
- Too Loose? If your stitches are very gappy and loose, try going down a hook size.
- Just Right? You should be able to insert your hook comfortably without struggling or feeling like the stitches are too tight or too loose.
- Swatch Success! Once you’re happy with your swatch and tension, unravel it gently. You can reuse this yarn for your blanket – no yarn wasted!
(Visual Aid Suggestion: Insert a photo here showing a swatch with good tension vs. a swatch that’s too tight and one that’s too loose. Arrows could point to the differences.)
Step 3: Building the “Salmon” Base – Let’s Roll!
This pink section represents the salmon in your sushi roll and forms the inner core of your blanket.
- Foundation Chain: With your pink yarn, create a chain that’s as long as you want your blanket to be wide. A good starting point for a throw blanket is around 40-50 inches (approximately 100-130 chains with super bulky yarn, but this will vary depending on your tension and yarn). Pro Tip: Lay a throw blanket you already own flat and measure its width to use as a guide.
- Row 1: Double Crochet Debut: Skip the first two chains from your hook (these count as your first double crochet). Double crochet (dc) into the third chain from the hook and in each chain across the entire row.
- Stitch Count Sanity Check: Count your stitches in this first row and write down the total. This is crucial for keeping your edges straight and your blanket rectangular.
- Rows 2-8 (or more for wider salmon): Salmon Stripes:
- Chain 3 (Turning Chain): Chain 3. This chain 3 counts as your first double crochet of the row and helps create a straight edge.
- Turn Your Work: Flip your crochet piece over to start the next row.
- Double Crochet Across: Double crochet in each double crochet from the previous row, all the way across, ending in the top of the chain 3 from the previous row.
- Maintain Stitch Count: Double-check that you have the same number of stitches in each row as you recorded in Row 1. This prevents your blanket from getting wider or narrower as you crochet.
- Repeat: Repeat Row 2 until you have completed approximately 8 rows of pink, or until the pink section looks proportionally sized to your reference throw blanket.
- The “Roll-Up Test” – Salmon Size Check: After Row 8 (or your chosen row count), it’s time for a “roll-up test”!
- Fold your blanket width-wise (like folding laundry).
- Roll it up tightly from one short end to the other.
- Compare the rolled-up pink section to the size of the “salmon” portion you envision in a sushi roll. Adjust the number of pink rows if needed to achieve your desired salmon size.
(Visual Aid Suggestion: Insert a photo series here showing the “roll-up test” at different stages – unfolded blanket, folded width-wise, and rolled up tightly, highlighting the salmon section size.)
Step 4: Adding the “Rice” Stripe – The Snowy White Layer
Time to introduce the “rice” layer! This white stripe will frame the pink salmon and add to the sushi roll effect.
- Yarn Change Magic: Attach your white yarn to the last double crochet stitch you completed in the pink section. You can do this with a simple knot, ensuring it’s secure but not too bulky. Pro Tip: Leave a tail of yarn from both the pink and white yarn for weaving in later.
- “Rice” Rows – Repeat & Roll: Repeat Rows 2-8 from Step 3, using your white yarn instead of pink.
- Roll-Up Test (Again!): Perform the roll-up test after approximately 8 rows of white. The combined pink and white section should now resemble the “salmon” and “rice” layers of your sushi roll in terms of size. Adjust the number of white rows as needed.
Step 5: Creating the “Avocado/Cucumber” Green Section – Fresh and Vibrant
Now for the vibrant green that adds that fresh “veggie” element to your sushi roll! Choose your lighter green yarn for this section.
- Green Goodness: Attach your light green yarn to the last double crochet of the white section.
- Green Rows – Repeat & Roll: Repeat Rows 2-8 from Step 3, using your light green yarn.
- Roll-Up Test (You Know the Drill!): Perform the roll-up test. Compare the size of the pink, white, and light green sections together to your sushi roll vision. Adjust green rows if necessary.
- Second “Rice” Stripe – Mirror Image: Repeat Step 4 to add another white stripe after the light green section. This second white stripe helps to create a balanced, symmetrical sushi roll look. Make sure the start and end points of the green sections align visually with the white stripes for that balanced look.
Step 6: “Nori” Wrap – The Finishing Touch of Dark Green
The dark green “nori” is the final layer that wraps everything together and completes the sushi roll blanket!
- Final White Stripe – Extra Wrap: Before switching to dark green, add a few extra rows of white yarn (maybe 10-12 rows total for this final white section) to ensure it’s wide enough to fully wrap around all the previous layers when rolled up. This creates a nice, generous “rice” border around the “nori.”
- “Nori” Power – Dark Green Rows: Switch to your dark green yarn. Crochet enough rows (again, around 8-12 rows, or adjust based on your desired “nori” thickness) to ensure the dark green section will completely wrap around the entire rolled-up blanket. You want it to securely encase all the inner layers.
- Fasten Off & Weave in Ends – Tidy Time!
- Fasten Off: Cut your dark green yarn, leaving a tail of about 6 inches. Yarn over, pull the yarn through the last loop on your hook, and pull tightly to secure the knot.
- Weave in Ends: Thread your tapestry needle with each yarn tail. Weave the needle back and forth through the stitches on the wrong side of your blanket, carefully hiding the yarn ends. Trim any excess yarn close to the blanket surface. Repeat this for all yarn tails from color changes and starting/ending points.
(Visual Aid Suggestion: Insert photos here showing how to fasten off and how to weave in ends neatly.)
Final Step: Unroll the Cuteness – Enjoy Your Sushi Roll Blanket!
Congratulations, you’ve crafted a cozy and utterly adorable Sushi Roll Blanket! Roll it up tightly to admire your handiwork, then unroll it and snuggle up in its plush warmth.
Show Off Your Creation!
- Share Your Photos: We’d love to see your Sushi Roll Blankets! Share photos of your finished project on social media
- Gift it with Love: This blanket makes a truly unique and heartwarming gift for friends and family of all ages.
- Home Decor Delight: Drape it over your couch, armchair, or bed to add a playful and cozy touch to your home.
Troubleshooting Tips for Smooth Sailing:
- Curling Edges? If your blanket edges are curling inwards, it’s often due to tension being too tight. Try loosening your tension or going up a hook size in your next crochet project. Blocking (gently steaming or wetting and pinning your finished blanket flat to dry) can also help straighten edges.
- Uneven Edges? Double-check that you are maintaining the same stitch count in each row. Count your stitches at the end of each row, especially when you’re starting out.
- Yarn Splitting? Chenille yarn can sometimes split. Crochet slowly and carefully, making sure to catch all strands of the yarn with your hook.
- Running Out of Yarn? It’s always a good idea to buy a little extra yarn than you think you’ll need, just in case. If you do run short, try to purchase yarn from the same dye lot if possible to ensure color consistency.
Happy Crocheting and enjoy your delightful Sushi Roll Blanket!