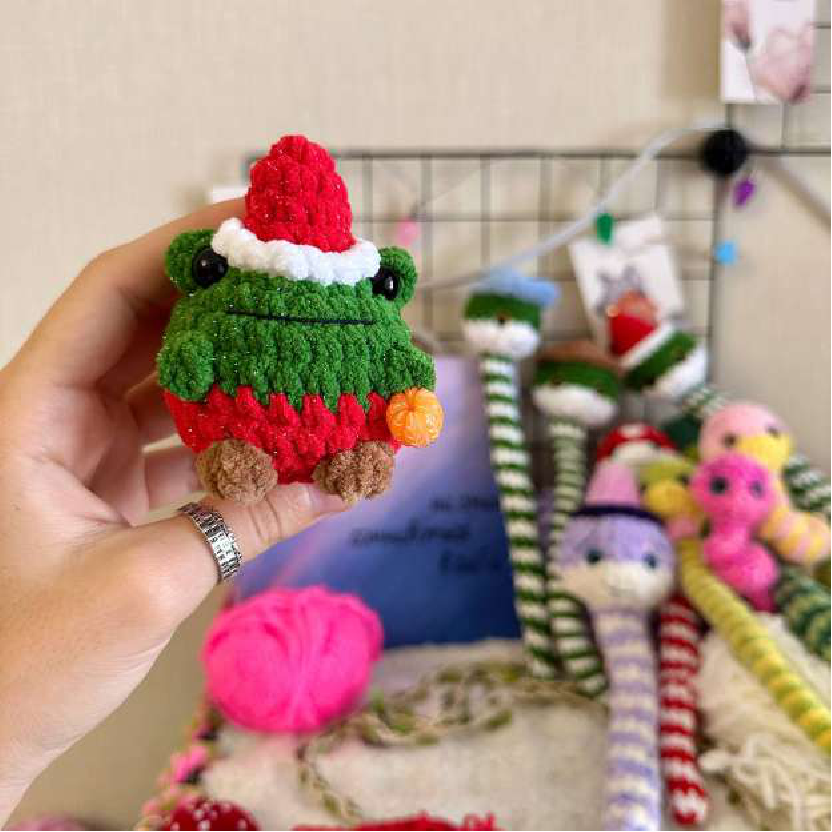
Cute Froggy Hat: Free Crochet Pattern
Get ready to crochet the cutest little froggy wearing a stylish hat! This free pattern, designed by Anastasia Volnukhina of Nastik Toys, is perfect for making an adorable amigurumi friend. It’s written in easy-to-follow steps, so let’s grab our hooks and yarn!
Materials You’ll Need
- Yarn in the following colors:
- Red: For the hat.
- White: For the hat trim.
- Green: For the frog’s body.
- Brown (optional): For the lower paws.
- Crochet hook (appropriate size for your chosen yarn – typically 2.0-3.0mm for amigurumi)
- Stuffing (polyester fiberfill)
- Safety eyes (or black thread for embroidering eyes)
- Tapestry needle for weaving in ends and embroidery
- Scissors
- Stitch marker (optional, but recommended for amigurumi in continuous rounds)
Abbreviations
- MR: Magic Ring (or Adjustable Ring)
- CH: Chain Stitch
- SC: Single Crochet
- DC: Double Crochet
- SL ST: Slip Stitch
- INC: Increase (2 single crochet stitches in the same stitch)
- DEC: Decrease (single crochet 2 stitches together)
- (X): The number in parentheses indicates the final stitch count for the row.
- (…)*n: Repeat what is in parentheses “n” number of times.
- FL: Front Loop
- BL: Back Loop
Special Stitches: Bobble Stitch
This pattern uses a bobble stitch for the eyes and paws. Here’s how to make it (either 3 DC or 4 DC variant):

- 3 DC Bobble: Yarn over, insert hook into stitch, yarn over, pull up a loop, yarn over, pull through 2 loops (2 loops on hook). *Yarn over, insert hook into same stitch, yarn over, pull up a loop, yarn over, pull through 2 loops* (3 loops on hook). Repeat from * to * one more time (4 loops on hook). Yarn over, pull through all 4 loops on hook.
- 4 DC Bobble: Work as above, but repeat from * to * two more times (5 loops on hook after 4 DCs). Yarn over, pull through all 5 loops on hook.
- The pattern specifies 4 DC bobble for eyes and 3 DC bobble for paws.
Let’s Get Crocheting!
This pattern is worked in continuous rounds unless otherwise specified. Use a stitch marker to keep track of your first stitch in each round.
Hat Section (Red & White Yarn)
We’ll start with the pointy top of the hat.
With Red Yarn:
Row 1: 6 SC in MR (6)
Row 2: (1 SC, INC)*3 (9)
Row 3: 9 SC (9)
Row 4: (2 SC, INC)*3 (12)
With White Yarn:
Row 5: 12 SC (12)
Hat Trim: This next row creates the brim of the hat. We will work in the front loops (FL) of Row 5.
Row 6 (Hat Trim – working in FL of Row 5): (1 SC, INC)*6 (18)
Fasten off white yarn and weave in ends.
Head and Body Section (Green & Red Yarn)
Starting the Head: Now, we’ll attach the green yarn and work into the back loops (BL) of Row 5 (the row you just worked the hat trim from). This will be the base of your frog’s head.
With Green Yarn:
Row 7 (Working in BL of Row 5): 1 SC, INC, Bobble Stitch (4 DC) for an eye, INC, 1 SC, INC, 1 SC, INC, Bobble Stitch (4 DC) for an eye, INC, 1 SC, INC (18)
Row 8: (2 SC, INC)*6 (24)
Row 9: 24 SC (24)
Upper Paws: The next row creates the upper paws (arms). If your bobble stitches don’t align symmetrically on the sides for the paws, adjust your starting SCs in this row by shifting them a stitch or two.
Row 10 (Upper Paws): 7 SC, Bobble Stitch (3 DC) for a paw, 6 SC, Bobble Stitch (3 DC) for a paw, 9 SC (24)
With Red Yarn:
Row 11-12 (2 rows): 24 SC (24)
Lower Paws: The next row creates the lower paws (legs). Again, adjust starting SCs if needed for symmetrical placement. You can make these in brown yarn if desired.
Row 13 (Lower Paws): 9 SC, Bobble Stitch (3 DC) for a paw, 3 SC, Bobble Stitch (3 DC) for a paw, 10 SC (24)
Row 14: (2 SC, DEC)*6 (18)
Row 15: (1 SC, DEC)*6 (12)
Begin to stuff your frog firmly now. Ensure it’s well-shaped.
Row 16: 6 DEC (6)
Finishing Touches
Once you complete the last row:
- SL ST to the next stitch.
- Cut your yarn, leaving a long tail.
- Using your tapestry needle, thread the tail through the front loop of each remaining 6 stitches. Pull tight to close the hole.
- Weave in the remaining yarn tail.
- Embroider a small mouth and rosy cheeks onto your frog’s face.
- Carefully glue the safety eyes directly under the bobble stitches (the ones made in Row 7 for the eyes). Alternatively, embroider small black eyes.
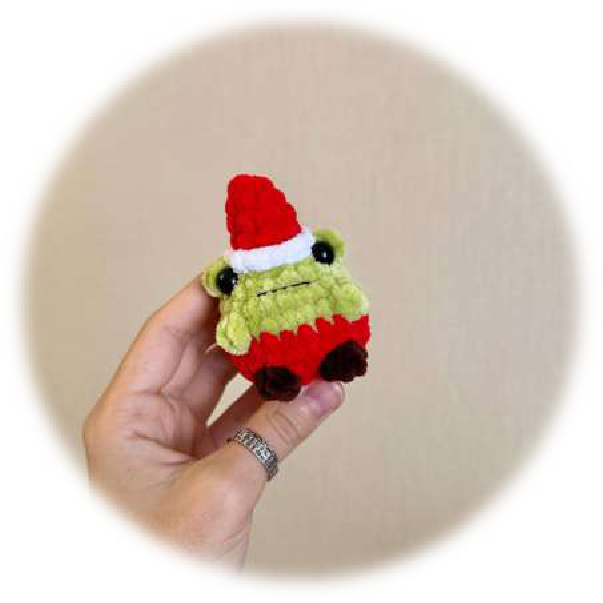
And there you have it! Your adorable Froggy in a Hat is complete!