Easy Crochet Snake Pattern – Beginner-Friendly Amigurumi Tutorial
Hello, crochet lovers! 🐍
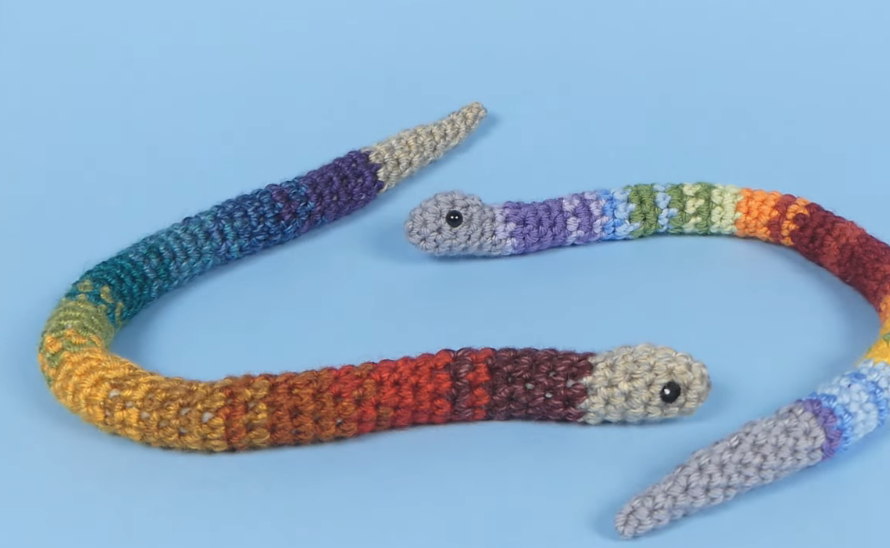
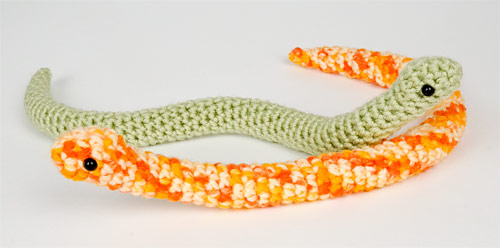
Today, we’re diving into a fun and flexible project: a crochet snake pattern that’s perfect for beginners and experienced crafters alike. This adorable snake can be customized with different colors and lengths, making it a fantastic addition to your crochet creations. Whether you’re making a playful toy, a unique gift, or just want to try something new, this easy-to-follow guide will walk you through every step.
Table of Contents
Terminology
| ch | chain |
| invdec | invisible decrease Note: If you prefer, you may use a standard sc2tog decrease in place of each invdec. |
| sc | single crochet (double crochet for UK/Aus) |
| st | stitch |
You Will Need…
- E US/3.5mm crochet hook
- Small quantity of worsted weight yarn in any solid or variegated colour
- Polyester fibrefill stuffing
- 2 eyes, approx 6mm diameter (optional)
- Yarn needle to weave in ends
- Stitch marker
Size
Samples are approx 13-15″ (33-38cm) long, but you can make yours as long as you want by adding more repeats to the body! (Your gauge and yarn choice will affect the finished size slightly.)
Gauge
Gauge is unimportant for this pattern, provided the pieces are crocheted sufficiently tightly that they will not gape visibly when stuffed. To test a swatch, crochet the first 3 rounds and then push a piece of fibrefill behind it:
- If the stitches stretch open too much and the fibrefill is clearly visible, reduce the hook size.
- If you cannot insert the hook into the previous stitches, reduce your tension (crochet more loosely) or increase the hook size.
Notes
- Do not join at the end of each round; rounds are worked in continuous spirals.
- Use a stitch marker to mark the beginning of each round. Move the marker up each time you start a new round.
Stuffing Tips
This pattern does not include stuffing reminders! The snake is crocheted in one continuous piece, so you should pause every couple of inches as you crochet the body of your snake to add a small amount of stuffing. (A stuffing tool works very well for this!)
Your snake should be bendy and poseable, not rigid, so, once you get past the head, you don’t need to stuff it as firmly as you usually stuff amigurumi. Add just enough stuffing to fill the body, so it remains flexible.

Try to avoid forcing the stuffing into clumps as you stuff; you can squeeze and squash the snake from the outside to redistribute and smooth out the stuffing.
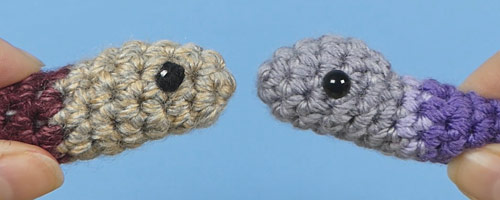
Tiny Yarn Eyes
Head
- Make a magic ring, ch 1.
- Rnd 1: 5 sc in magic ring. (5 st)
- Rnd 2: (2 sc in next st, sc in next st) twice, sc in next st. (7 st)
- Rnd 3: (sc in next st, 2 sc in next st) twice, sc in next 3 st. (9 st)
Note: In the next round (Rnd 4), complete the increase (‘2 sc in next st’), then mark the stitch you have just completed by slipping a stitch marker or a scrap of contrasting yarn through the stitch before you continue. This marks the top of the head and will be a reference for the position of the eyes.
- Rnd 4: sc in next 3 st, 2 sc in next st, sc in next 5 st. (10 st)
- Rnd 5: sc in next 9 st, 2 sc in next st. (11 st)
- Rnd 6: sc in next 2 st, invdec, sc in next st, invdec, sc in next 3 st, 2 sc in next st. (10 st)
Stuff head and attach animal eyes (if using) halfway up either side of the head (2 or 3 stitches to either side of the marker you placed at Rnd 4), using the marker as a guide to which side is the top of the head.
- Rnd 7: (sc in next st, invdec) twice, sc in next 4 st. (8 st)
Do not fasten off; continue to Body (below).
Body
- Rnd 1: sc in each st around. (8 st)
Repeat Rnd 1 as many times as you want. (The tapered tail will add about 2″/5cm additional length.)
For each of my samples, I made 50 rounds for the body.
Do not fasten off; continue to Tail (below).
Tail
- Rnd 1: invdec, sc in next 6 st. (7 st)
- Rnds 2-3: sc in each st around. (7 st)
- Rnd 4: invdec, sc in next 5 st. (6 st)
- Rnds 5-6: sc in each st around. (6 st)
- Rnd 7: invdec, sc in next 4 st. (5 st)
- Rnd 8: sc in each st around. (5 st)
- Rnd 9: invdec, sc in next 3 st. (4 st)
Fasten off, stitch the remaining hole closed and weave in the end.
Video Tutorial