Free Amigurumi Pattern: Classic Cheburashka
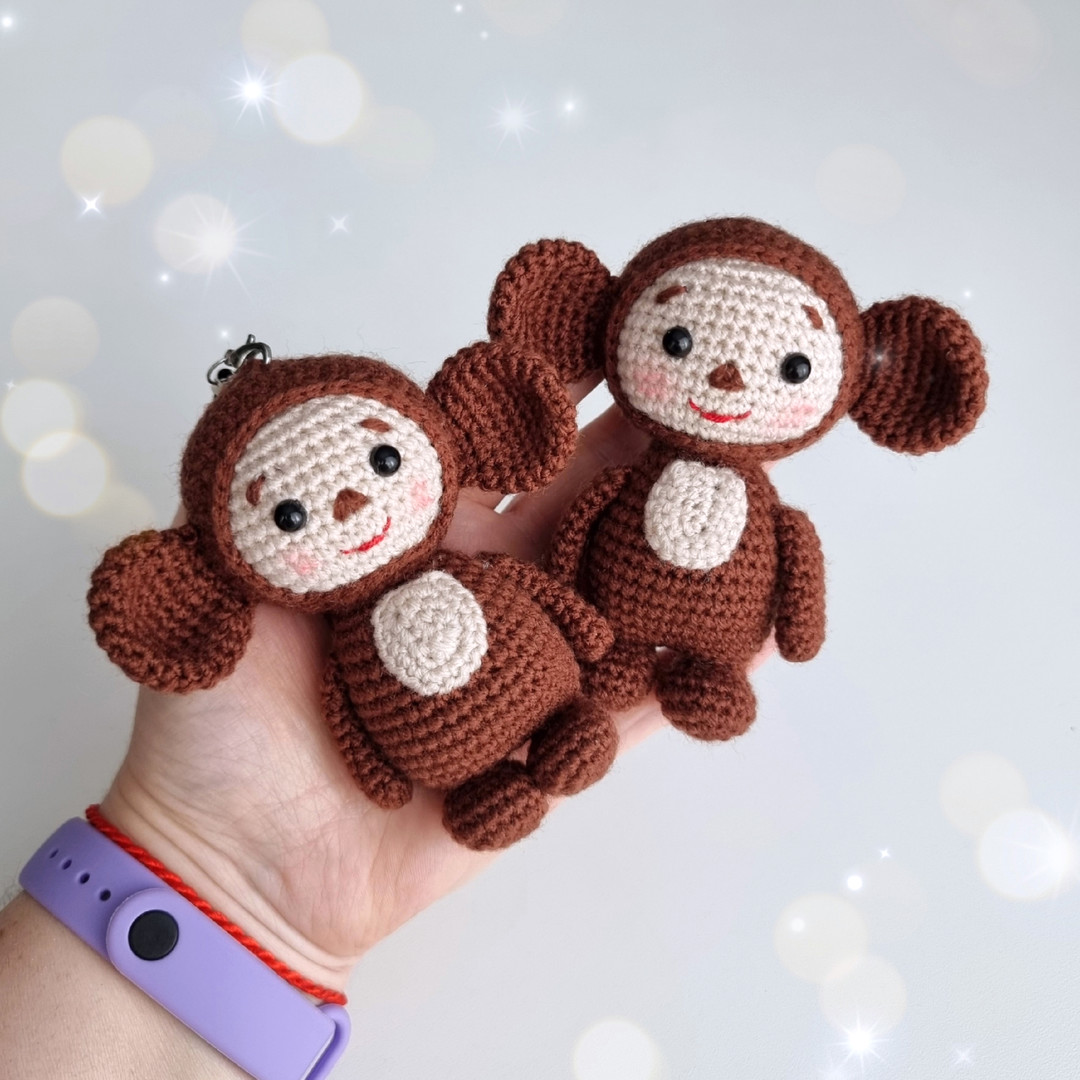
Looking for a unique, incredibly adorable, and nostalgic crochet project? Meet Cheburashka! If you aren’t familiar with him, Cheburashka is a beloved, classic character from Russian children’s literature and animation. With his big, soulful eyes, tiny body, and giant round ears, he looks like a mix between a little bear and a monkey—and he makes the absolute perfect amigurumi!
This wonderful free pattern was originally designed by the talented Elena Kuznetsova (VK: @igruha78). I have translated and adapted her pattern into standard US crochet terms so you can make your very own little friend!
Let’s get our hooks ready!
🧶 Materials Needed
- Yarn: Fine/Sport weight (Size 2) or Light DK (Size 3) acrylic yarn in two colors:
- Brown (Main body, ears, arms, hood)
- Beige (Face, tummy patch)
- Crochet Hook: 1.5 mm (If you use thicker yarn like Worsted/Size 4, use a 2.5mm or 3.0mm hook, your toy will just be a bit bigger!)
- Eyes: 5 mm or 6 mm safety eyes (or black half-beads/buttons)
- Embroidery Floss: Black or dark brown (for eyebrows) and red (for mouth)
- Stuffing: Polyfill stuffing
- Tools: Tapestry needle, stitch markers, scissors, and a bit of pink blush for the cheeks.
📝 Abbreviations (US Terms)
- MR: Magic Ring
- ch: chain
- sc: single crochet
- inc: increase (2 sc in one stitch)
- dec: decrease (sc 2 stitches together – invisible decrease recommended)
- st(s): stitch(es)
- (…) x N: repeat the instructions in the brackets N times
- = (N): total number of stitches in that row/round
🐻 Pattern Instructions
Note: This pattern is worked in continuous rounds unless otherwise stated. Use a stitch marker to keep track of the first stitch of each round.
Legs (Make 2)
Use Brown yarn.
Rnd 1: 6 sc in MR = (6)
Rnd 2: 6 inc = (12)
Rnd 3: (1 sc, inc) x 6 = (18)
Rnds 4-5: 18 sc = (18) (2 rounds)
Rnd 6: 3 sc, 6 dec, 3 sc = (12)
Rnd 7: (1 sc, dec) x 4 = (8)
For Leg 1: Fasten off and weave in the end.
For Leg 2: Do NOT cut the yarn. We will now join the legs to start the body.
Body & Head (Worked as one piece)
Joining the legs:
From where you are on Leg 2, crochet 2 sc. Chain 2.
Take Leg 1. Count 2 stitches to the right from where you fastened off, and insert your hook there to join. (This ensures the toes point slightly inward/forward).
Rnd 8: On Leg 1: (2 sc, inc) x 2, 2 sc. On the ch 2: 2 sc. On Leg 2: 2 sc, (inc, 2 sc) x 2. On the other side of the ch 2: 2 sc = (24)
Place your stitch marker here. This is the new start of the round (center of the back).
Rnd 9: (3 sc, inc) x 6 = (30)
Rnd 10: (4 sc, inc) x 3, (inc, 4 sc) x 3 = (36)
Rnds 11-18: 36 sc = (36) (8 rounds)
Rnd 19: (4 sc, dec) x 3, (dec, 4 sc) x 3 = (30)
Rnd 20: (3 sc, dec) x 6 = (24)
Rnd 21: (2 sc, dec) x 6 = (18)
Rnd 22: (4 sc, dec) x 3 = (15)
Rnd 23: 15 sc = (15)
Stuff the body firmly, especially up through the neck area.
Change yarn color to Beige to start the face.
Rnd 24: 15 inc = (30)
Rnd 25: (4 sc, inc) x 6 = (36)
Rnd 26: (5 sc, inc) x 6 = (42)
Rnds 27-34: 42 sc = (42) (8 rounds)
Rnd 35: (5 sc, dec) x 6 = (36)
Rnd 36: (4 sc, dec) x 6 = (30)
Rnd 37: (3 sc, dec) x 6 = (24)
Stuff the head firmly.
Rnd 38: (2 sc, dec) x 6 = (18)
Rnd 39: (1 sc, dec) x 6 = (12)
Rnd 40: 6 dec = (6)
Fasten off, weave the tail through the front loops of the remaining 6 stitches, pull tight to close the hole, and hide the yarn tail inside.
Brown Head Overlay (Hood)
Use Brown yarn. This piece will slip over the beige head you just made.
Rnd 1: 6 sc in MR = (6)
Rnd 2: 6 inc = (12)
Rnd 3: (1 sc, inc) x 6 = (18)
Rnd 4: (2 sc, inc) x 6 = (24)
Rnd 5: (3 sc, inc) x 6 = (30)
Rnd 6: (4 sc, inc) x 6 = (36)
Rnd 7: (5 sc, inc) x 6 = (42)
Rnds 8-12: 42 sc = (42) (5 rounds)
Now we will work in turned rows to create the face opening:
Rows 13-14: 36 sc, ch 1, turn. (Leave the remaining stitches unworked). Do NOT cut the yarn.
Fitting the Hood: Place the brown “hood” onto the beige head. The opening you just created goes around the face/neck.
Rnd 15: Chain 7 (this chain goes under the chin). Attach with a sc to the other side of the hood opening to create a full circle around the face. Crochet around the entire face opening: (5 sc, dec) x 6.
Rnd 16: 36 sc around. (Note: If the hood bulges around the top of the forehead, you can do 1 or 2 invisible decreases to make it lay flat against the beige face).
Fasten off and weave in ends. You can add a few invisible stitches to sew the edge of the hood to the beige face if desired.
Ears (Make 2)
Use Brown yarn.
Rnd 1: 6 sc in MR = (6)
Rnd 2: 6 inc = (12)
Rnd 3: (1 sc, inc) x 6 = (18)
Rnd 4: (2 sc, inc) x 6 = (24)
Rnds 5-7: 24 sc = (24) (3 rounds)
Rnd 8: (2 sc, dec) x 6 = (18)
Rnd 9: (1 sc, dec) x 6 = (12)
Do not stuff the ears.
Rnd 10: Fold the ear flat in half. Crochet through both sides across the top: 6 sc.
Fasten off, leaving a long tail for sewing.
Arms (Make 2)
Use Brown yarn.
Rnd 1: 8 sc in MR = (8)
Rnds 2-5: 8 sc = (8) (4 rounds)
Rnd 6: 6 sc, dec = (7)
Rnds 7-10: 7 sc = (7) (4 rounds)
Lightly stuff the bottom of the arms, leave the top empty.
Fold flat in half. Crochet through both sides across the top: 3 sc.
Fasten off, leaving a long tail for sewing.
Tummy Patch
Use Beige yarn. Worked in turned rows.
Row 1: Ch 5. Starting in the 2nd ch from hook: 3 sc, 4 sc in the last chain. Turn your work to crochet down the opposite side of the chain: 3 sc. Ch 1, turn.
Row 2: 3 sc, 4 inc, 3 sc. Ch 1, turn.
Row 3: 5 sc, inc, 2 sc, inc, 5 sc.
Fasten off, leaving a long tail for sewing.
🪡 Assembly & Facial Features
This is where your little Cheburashka comes to life! Follow these spacing guidelines provided by the designer to get that perfect, sweet expression:
- Sewing Parts:
- Sew the beige Tummy Patch to the center of the brown body.
- Sew the Arms to the sides of the body, right where the head meets the neck.
- Sew the giant Ears to the sides of the head on the brown hood portion. They should sit fairly low and stick straight out.
- Face Embroidery: (Use brown yarn for the nose).
- Nose: Count up 4 rows from the bottom of the beige face. On the 5th row, embroider a small triangle for the nose (the bottom of the triangle should be about 2 stitches wide).
- Mouth: Using red thread, embroider a little smile. It should be located 2 rows up from the bottom of the beige face, and 2 rows below the nose.
- Eyes:
- If gluing half-beads (or inserting safety eyes if you waited to stuff): The bottom of the eye should sit flush with the top point of the nose triangle (or slightly above it).
- Count 2 stitches out to the left and 2 stitches out to the right from the top point of the nose—this is where your eyes go!
- Finishing Touches:
- Embroider two small, slightly angled brown eyebrows above the eyes to give him an innocent look.
- Use a brush and a little bit of real blush (or soft pink pastels) to add rosy cheeks just below the eyes.
And you are done!
Enjoy your sweet little Cheburashka! He makes a perfect keychain, bag charm, or pocket buddy.