Free Owlet Amigurumi Pattern: Crochet Your Own Plush!
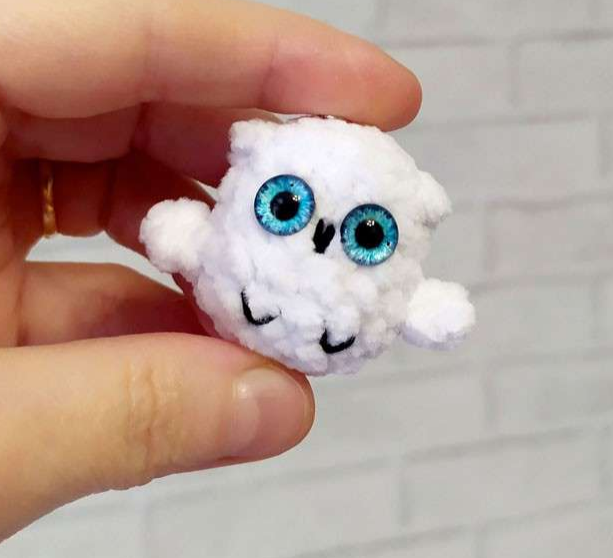
Adorable Owlet Amigurumi Crochet Pattern
Welcome, fellow crafters, to a delightful project that will surely capture your heart! There’s something truly enchanting about a tiny, wise-looking owlet, and with this free crochet pattern, you can bring one to life right from your hooks. This pattern is perfect for crocheters of all skill levels, offering a quick and satisfying make that results in an incredibly cute finished toy. Whether you’re making a gift, a nursery decoration, or just want a charming companion, this owlet is a joy to create.
We’re thrilled to share this wonderful design by the talented Olesya Tkachenko. Let’s gather our materials and get started on this sweet little feathered friend!
Materials You’ll Need
To crochet your adorable owlet, you will need:
Plush yarn with a density of 120m/100g
Crochet hook 4 mm
Fiberfill or other suitable filler
Cabochon eyes 12 mm
Black embroidery thread for details
Abbreviations Used
Familiarize yourself with these standard crochet abbreviations before you begin:
sc: single crochet
inc: increase (crochet two single crochets into the same stitch)
dec: decrease (crochet two single crochets together)
ch: chain stitch
sl st: slip stitch
Special Techniques
These unique components will give your owlet its distinctive features:
Wing: Chain 2, in the 2nd stitch from the hook crochet 3 sc, slip stitch into the base of the stitch.
Ear: Chain 2 (or 3), slip stitch into the base of the stitch.
Owlet Body Pattern
This pattern is worked in continuous rounds unless otherwise specified. Use a stitch marker to keep track of your first stitch in each round.
Round 1: 7 sc into an amigurumi ring (7 stitches)
Round 2: (inc) x 7 (14 stitches)
Round 3: 3 sc, ear, 7 sc, ear, 4 sc (14 stitches)
If you prefer your owlet without ears, simply crochet 14 sc in this round.
Round 4: 14 sc (14 stitches)
Round 5: 3 sc, wing, 7 sc, wing, 4 sc (14 stitches)
Rounds 6-7: 14 sc (2 rows) (14 stitches)
Finishing Touches:
Insert the cabochon eyes between Round 4 and Round 5.
Begin stuffing your owlet firmly with fiberfill.
Round 8: (dec) x 7 (7 stitches)
If necessary, add more stuffing before closing the opening. Pull the remaining opening closed securely.
Using black embroidery thread, carefully embroider small paws and a beak onto your owlet’s face.
Congratulations! Your adorable owlet is now complete and ready to bring a touch of charm wherever it goes.
We hope you thoroughly enjoyed crocheting this sweet owlet! Don’t forget to share your finished creation with us on social media using #CrochettoOwlet. We love seeing your beautiful work and connecting with our amazing crafting community. Happy crocheting!