Free Pompompurin Crochet Pattern: No Sew!

Crochet Your Own Adorable Pompompurin: A Free Pattern!
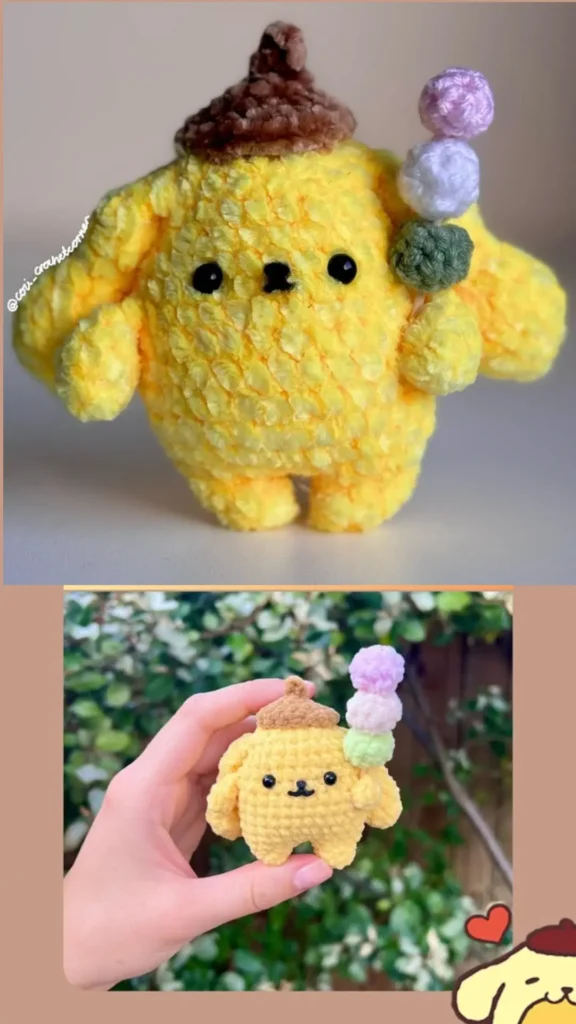
Calling all Sanrio fans and crochet enthusiasts! If you’ve ever wanted to bring one of the world’s cutest characters to life, you’re in the right place. Today, we’re sharing a wonderfully sweet and free amigurumi pattern for Pompompurin, created by the talented @cozi_crochetcorner.
This pattern helps you create the iconic golden pup, complete with his signature brown beret and a tasty dango snack. Thanks to a clever, low-sew construction, this project is as fun to make as it is to admire.
So, gather your yarn, get your hook ready, and let’s crochet this little bundle of joy!
Important Notes from the Creator
Before you dive in, here are a few important notes from @cozi_crochetcorner:
- This pattern is for personal use only. Please do not copy, steal, alter, or repost the pattern itself.
- You are welcome to sell or post the finished products you create, but please make sure to credit the original creator, @cozi_crochetcorner.
- This pattern is worked in continuous rounds (unless otherwise specified) and uses US crochet terminology.
- It’s versatile! You can use any yarn type and corresponding hook size you like.
Materials
- Yellow, Brown, Pink, White, and Green yarn
- Crochet hook
- Felt (for the mouth)
- Glue
- Yarn needle
- Stuffing
- Toothpick (for the dango)
Abbreviations (US Terms)
- MR: Magic Ring
- sc: Single Crochet
- inc: Single Crochet Increase
- dec: Single Crochet Decrease
- fo: Fasten Off
- ch: Chain
- dc: Double Crochet
- slst: Slip Stitch
The Pattern
Ears (Make 2)
In yellow yarn:
- R1: 4sc in MR (4)
- R2: 4inc (8)
- R3: (sc, inc)x4 (12)
- R4: 12sc (12)
- R5: (sc, dec)x4 (8)
- R6: 8sc (8)
- Start lightly stuffing.
- R7: 4dec (4)
- R8: (sc, inc)x2 (6)
- R9: (sc, inc)x3 (9)
- R10: (sc, dec)x3 (6)
- Finish stuffing lightly.
- R11: ch1 and press the top of the ear flat. Sc 3 along the top.
- FO and leave a short tail.
Arms (Make 2)
In yellow yarn:
- R1: 3sc in MR (3)
- R2: 3inc (6)
- R3: 6sc around (6)
- R4: (sc, dec)x2 (4)
- R5: ch1 and sc 2 through the top of the arm.
- FO and leave a short tail.
⭐ Important Tip! ⭐Make the ears and arms before starting the body. You’ll be crocheting them directly into the body, so they need to be ready to go!
Body
We’ll start with the feet and work our way up.
Legs (Make 2, in yellow):
- R1: 4sc in MR (4)
- R2: (sc, inc)x2 (6)
- R3: (2sc, inc)x2 (8)
- For Leg 1, FO and leave a short tail.
- For Leg 2, do not FO. Instead, ch2.
Now, let’s join the legs to start the body:
- R4: sc 20 (20)
- How to join: First, work sc into the stitches of Leg 1. Then sc around the leg and the chains. Next, sc around Leg 2 and the chains on the other side for a total of 20 stitches.
- R5: (4sc, inc)x4 (24)
- R6: (5sc, inc)x4 (28)
- R7-10: sc around (28) [4 rounds]
- R11: 6sc, 2sc through arms, 12sc, 2sc through arms, 6sc (28)
- This is where you’ll attach the arms you made earlier!
- R12: sc around (28)
- R13: 6sc, dec, 12sc, dec, 6sc (26)
- Place safety eyes between rows 12 and 13, with about 5 stitches apart. Cut a small mouth shape out of felt and glue it between the eyes.
- R14: 6sc, dec, 10sc, dec, 6sc (24)
- R15: 2sc, dec, 3sc through ear, (2sc, dec)x2, sc, 3sc through ear, 2sc, dec, sc (20)
- Time to attach the ears!
- R16: (2sc, dec)x5 (15)
- Stuff the body firmly.
- R17: (sc, dec)x5 (10)
- R18: 5dec (5)
- FO and sew the remaining hole shut.
Hat
In brown yarn:
- R1: Make a MR, ch 3, slst into 2nd chain, slst into next ch, slst into MR.
- R2: 5sc in MR (5)
- R3: (inc)x5 (10)
- R4: (sc, inc)x5 (15)
- R5: (2sc, inc)x5 (20)
- FO and tuck loose ends under the hat. Glue or sew onto the top of the head.
Dango
Make 3 balls (one each in white, pink, and green).
- R1: 6sc in MR (6)
- R2: (sc, inc)x3 (9)
- R3: sc around (9)
- R4: (sc, dec)x3 (6)
- Stuff firmly.
- R5: 3dec (3)
- FO and sew shut.
Assembly:
After making your 3 dango balls, skewer them onto a toothpick. Glue (or sew, if preferred) the dango stick to Pompompurin’s arm.
You Did It!
Congratulations on creating your very own Pompompurin! A massive thank you to @cozi_crochetcorner for designing and sharing this incredibly cute pattern.
When you share your adorable creation online, please remember to credit the original designer, @cozi_crochetcorner, so everyone can admire your work and find the pattern for themselves!
Happy Crocheting