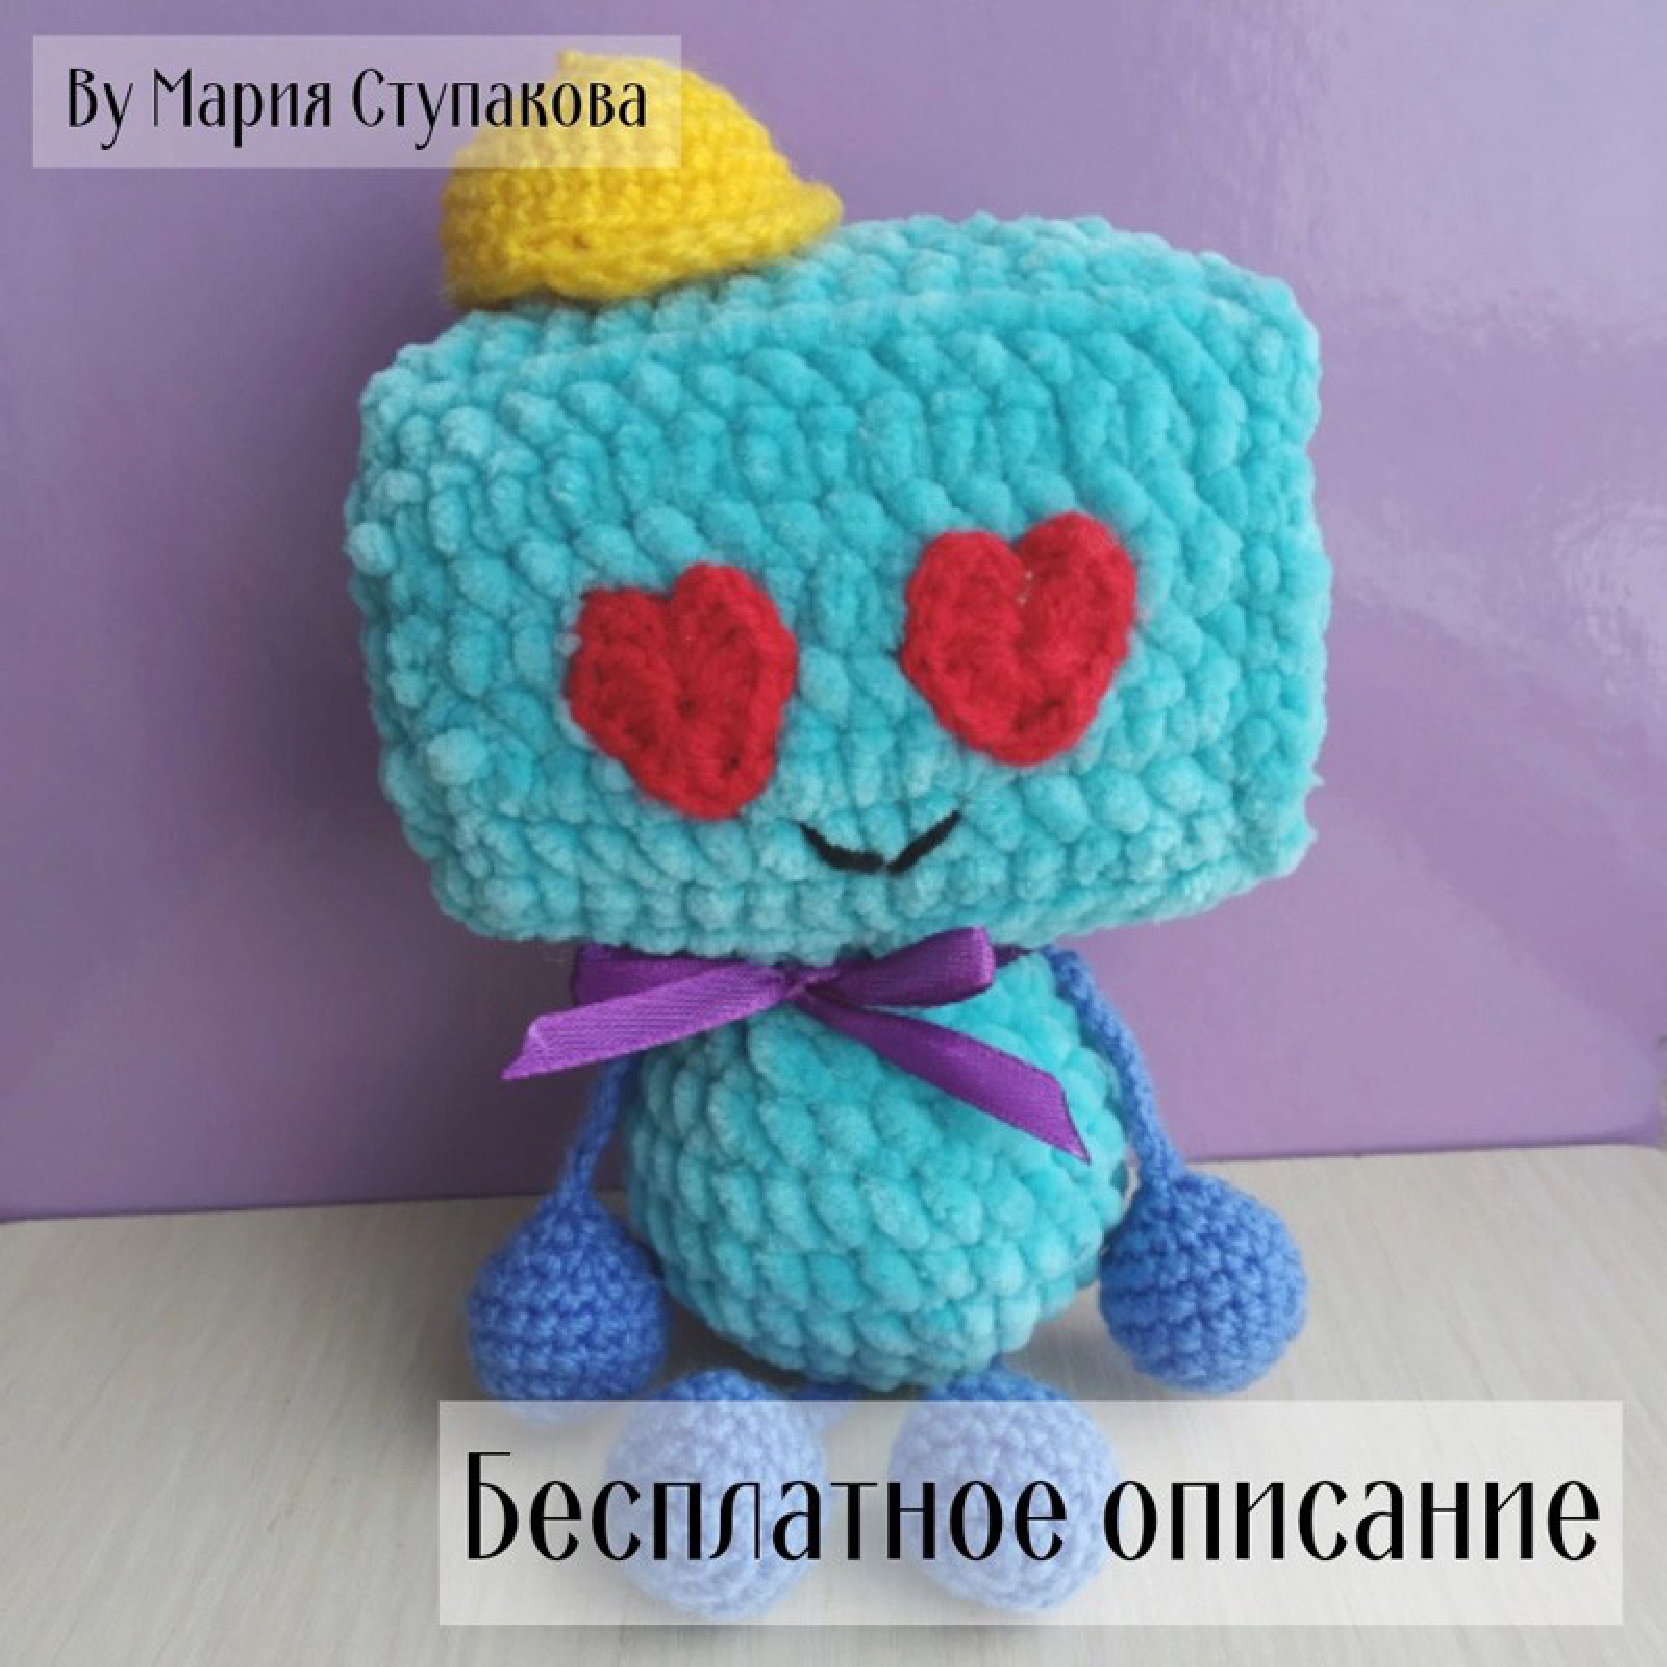
Make This Adorable Robot: Free Crochet Pattern
Get ready to create your own adorable robotic friend! This free crochet pattern for Robot Koljan, designed by the talented Maria Stupakova, is perfect for amigurumi lovers of all levels. He has a unique, boxy head and charming details that make him a wonderful handmade toy or gift. Let’s get our hooks ready and dive in!
Materials
To create your robot, you will need the following materials:

- Yarn:
- Himalaya Dolphin Baby (or similar chenille yarn) in Light Blue for the body and head.
- Pekhorka Detskaya Novinka (or similar sport weight yarn) in:
- Red for the eyes
- Blue for the arms and legs
- Yellow for the cap
- Crochet Hooks:
- 3.0 mm hook for the Himalaya Dolphin Baby yarn.
- 1.5 mm hook for the Pekhorka yarn.
- Other Supplies:
- Polyester fiberfill for stuffing
- Stitch marker
- Yarn needle for sewing parts together
- Scissors
Abbreviations (US Crochet Terms)
- MR: Magic Ring
- ch: Chain
- sl st: Slip Stitch
- sc: Single Crochet
- hdc: Half Double Crochet
- dc: Double Crochet
- inc: Increase (work 2 sc in the same stitch)
- dec: Decrease (work 2 sc together)
- BLO: Back Loop Only
- st(s): Stitch(es)
- (…) x: Repeat the instructions in the parenthesis x times
- (…): Total stitch count for the round or row
Pattern Instructions
Head
The head is constructed from a few flat panels that are sewn together to create a box shape.
Front Panel
(Use Light Blue chenille yarn and 3.0 mm hook)
- Row 1: Ch 15.
- Row 2: Starting in the 2nd ch from the hook, sc 14. Ch 1, turn. (14)
- Rows 3-6: Sc 14. Ch 1, turn. (14)
- Row 7: Work this row in BLO. Sc 14. Ch 1, turn. (14)
- Rows 8-14: Sc 14. Ch 1, turn. (14)
- Row 15: Work this row in BLO. Sc 14. Ch 1, turn. (14)
- Rows 16-20: Sc 14. Ch 1, turn. (14)
- Row 21: Work this row in BLO. Sc 14. Ch 1, turn. (14)
- Rows 22-28: Sc 14. Ch 1, turn. (14)
Fasten off, leaving a very long tail for sewing. Fold the piece and sew the beginning (Row 1) to the end (Row 28) to form a boxy, open-ended ring.
Side Panels (Make 2)
(Use Light Blue chenille yarn and 3.0 mm hook)
- Row 1: Ch 8.
- Row 2: Starting in the 2nd ch from the hook, sc 7. Ch 1, turn. (7)
- Rows 3-9: Sc 7. Ch 1, turn. (7)
Fasten off, leaving a long tail. Sew these square panels onto the open sides of the Front Panel to close the head and complete the cube shape. Stuff the head firmly before sewing the second panel on completely.
Body
(Use Light Blue chenille yarn and 3.0 mm hook)
- Rnd 1: Start with 6 sc in a MR. (6)
- Rnd 2: Inc in each st around. (12)
- Rnd 3: (1 sc, inc) x 6. (18)
- Rnd 4: (2 sc, inc) x 6. (24)
- Rnd 5: (3 sc, inc) x 6. (30)
- Rnds 6-7: Sc in each st around. (30)
- Rnd 8: (3 sc, dec) x 6. (24)
- Rnd 9: (2 sc, dec) x 6. (18)
- Rnd 10: Sc in each st around. (18)
Fasten off, leaving a long tail for sewing. Stuff the body firmly.
Eyes (Make 2)
(Use Red sport weight yarn and 1.5 mm hook)
This part is worked in a spiral into the magic ring to create a unique shape.
- Start with a MR.
- Ch 3 (counts as the first dc).
- Work the following stitches all into the MR: 2 dc, 3 hdc, ch 1, 1 dc, ch 1, 3 hdc, 3 dc.
- Ch 3, and sl st into the MR to finish.
Pull the ring tight to shape the eye. Fasten off, leaving a long tail for sewing.
Arms & Legs (Make 4 identical pieces)
(Use Blue sport weight yarn and 1.5 mm hook)
- Rnd 1: Start with 6 sc in a MR. (6)
- Rnd 2: Inc in each st around. (12)
- Rnd 3: (1 sc, inc) x 6. (18)
- Rnds 4-6: Sc in each st around. (18)
- Rnd 7: (1 sc, dec) x 6. (12)
- Rnd 8: Dec x 6. (6)
Stuff the foot part lightly. Close the remaining opening by weaving the tail through the front loops of the last 6 stitches and pulling tight. Do not cut the yarn.
- Rnd 9: From the center of the closed opening, ch 13.
- Rnd 10: Starting in the 2nd ch from the hook, sl st in the next 12 chains.
Fasten off, leaving a tail for sewing.
Cap
(Use Yellow sport weight yarn and 1.5 mm hook)
- Rnd 1: Start with 6 sc in a MR. (6)
- Rnd 2: Inc in each st around. (12)
- Rnd 3: (1 sc, inc) x 6. (18)
- Rnd 4: (2 sc, inc) x 6. (24)
- Rnd 5: (3 sc, inc) x 6. (30)
- Rnds 6-8: Sc in each st around. (30)
- Rnd 9: To create a small brim: sc in the next st, (dc, inc in dc) x 2, dc, sc, sl st.
Fasten off and weave in the end. You can add a small knot or tassel to the top of the cap for extra detail if you wish.
Assembly and Finishing
- Sew the Eyes: Attach the red eyes to the front panel of the head. Position them between the BLO ridges created by Rows 7 and 15, approximately between rows 2 and 6 of the sections.
- Attach Head to Body: Using the long tail from the body, sew the head securely onto the body.
- Attach Arms: Take two of the blue limbs and sew them to the sides of the body, between Rnds 8 and 9.
- Attach Legs: Take the remaining two blue limbs and sew them to the bottom of the body, positioning them between Rnds 2 and 3.
- Add the Cap: Place the yellow cap on the robot’s head. You can either let it sit loosely or add a few stitches to secure it in place.
Congratulations on finishing your Robot Koljan! Using the recommended materials, your new friend should be about 19 cm (7.5 inches) tall. We’d love to see your creation! Share your photo and tag us on social media.
This free pattern was generously designed and provided by Maria Stupakova.