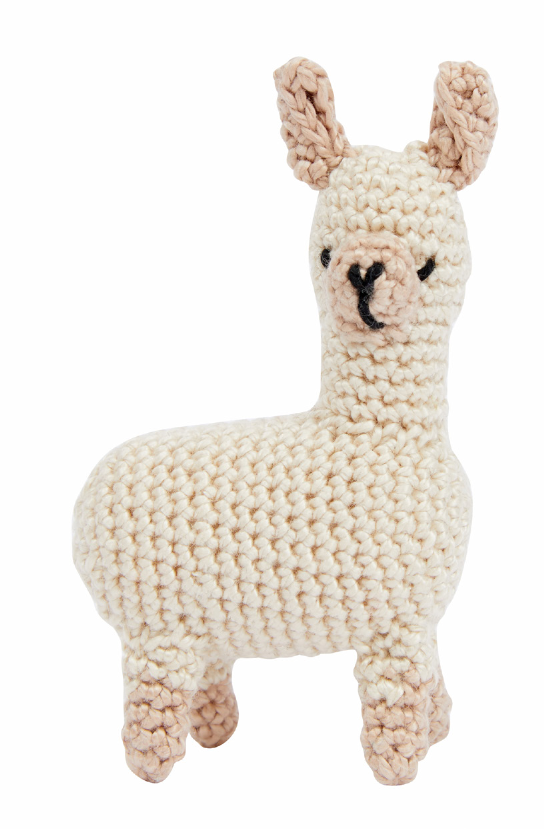
Make Your Own Adorable Crochet Llama!
Welcome to Crochetto! Are you ready to embark on a delightful crochet adventure? Today, we’re bringing you an adorable pattern to create your very own charming Llama! This lovable amigurumi project is perfect for adding a touch of whimsy to your home or gifting to someone special. With clear, detailed instructions, even those new to amigurumi will find joy in watching their little llama come to life. Grab your hook and yarn, and let’s get started on crafting this irresistibly cute companion!
Tool Kit / Supplies
- DMC Pearl Cotton Size 3
- 2.5MM Crochet Hook
- Llama Pattern
- Sewing Needle
- You will also need some toy stuffing – or why not stuff your llama with some left-over yarn?
Colors
| CODE N° | COLOUR | N° SKEINS* |
|---|---|---|
| A | ecru | x 2 |
| B | 842 | x 1 |
| C | 310 | x 1 |
Techniques
Chain Stitch
Slip Stitch
Single Crochet (US)
Single Crochet Decrease
Insert your hook into the next stitch. Loop the yarn around the groove of the hook, and pull it through the stitch. There are now two loops on your hook.

Repeat step 1. You now have three loops on the hook.
Loop the yarn around the hook again and pull it through all three loops on your hook. You have now made one decrease.
Magic Loop
Important Notes & Abbreviations
Your llama is worked in the round in separate pieces which are then sewn together at the end. These pieces include a head, body, legs, ears, and a nose. Remember to fill the llama’s body and head with stuffing as you make it.
To make the instructions easier to read, we will use some simple abbreviations:
- SC1 = make one single crochet stitch
- SC2 = make two single crochet stitches
- SC3 = make three single crochet stitches
- SC DEC = make one single crochet decrease
- CH = chain
- SL = slip stitch
Head
- Using the DMC pearl cotton in Colour A, make a foundation chain of 3 chain stitches.
- CH1 (this is your turning chain), SC2 into the first stitch, SC2. Turn your piece 180 degree, you will now work across the opposite edge of the foundation chain. SC2 into the first stitch, SC2. Join in the round by making a slip stitch into the first stitch of the round. (8 stitches.)
- Increase round: *SC1, SC2 into the next stitch*. Repeat the section inside the stars to the end of the round. (12 stitches.)
- Increase round: SC1, *SC2 into the next stitch, SC2*. Repeat the section inside the stars twice more, SC2 into the next stitch, SC1. (16 stitches.)
- Increase round: SC1, SC2 into the next stitch, SC7, SC2 into the next stitch, SC6. (18 stitches.)
- Work 3 rounds in SC.
- Decrease round: SC3, SC DEC, SC6, SC DEC, work in SC to the end of the round. (14 stitches.)
- Work 5 rounds in SC.
- Cut your yarn approx. 10cm/4″ from the last stitch. Pull on the loop on your hook until the end pops through – you have now secured your last stitch.
Body
- Using the DMC pearl cotton in Colour A, make a magic loop and SC6 around it. Join in the round by making a slip stitch into the first stitch of the round.
- Increase round: SC2 into every stitch of the round. (12 stitches.)
- Increase round: *SC1, SC2 into the next stitch*. Repeat the section inside the stars to the end of the round. (18 stitches.)
- Increase round: SC1, *SC2 into the next stitch, SC2*. Repeat the section inside the stars a further 4 times, SC2 into the next stitch, SC1. (24 stitches.)
- Increase round: SC4, *SC2 into the next stitch, SC7*. Repeat the section inside the stars once more, SC2 into the next stitch, SC3. (27 stitches.)
- Work 14 rounds in SC.
- Decrease round: SC4, *SC DEC, SC7*. Repeat the section inside the stars once more, SC DEC, SC3. (24 stitches.)
- Decrease round: SC1, *SC DEC, SC2*. Repeat the section inside the stars a further 4 times, SC DEC, SC1. (18 stitches.)
- Decrease round: *SC1, SC DEC*. Repeat the section inside the stars to the end of the round. (12 stitches.)
- Decrease round: *SC DEC*. Repeat the section inside the stars to the end of the round. (6 stitches.)
- Cut your yarn approx. 10cm/4″ from the last stitch. Pull on the loop on your hook until the end pops through – you have now secured your last stitch.
- To completely join the end of your llama’s body, thread your sewing needle with your yarn tail and pass your needle underneath each stitch in your last round. Pull your yarn tight, the stitches should pull together in a drawstring effect, sealing in any stuffing.
Legs (Make 4)
- Using the DMC pearl cotton in Colour B, make a magic loop and SC6 around it. Join in the round by making a slip stitch into the first stitch of the round.
- Work 3 rounds in SC.
- Cut Colour B and join Colour A. The remainder of the leg will be worked in Colour A only. Increase round: *SC2 into the next stitch, SC1*. Repeat the section inside the stars to the end of the round. (9 stitches.)
- Work 1 round in SC.
- Cut your yarn approx. 10cm/4″ from the last stitch. Pull on the loop on your hook until the end pops through you have now secured your last stitch.
Ears (Make 2)
- Using the DMC pearl cotton in Colour B, make a foundation chain of 5 chain stitches.
- Chain 1 (this is your turning chain), SC5. Turn your piece 180 degrees, you will now work across the opposite edge of the foundation chain. SC5. Join in the round by making a slip stitch into the first stitch of the round. (10 stitches.)
- Work 1 round in SC.
- Cut your yarn approx. 10cm/4″ from the last stitch. Pull on the loop on your hook until the end pops through – you have now secured.
Nose
- Using the DMC pearl cotton in Colour B, make a magic loop and SC6 around it. Join in the round by making a slip stitch into the first stitch of the round.
- Increase round: *SC2 into the next stitch, SC1*. Repeat the section inside the stars to the end of the round. (9 stitches.)
- Work 1 round in SC.
- Cut your yarn approx. 10cm/4″ from the last stitch. Pull on the loop on your hook until the end pops through – you have now secured your last stitch.
Assembly and Finishing
- Stitch the ears to either side of the top of the llama’s head, 1cm/0.4″ apart.
- Attach the nose to the front of the llama’s face so that the top edge is approx. 1.5cm/0.6″ from the top of the llama’s head.
- Use Colour B to stitch around the entire circumference of the nose to secure in place.
- Position the head on the top of the body and use Colour A to stitch around the entire circumference of the neck to secure in place.
- Add the eyes by threading your needle with a short length of Colour C and embroidering 1 vertical stitch either side of the llama’s nose, 6 rounds down from the top of the head. Embroider 2 diagonal stitches to form a ‘V’ for the nose and then make one long vertical stitch down to finish.
- Attach the 4 legs to the underside of the body. The front legs should touch each other and the back legs should be positioned 0.5cm/0.2″ apart. The front and the back legs should be approx. 2cm/0.8″ apart.
- Weave in any loose ends.
Conclusion
We hope you enjoyed crafting your very own adorable crochet llama! Each stitch brings this charming creature to life, adding personality and a handmade touch to your collection. Don’t forget to share your finished llama with the Crochetto community on social media – we love seeing your beautiful creations! Your support helps us continue to provide amazing patterns and resources. Happy crocheting!