How to Crochet a Skeleton Pillow (Mr. Bones)
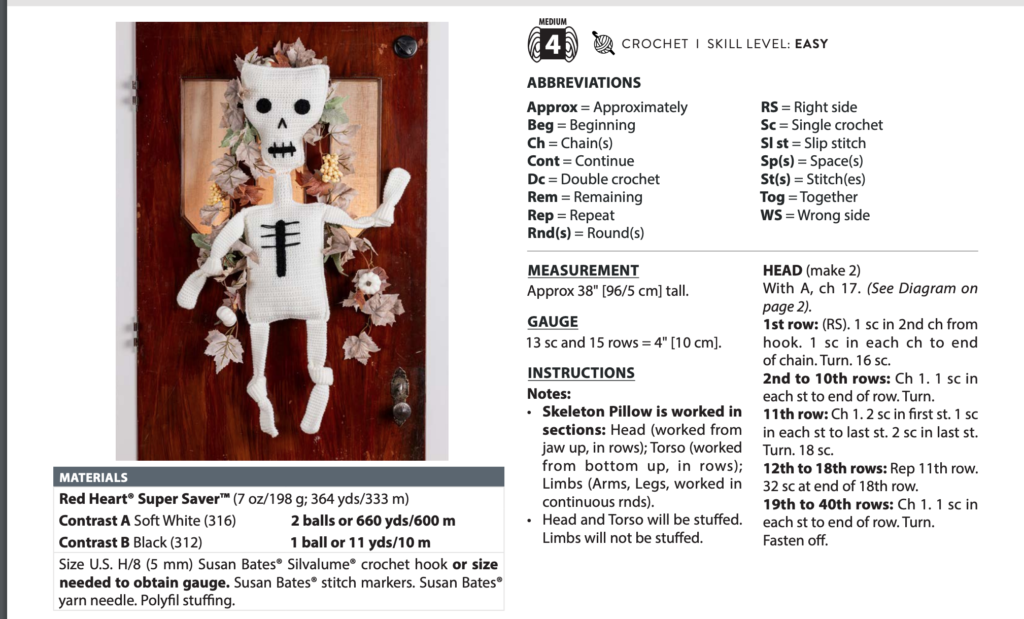
This guide will teach you how to crochet a fun and unique skeleton pillow, named Mr. Bones. With a finished height of approximately 38 inches (96.5 cm), this quirky pillow is the perfect addition to your Halloween décor or for anyone who loves fun crochet projects. We’ll break down the instructions into simple, easy-to-follow steps, making it beginner-friendly and suitable for crocheters at any level.
Materials You Will Need
To create your Mr. Bones skeleton pillow, gather the following materials:
- Yarn:
- Red Heart® Super Saver™:
- Contrast A (Soft White): 2 balls or 660 yds (600 m)
- Contrast B (Black): 1 ball or 11 yds (10 m)
- Crochet Hook: Size U.S. H/8 (5 mm)
- Stuffing: Poly-fil or other stuffing material to give your skeleton shape
- Additional Tools:
- Susan Bates® stitch markers
- Susan Bates® yarn needle for sewing pieces together
Abbreviations Used
- ch: Chain
- sc: Single crochet
- dc: Double crochet
- slst: Slip stitch
- sp(s): Space(s)
- st(s): Stitch(es)
- rnd(s): Round(s)
- RS: Right side
- WS: Wrong side
- tog: Together
- rep: Repeat
- cont: Continue
- beg: Beginning
Now that you have the basics, let’s start with the different sections of Mr. Bones.
Step 1: Crocheting the Head
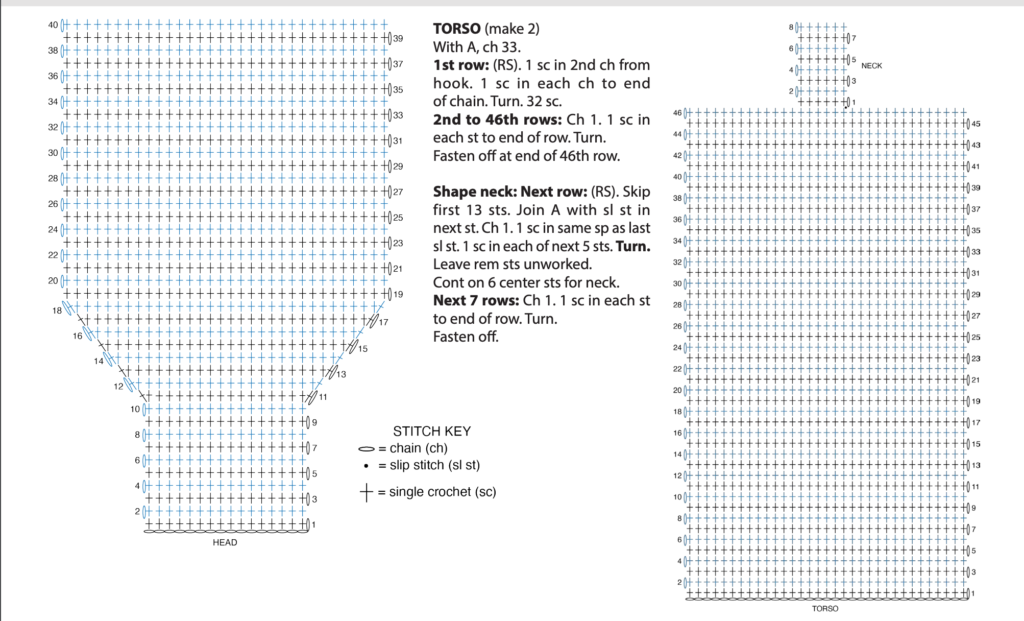
You will start by crocheting two identical pieces for the head. Follow these steps carefully to build your skeleton’s head shape.
Instructions for the Head:
- Begin by making a chain of 17 stitches using Contrast A (Soft White).
- Row 1: Make 1 single crochet (sc) in the second chain from the hook and 1 sc in each chain to the end (you will have 16 sc). Turn your work.
- Rows 2-10: Chain 1 at the beginning of each row, then make 1 sc in each stitch. Turn your work at the end of every row.
- Row 11: To start shaping the head, chain 1, then work 2 sc in the first stitch, sc across to the last stitch, and work 2 sc in the last stitch (18 sc total). Turn.
- Rows 12-18: Repeat the increases in each row by adding 2 sc (one in the first and one in the last stitch of each row) until you have 32 sc at the end of Row 18. Turn.
- Rows 19-40: Chain 1 at the beginning of each row and work 1 sc in every stitch across (32 sc). Fasten off when you finish Row 40.
Step 2: Crocheting the Torso
The torso is worked in two identical pieces, and later, these will be stitched together with stuffing inside.
Instructions for the Torso:
- Chain 33 stitches with Contrast A.
- Row 1: Make 1 sc in the second chain from the hook, and continue making 1 sc in each stitch across (32 sc). Turn your work.
- Rows 2-46: Chain 1, sc across the row, and turn at the end. Keep working sc stitches for 46 rows in total. Fasten off.
Shaping the Neck:
- To form the neck, skip the first 13 stitches from the beginning of your next row.
- Join Contrast A in the 14th stitch with a slip stitch.
- Chain 1, then make 1 sc in the same stitch where you joined, and continue sc in the next 5 stitches (6 sc total). Turn.
- Work 7 more rows of 6 sc, turning at the end of each row. Fasten off.
Step 3: Crocheting the Limbs
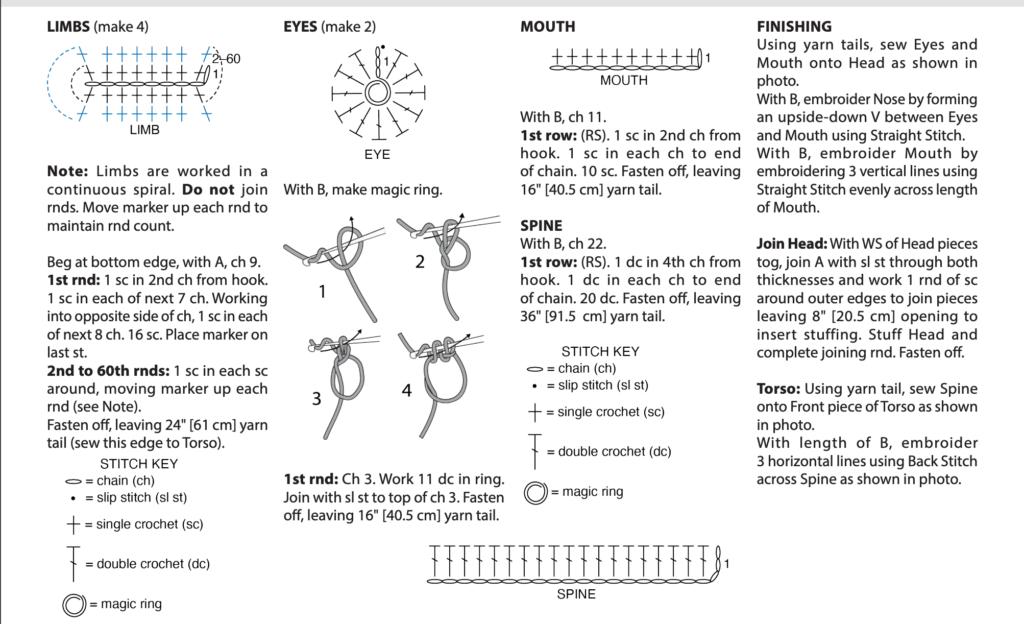
The arms and legs are worked in a continuous spiral, so there is no need to join rounds. You’ll make four limbs in total.
Instructions for the Limbs:
- Start by chaining 9 stitches using Contrast A.
- Round 1: Work 1 sc in the second chain from the hook and 1 sc in each of the next 7 chains. Now, crochet into the opposite side of the chain, making 1 sc in each of the next 8 stitches (16 sc total). Place a stitch marker to keep track of the rounds.
- Rounds 2-60: Continue working 1 sc in each stitch, moving your marker up as you complete each round. There are no increases or decreases here, so just focus on keeping your rounds even.
- Fasten off and leave a long yarn tail to sew the limbs to the torso.
Step 4: Crocheting the Facial Features (Eyes and Mouth)
Now, let’s crochet the facial details using Contrast B (Black).
Eyes (Make 2):
- Begin with a magic ring using Contrast B.
- Round 1: Chain 3, then work 11 double crochets (dc) into the ring. Join with a slip stitch to the top of the chain 3. Fasten off, leaving a 16-inch yarn tail for sewing the eyes onto the head.
Mouth:
- Chain 11 with Contrast B.
- Row 1: Work 1 sc in the second chain from the hook and in each chain across (10 sc). Fasten off, leaving a 16-inch yarn tail for sewing the mouth.
Step 5: Crocheting the Spine
The spine will be attached to the torso of Mr. Bones for an authentic skeleton look.
Instructions for the Spine:
- Chain 22 stitches with Contrast B.
- Row 1: Work 1 dc in the 4th chain from the hook and 1 dc in each chain across (20 dc). Fasten off, leaving a long tail for sewing the spine onto the torso.
Step 6: Assembling the Skeleton
Now that you have crocheted all the parts, it’s time to assemble Mr. Bones.
Head Assembly:
- Place the two head pieces together with the wrong sides facing.
- Using Contrast A, join the pieces by slip stitching through both layers, working 1 sc around the outer edge. Leave an 8-inch gap at the bottom for stuffing.
- Stuff the head with Poly-fil and then close the gap by continuing to sc around. Fasten off.
Torso Assembly:
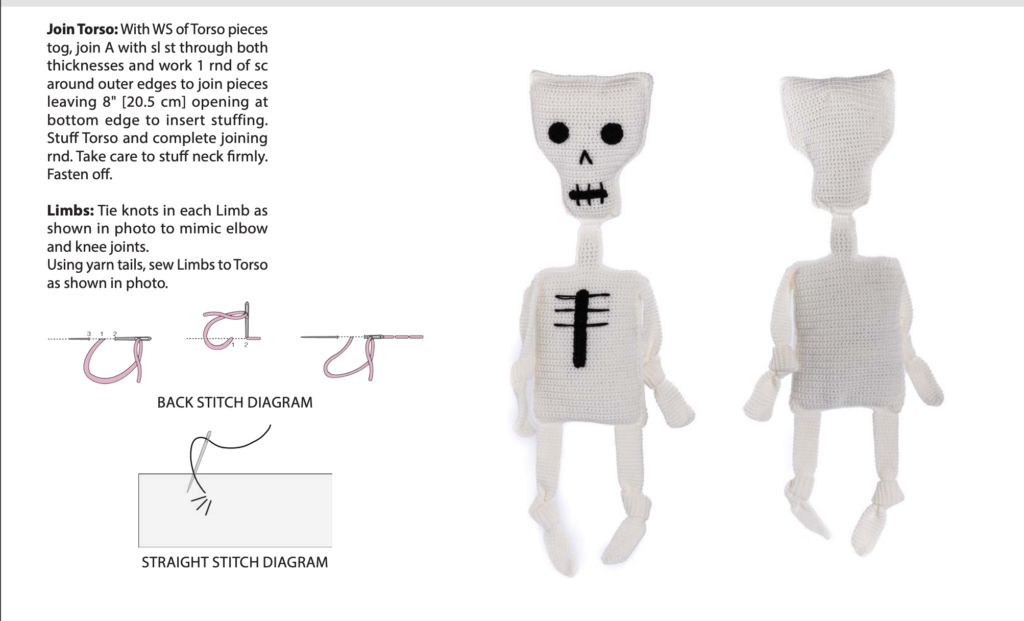
- Attach the crocheted spine to the front piece of the torso with the long tail.
- Using a yarn needle, embroider 3 horizontal lines across the spine to mimic vertebrae using Contrast B and a backstitch.
Joining the Torso:
- Place the torso pieces together with wrong sides facing.
- Join the two pieces with a slip stitch and work 1 sc around the outer edge, leaving an 8-inch gap at the bottom.
- Stuff the torso with Poly-fil, paying extra attention to stuffing the neck firmly.
- Close the gap with the remaining sc stitches and fasten off.
Attaching the Limbs:
- Knot the limbs to mimic elbows and knee joints as shown in the image.
- Sew the limbs onto the torso using the long yarn tails.
Attaching the Facial Features:
- Sew the eyes onto the head using the long yarn tails.
- Use Contrast B to embroider a nose between the eyes and the mouth by forming an upside-down “V” with straight stitches.
- Sew the mouth onto the face and use straight stitches to embroider vertical lines along the mouth to form teeth.
Final Touches and Finishing
Congratulations! You’ve now crocheted your very own Mr. Bones Skeleton Pillow. Make sure to check all seams and ensure everything is securely fastened. You can also adjust the stuffing if needed, making sure the head and torso are nicely shaped.
This project is perfect for beginners and makes a great decorative item for Halloween or even as a quirky year-round addition to your home.


