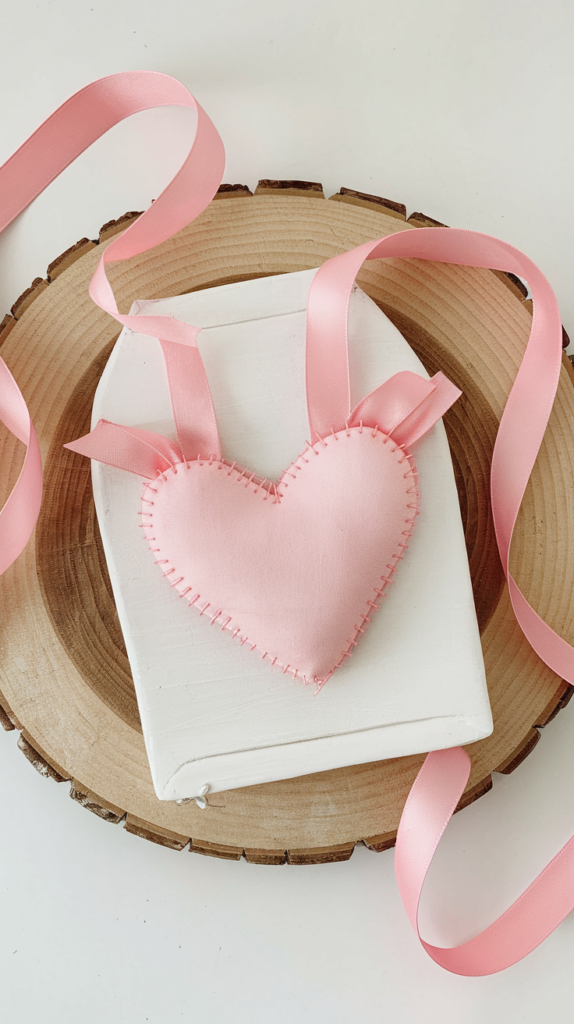
Stitch Up Some Sweetness: DIY Fabric Heart Craft That’s Bursting with Charm!

Isn’t this just the most adorable little craft you’ve ever seen? That sweet pink heart, nestled on a crisp white block and tied up with a pretty ribbon… it’s pure handmade charm! Whether you’re looking for a delightful Valentine’s Day decoration, a sweet gift for a friend, or just a fun and easy crafting project, this little fabric heart craft is absolutely perfect.
The best part? It’s surprisingly simple to make! We’re going to walk you through each step, so even if you’re new to sewing or fabric crafts, you’ll be able to create your own version of this darling decoration in no time. Get ready to stitch up some sweetness!
What You’ll Need to Gather:
Let’s gather our supplies. Here’s what you’ll need to create this charming fabric heart craft:
- Fabric for the Heart: Choose a soft, light pink fabric. Cotton, felt, or even a light linen would work beautifully. You won’t need much – scraps are perfect!
- Stuffing: Polyester fiberfill is ideal for stuffing your heart and giving it that plump, cuddly look.
- Embroidery Floss (Pink): Select a pink embroidery floss that is a slightly darker or contrasting shade than your heart fabric. This will make the blanket stitch stand out beautifully.
- Embroidery Needle: A needle with a larger eye to easily thread your embroidery floss.
- Scissors: Fabric scissors for cutting your fabric and regular scissors for paper.
- Paper for Template: A piece of paper to draw and cut out your heart template.
- Pencil or Fabric Marker: To trace your heart shape onto the fabric.
- Small Wooden Block: A small wooden block. The image shows a rectangular block, but you could use a square or even a slightly different shape if you like.
- White Paint: White acrylic paint or chalk paint to give your wooden block a fresh, clean look.
- Paintbrush: For painting your wooden block.
- Pink Ribbon: A soft pink satin ribbon, similar in color to the heart fabric, to tie around the block.
- Hot Glue Gun (Optional but Recommended): For quickly and easily attaching the ribbon and heart to the wooden block. Fabric glue can also be used, but hot glue is faster.
- Wooden Slice (Optional for Display): A wooden slice to display your finished craft, just like in the picture!
Let’s Get Crafting! Step-by-Step Instructions:
Step 1: Create Your Heart Template
- Draw a Heart: On your piece of paper, draw a heart shape that you like. Keep it a manageable size for your wooden block – about 3-4 inches wide is a good starting point. You can freehand it or find a heart template online to print and cut out.
- Cut Out the Template: Carefully cut out your paper heart template.
Step 2: Cut Out Your Fabric Hearts
- Fold Your Fabric: Fold your pink fabric in half, right sides together (if there is a right and wrong side to your fabric).
- Trace the Heart: Place your paper heart template on top of the folded fabric and trace around it with your pencil or fabric marker.
- Cut Out the Fabric Hearts: Carefully cut out the two heart shapes from the fabric, cutting through both layers at once. This will give you two identical fabric heart pieces.
Step 3: Blanket Stitch Around the Heart
- Thread Your Needle: Thread your embroidery needle with a length of pink embroidery floss. Separate the floss into fewer strands if you prefer a thinner stitch line – 3 strands often looks nice for this project. Tie a knot at the end of your floss.
- Start Stitching: Place your two fabric heart pieces together, wrong sides facing out. Starting at the top curve of the heart (or anywhere you feel comfortable), begin your blanket stitch.
- Bring the needle up through both layers of fabric from the back to the front, near the edge.
- Insert the needle back down into the fabric a short distance away from where you came up, going through both layers.
- Bring the needle up again through both layers, just a tiny bit further along the edge, making sure the needle comes up over the loop of floss from the previous stitch.
- Pull the floss gently to tighten the stitch and create the “blanket” edge.
- Repeat: Continue this blanket stitch all the way around the edge of the heart.
Step 4: Stuff Your Heart
- Leave an Opening: As you stitch around the heart, leave a small opening of about 1-2 inches unstitched. This is where you will stuff the heart.
- Stuff with Fiberfill: Take small pieces of polyester fiberfill and gently stuff them into the heart through the opening. Use your fingers or the end of a pencil to push the stuffing into all the corners and curves of the heart. Stuff it firmly enough to give it a nice plump shape, but not so tightly that it distorts the stitching.
- Close the Opening: Once you’re happy with the stuffing, continue your blanket stitch around the remaining opening to close it up completely. Tie off your floss securely at the back and trim the excess.
Step 5: Paint the Wooden Block
- Paint the Block: Using your white paint and paintbrush, paint all sides of your wooden block. You might need a couple of coats to get good coverage, depending on your paint and the wood.
- Let it Dry: Allow the white paint to dry completely.
Step 6: Attach the Ribbon
- Cut Ribbon Length: Cut a length of pink ribbon long enough to wrap around your wooden block and tie a bow at the top.
- Wrap and Glue (or Tie):
- Hot Glue Method: Use a dab of hot glue on the back of the wooden block to secure one end of the ribbon. Wrap the ribbon around the block, crossing over at the front and bringing the ends to the top. Secure the other end of the ribbon with another dab of hot glue on the back. Tie the ribbon ends into a pretty bow at the top.
- Tying Method: Wrap the ribbon around the block and simply tie it securely into a bow at the top, adjusting as needed.
Step 7: Attach the Heart to the Block
- Position the Heart: Decide where you want to position your fabric heart on the painted wooden block. In the image, it’s centered at the top, slightly overlapping the ribbon.
- Glue the Heart: Apply a small amount of hot glue (or fabric glue) to the back of the fabric heart.
- Press and Hold: Carefully position the heart onto the wooden block and press gently to secure it in place. Hold for a few seconds until the glue sets.
Voila! You Did It!
You’ve now created your own charming fabric heart craft! Isn’t it just delightful? You can display it on a shelf, a mantelpiece, or even use it as a sweet little paperweight. It’s also a wonderful handmade gift for someone special.
Tips for Extra Charm:
- Vary the Stitch Color: Experiment with different colors of embroidery floss for your blanket stitch – a slightly darker pink, a soft cream, or even a contrasting color like light grey could look lovely.
- Add Embellishments: You could add tiny buttons, beads, or even a little embroidered detail to your fabric heart for extra personality.
- Scented Heart: Add a few drops of essential oil (like lavender or rose) to the stuffing for a subtly scented heart.
- Different Fabrics: Try using patterned fabrics or different textures for your heart to create a variety of looks.
We hope you enjoyed making this sweet fabric heart craft! It’s a wonderful project that’s both easy and rewarding. Share your creations with us – we’d love to see your stitched-up sweetness! Happy crafting!