The Cutest No-Sew Crochet Axolotl: Axolotl Crochet Pattern Free
Hello, fellow crocheters! Are you looking for a project that’s maximum cute and minimum fuss? Then you have come to the right place! Today, we are making an absolutely adorable baby axolotl amigurumi, and the best part is that it requires absolutely NO SEWING!
That’s right—every part of this sweet little friend is crocheted directly onto the body. This makes it a quick, satisfying project that’s perfect for beginners or anyone who just wants to avoid picking up a yarn needle.
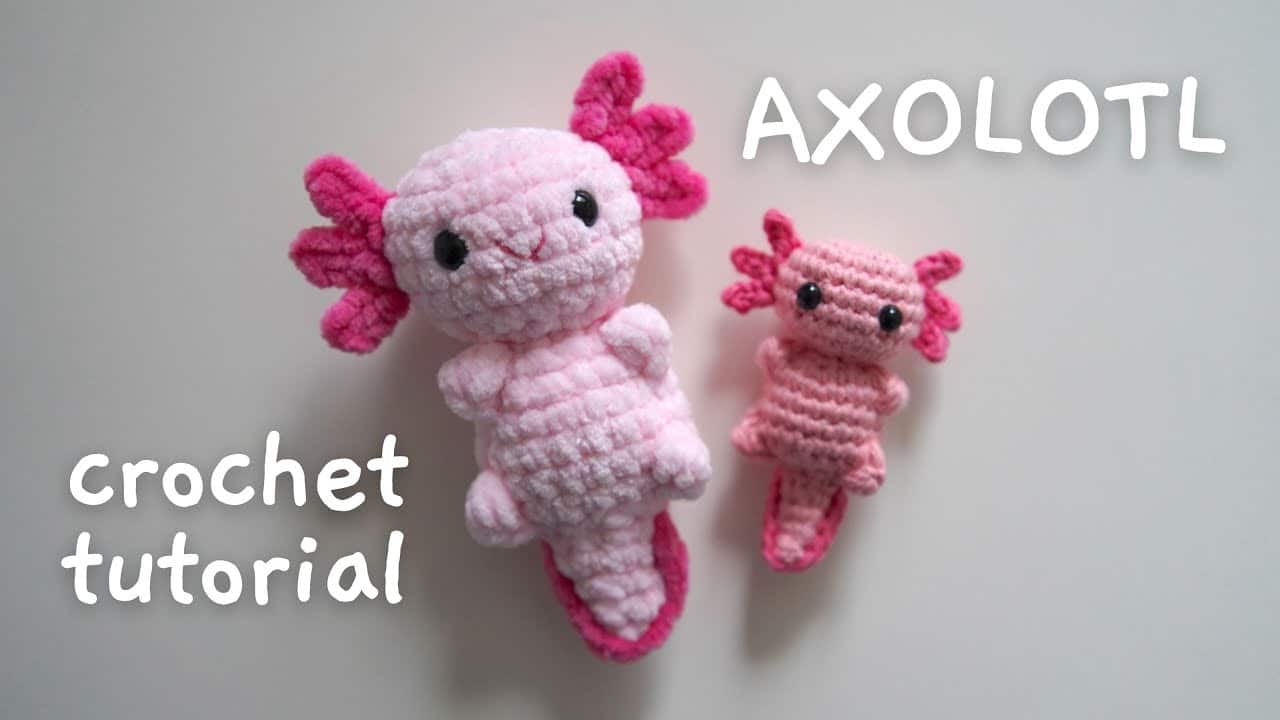
This pattern is wonderfully versatile. You can create a small, charming axolotl with standard cotton yarn or a big, squishy plushie with super bulky blanket yarn. They’re both made with the exact same pattern!
So, clear your table, grab your favorite hook, and let’s bring this little creature to life!

Gather Your Materials
You can choose your own adventure with the yarn for this project. Below are the materials for both a small cotton version and a large plush version.
For a Small Cotton Axolotl (like our pink example):
- Yarn: Medium Weight (4) 100% Cotton Yarn.
- Main Color (e.g., Light Pink)
- Accent Color (e.g., Dark Pink for gills)
- Crochet Hook: 2.75 mm
- Eyes: 6 mm plastic safety eyes
- Other: Polyester fiberfill for stuffing, scissors.
For a Large Plush Axolotl:
- Yarn: Super Bulky (6) Polyester “Blanket” Yarn.
- Main Color
- Accent Color
- Crochet Hook: 5.0 mm
- Eyes: 9 mm plastic safety eyes
- Other: Polyester fiberfill for stuffing, scissors.
Pattern Notes & Abbreviations (US Terms)
- This pattern is worked in continuous rounds. Do not join or turn unless instructed.
- Use a stitch marker to mark the beginning of each round.
- MC: Magic Circle (or Magic Ring)
- sc: single crochet
- inc: increase (work 2 sc in the same stitch)
- dec: decrease (work 1 sc over the next 2 stitches)
- Invisible Decrease: Insert hook into the front loop only of the next two stitches, yarn over, pull through both loops, yarn over, and pull through to finish the stitch. This is recommended for a cleaner look.
- ch: chain
- sl st: slip stitch
- FLO: front loops only
- Puff Stitch: A special stitch used for the arms and legs, explained in the pattern.
Let’s Start Crocheting!
Step 1: The Head, Body, and Tail (All in One Piece!)
Using your Main Color, we’ll start from the top of the head and work our way down.
- A Note on Starting: You can either use the Magic Circle (MC) method or the chain method. To use the chain method, ch 2 and work Round 1 into the second chain from the hook. The chain method is often easier with fluffy, plush yarn.
Rnd 1: Start with an MC, ch 1, and work 8 sc into the circle. (8 sts)
Rnd 2: Inc in each stitch around. (16 sts)
Rnd 3: [Sc in next st, inc] repeat 8 times. (24 sts)
Rnd 4-7: Sc in each stitch around. (24 sts)
Rnd 8: [Sc in next st, dec] repeat 8 times. (16 sts)
Step 2: Add the Safety Eyes
Now is the perfect time to add the face!
- Place the safety eyes between Rounds 5 and 6.
- Position them about 5 stitches apart.
- Once you are happy with the placement, secure the washers on the back. A handy tip if you struggle with the backings is to use a safety eye tool, which can make it much easier to snap them securely in place.
Step 3: Continue with the Body & Tail
Let’s get back to crocheting. Start stuffing the head firmly and continue to add stuffing as you go.
Rnd 9: Dec in each stitch around. (8 sts)
— Begin the Body Section —
Rnd 10: Working in the FLO for this round only: repeat 4 times. (12 sts)
Rnd 11: Now working in both loops again: repeat 4 times. (16 sts)
Rnd 12: [Sc in next 3 sts, inc] repeat 4 times. (20 sts)
Rnd 13-15: Sc in each stitch around. (20 sts)
Rnd 16: [Sc in next 3 sts, dec] repeat 4 times. (16 sts)
Before the next round, make sure the head and body are well-stuffed.
Rnd 17: Dec in each stitch around. (8 sts)

— Begin the Tail Section —
Rnd 18: Working in the FLO for this round only: sc in each stitch around. (8 sts)
Rnd 19: [Sc in next 2 sts, dec] repeat twice. (6 sts)
Rnd 20: Sc in each stitch around. (6 sts)
Rnd 21: [Sc in next st, dec] repeat twice. (4 sts)
Rnd 22: Sc in each stitch around. (4 sts)
The tail opening will be very small now. Fasten off, leaving a short tail. You can use your hook to tuck the yarn tail inside.
Step 4: Making the Arms & Legs (Puff Stitches)
Now for the magic of no-sew! We will create the limbs directly on the body. Use your Main Color.
To Make the Arms:
- Locate the side of the body between Rounds 11 and 12.
- Insert your hook under a stitch that spans both rounds. Attach your yarn by pulling a loop through.
- To create the Puff Stitch:
- Ch 1 to secure.
- [Yarn over, insert hook into the same space, yarn over, pull up a loop] repeat this 3 times. You will have 7 loops on your hook.
- Yarn over and pull through all 7 loops.
- Ch 1 to secure the puff stitch.
- Fasten off, leaving a long tail. Pull both the starting and ending yarn tails into the body to hide them.
- Repeat on the other side of the body to create the second arm.
To Make the Legs:
The legs are made exactly the same way as the arms, just further down the body.
- Locate the side of the body between Rounds 15 and 16.
- Follow the same Puff Stitch instructions as you did for the arms.
- Repeat on the other side for the second leg, and hide all yarn tails inside the body.

Step 5: Adding the Gills
Switch to your Accent Color. The gills are made of three small frills on each side of the head.
For the Right-Side Gills (working from top to bottom):
- Insert your hook into a stitch on the side of the head in Round 4. Attach your accent color yarn.
- Ch 4. Starting from the second chain from the hook, sl st in the next 3 chains.
- Insert your hook into the next round down (Round 5) and make a sl st to anchor the frill.
- Repeat Step 2: Ch 4, then sl st in the next 3 chains.
- Insert your hook into the next round down (Round 6) and make a sl st.
- Repeat Step 2 one last time. Fasten off, leaving a tail. Hide both yarn tails inside the head.
(A photo showing the placement and creation of the gills on the side of the head.)
For the Left-Side Gills (working from bottom to top):
Repeat the same process, but work from the bottom up. Start by attaching your yarn in Round 6, work your way up to Round 5, and finish in Round 4.
Step 6: Finishing with the Tail Frill
Using your Accent Color, we’ll add a simple frill around the tail.
- Attach your yarn to a stitch at the base of the tail (Round 18).
- Ch 1, then work 1 sc in each stitch down the side of the tail. The stitches may be tight, so just find a loop to work into.
- At the very tip of the tail, make a single chain (ch 1). This helps you turn the corner without the yarn pulling too tightly.
- Continue working 1 sc in each stitch up the other side of the tail.
- When you reach the top, sl st to the base. Fasten off and weave in your ends, hiding them inside the body.