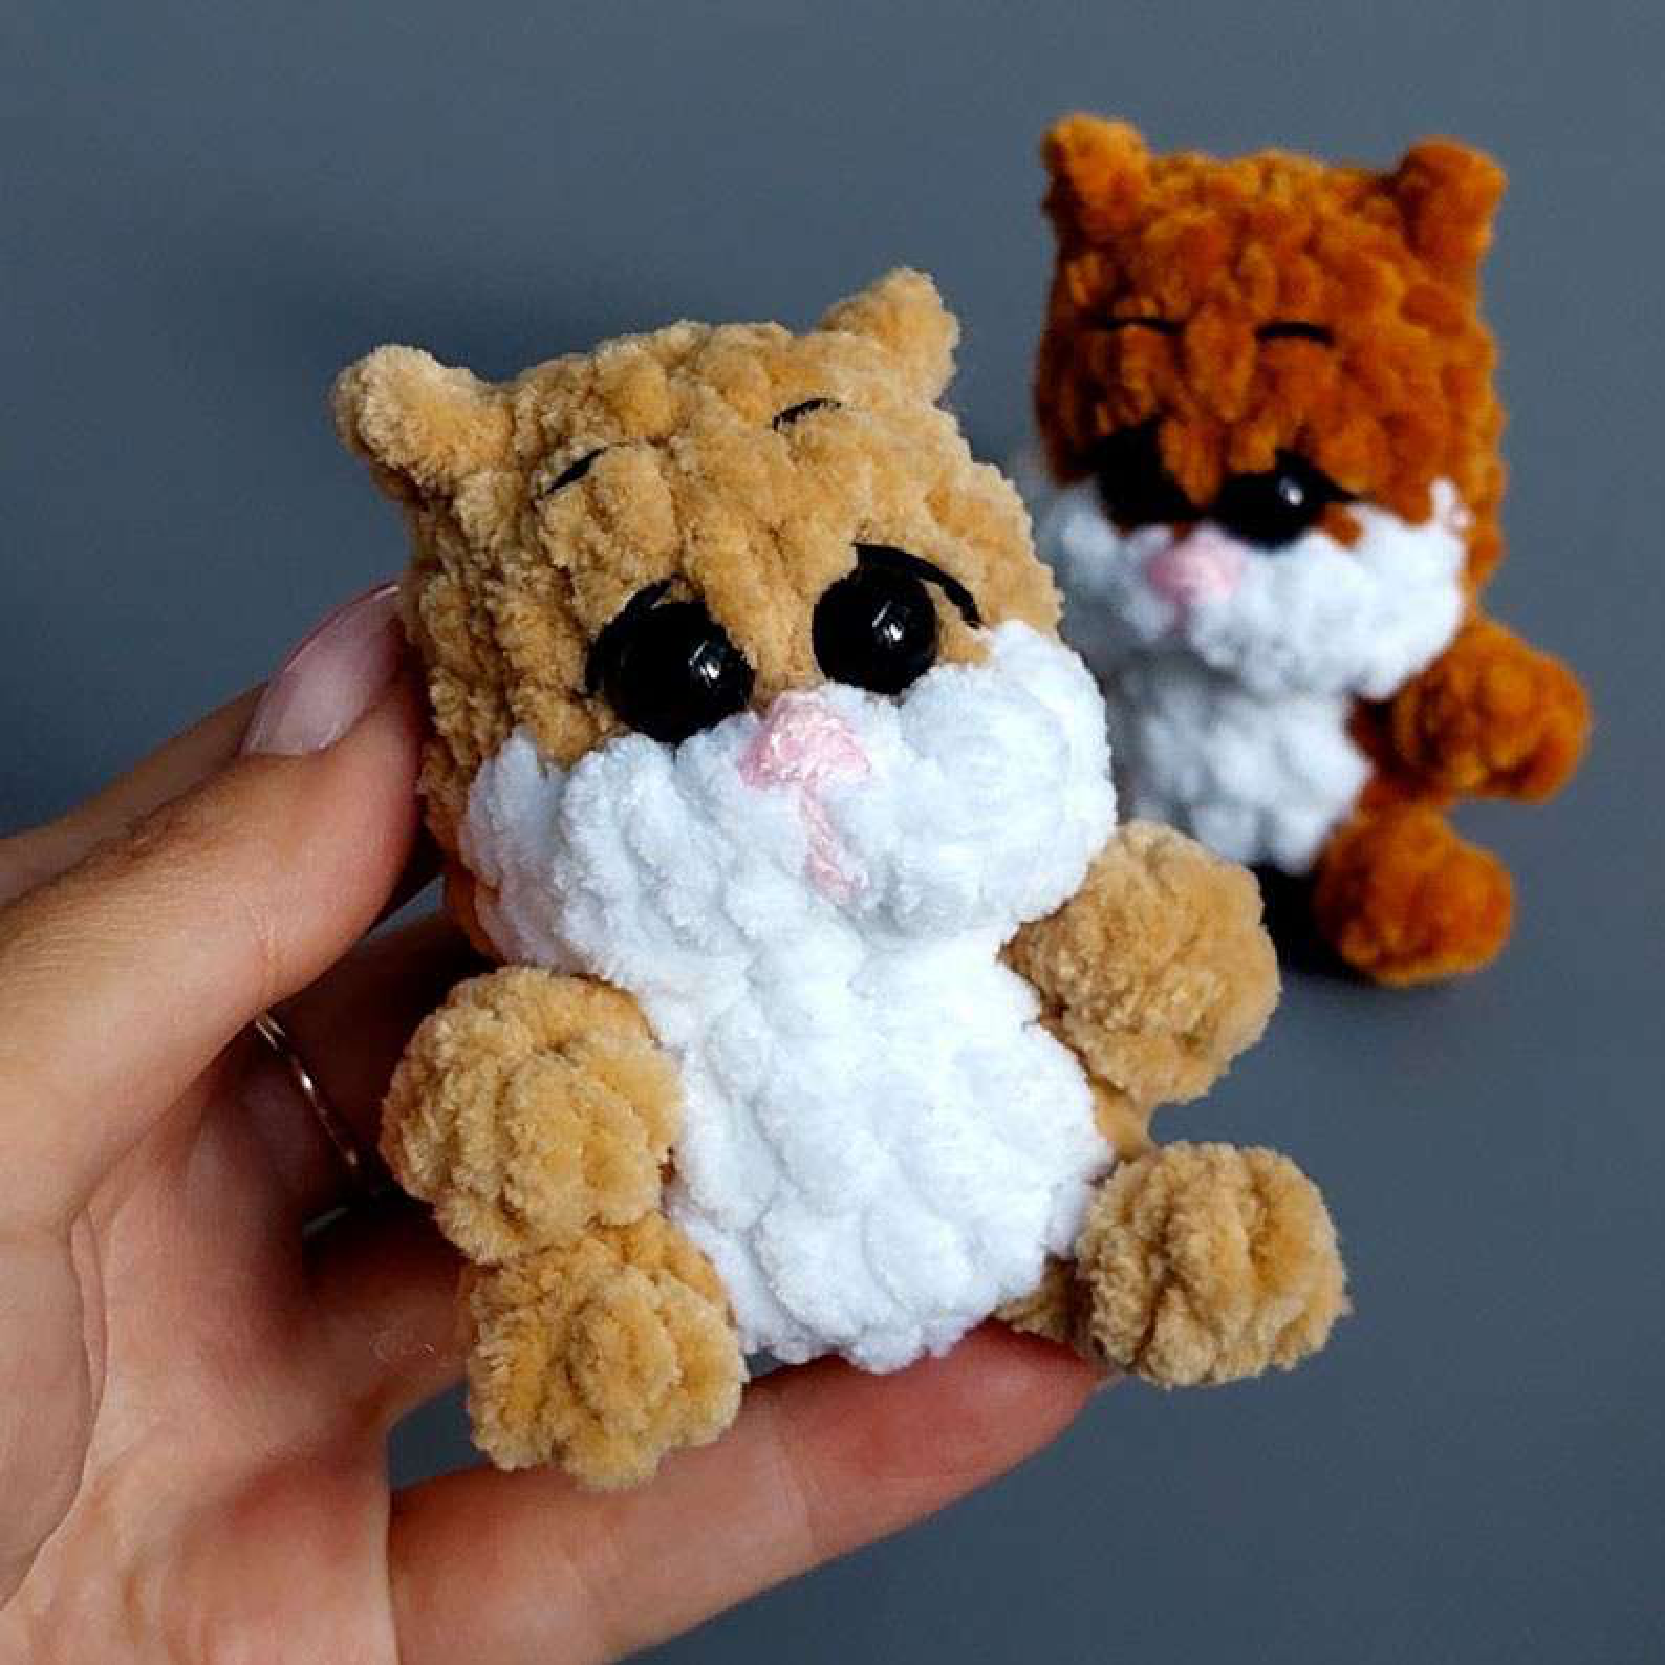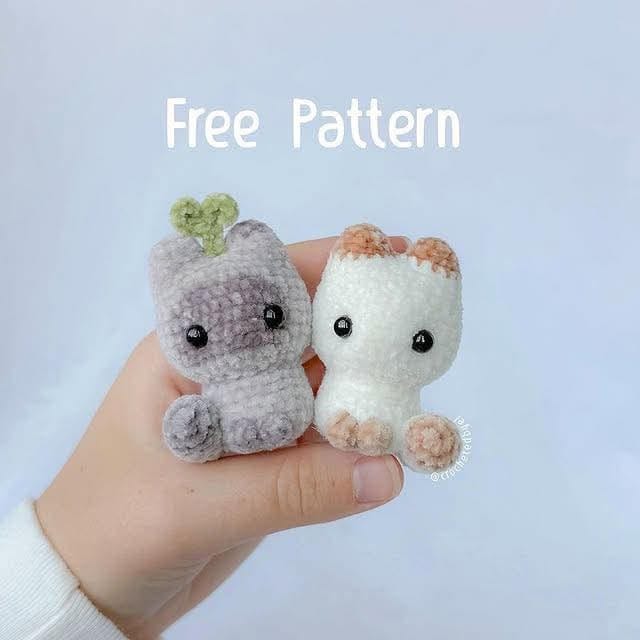
Adorable Amigurumi Cats Crochet Pattern for Beginners
Welcome to a delightful crochet adventure here at Crochetto! Get ready to create the cutest little feline friends with our adorable Amigurumi Cats pattern. Perfect for beginners and seasoned crocheters alike, this pattern guides you through crafting charming, low-sew kittens that are sure to melt hearts. Whether you’re making a gift for a loved one or a sweet companion for yourself, these little furballs are incredibly fun to make and customize.
Important Notes Before You Start
This pattern is for personal use only. Please do not copy, share, sell, or claim it as your own.
Selling finished products made from this pattern is permitted, with credit to @crochetedbyel.
This pattern uses US crochet terminology.
There is no slip stitch (SL ST) or chain 1 (CH 1) after each row.
You are welcome to use your preferred yarn and materials; just ensure your hook size matches your yarn weight to avoid gaps in your stitches.
This is a low-sew pattern, meaning the ears, head, and body are crocheted as one piece.
Bobble stitches are included in the pattern but are optional for beginners if you prefer to skip them.
Materials You’ll Need
Velvet yarn (size 1) in your desired color(s) for the cat, and green for the optional sprout accessory.
2.25 mm crochet hook
Poly-fil (stuffing)
Safety eyes
Tapestry needle
Scissors
Row marker
Abbreviations Used
MC: Magic Circle
SC: Single Crochet
INC: Increase (2 single crochet in the same stitch)
DEC: Decrease (single crochet two stitches together)
CH: Chain
FO: Fasten Off
BO: Bobble Stitch
HDC: Half Double Crochet
SL ST: Slip Stitch
The Pattern
Ears (Make 2)
R1: SC 6 in MC (6)
R2: (1 SC, 1 INC)x3 (9)
R3: SC around (9)
R4: (2 SC, 1 INC)x3 (12)
For the first ear, fasten off and leave a tail for sewing later. For the second ear, do not fasten off; you will continue directly into the head and body section.
Head and Body
After completing the second ear, you will now connect it to the first ear. Join the two ears together with a single crochet stitch to begin the head and body section.
R5-7 [3 rows]: SC around (26)
R8: (4 SC, 1 INC)x5, 1 SC (31)
R9: SC around (31)
R10: (3 SC, 1 INC)x7, 3 SC (38)
R11-14 [4 rows]: SC around (38)
At this point, place your safety eyes between rows 11 and 12, approximately 6 stitches apart.
R15: (2 SC, 1 DEC)x9, 1 DEC (28)
R16: (1 SC, 1 DEC)x9, 1 SC (19)
Begin to stuff the ears and head firmly with poly-fil.
R17: (2 SC, 1 DEC)x4, 1 SC, 1 DEC (14)
R18: (1 SC, 1 INC)x7 (21)
R19-20 [2 rows]: SC around (21)
R21: (2 SC, 1 INC)x7 (28)
R22: SC around (28)
R23: 18 SC, BO, 1 SC, BO, 7 SC (28) (Note: BO stands for Bobble Stitch)
R24: (1 SC, 1 DEC)x9, 1 SC (19)
Stuff the body firmly with poly-fil.
R25: DEC x9, 1 SC (10)
R26: DEC x5 (5)
Fasten off, then use your tapestry needle to sew the remaining hole closed.
Tail
R1: SC 5 in MC (5)
R2: INC around (10)
R3-8 [6 rows]: SC around (10)
R9: (1 SC, 1 DEC)x3, 1 SC (7)
R10-11 [2 rows]: SC around (7)
Fasten off, leaving a long tail for sewing.
Assembly Instructions
1. Sew the opening of the tail closed.
2. Sew the tail to the cat’s body between rows 21-23, positioning it one stitch away from where the paw/bobble stitch is located. Continue sewing the remaining rows of the tail securely to the body.
3. If you haven’t already, place the safety eyes between rows 11-12, ensuring they are about 6 stitches apart. Secure them with adhesive if desired for extra stability.
4. Optional: Use a small amount of blush or pink yarn to embroider a rosy cheek next to each eye for extra cuteness.
Optional Sprout Accessory
This little sprout is perfect for adding a touch of charm, especially if you’re making a “cat-fruit” or a garden-themed kitty!
Sprout Pattern
Step 1: CH 7
Step 2: In the second stitch from the hook, HDC x4 in the same stitch.
Step 3: SL ST in the following stitch. In the same stitch where you just created the slip stitch, CH 2.
Step 4: (Working into the chain 2) In the second stitch from the hook, HDC x4. SL ST in the following stitch.
Step 5: SL ST x3 down the chain.
Fasten off, leaving a long tail for sewing.
Sprout Assembly
Sew the sprout securely to the top of the cat’s head, centered between the ears.
We hope you loved creating your adorable Amigurumi Cat! There’s nothing quite like the joy of bringing a pattern to life with your own hands. We’d love to see your finished furballs! Share your creations with us on social media using CrochettoCats, and tag us so we can admire your work. Happy crocheting!