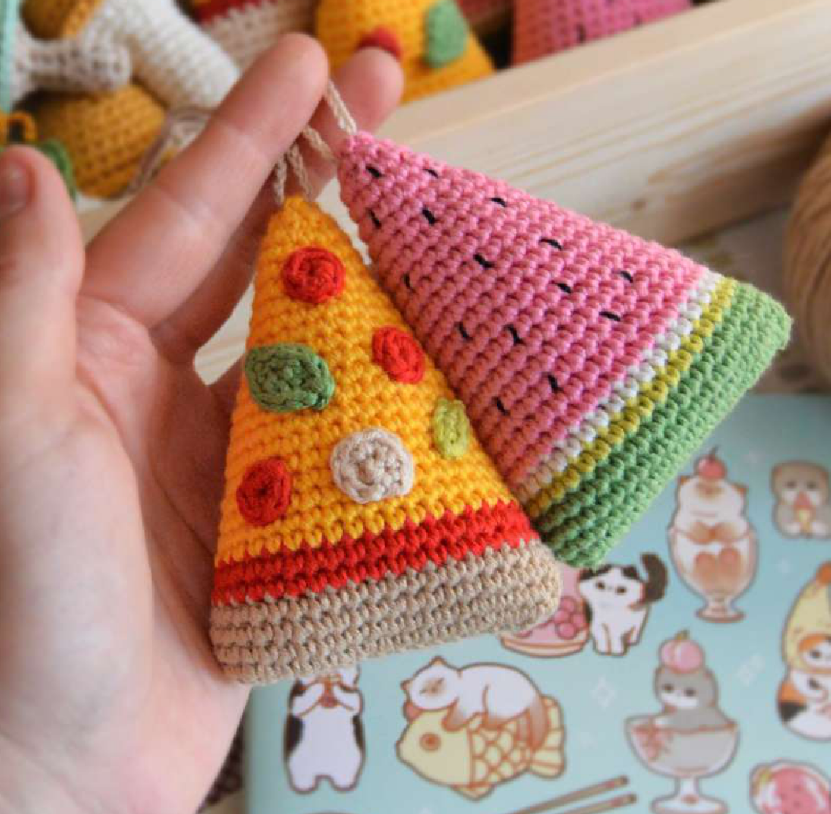
Free Crochet Watermelon & Pizza Keychains
Ready to add a splash of fun to your keys or bag? Today, we’re diving into a deliciously cute project: crochet watermelon and pizza slice keychains! These little amigurumi treats are quick to make, use up leftover yarn scraps, and are guaranteed to make you smile. Perfect for beginners and seasoned crocheters alike, this pattern will guide you step-by-step to create your own adorable foodie accessories.

Let’s grab our hooks and get started!
Materials You’ll Need
Here’s everything you’ll need to create these tasty-looking keychains. The finished size will be approximately 8.5 cm.

- Yarn: Gazzal Baby Cotton (or similar sport weight yarn) in the following colors:
- For Watermelon: Watermelon Pink (3468), Green (3448), Light Green (3457), White (3410)
- For Pizza: Beige (3424), Red (3443), Yellow (3417), Green (3448), Light Green (3457), Light Beige (3445)
- Crochet Hook: 2 mm
- Other Supplies:
- Tapestry needle
- Tailor’s pins & Scissors
- Sewing threads (beige, red, green)
- Fiberfill stuffing (sintepuh or holofiber)
- Black thread for watermelon seeds
- Sturdy cotton thread for keychain loop
Crochet Abbreviations (US Terms)
- ch: chain stitch
- sc: single crochet
- sl st: slip stitch
- dc: double crochet
- inc: increase (2 sc in the same stitch)
- dec: decrease (sc 2 stitches together)
- (…): total number of stitches in the row/round
- xN: repeat the instructions N times
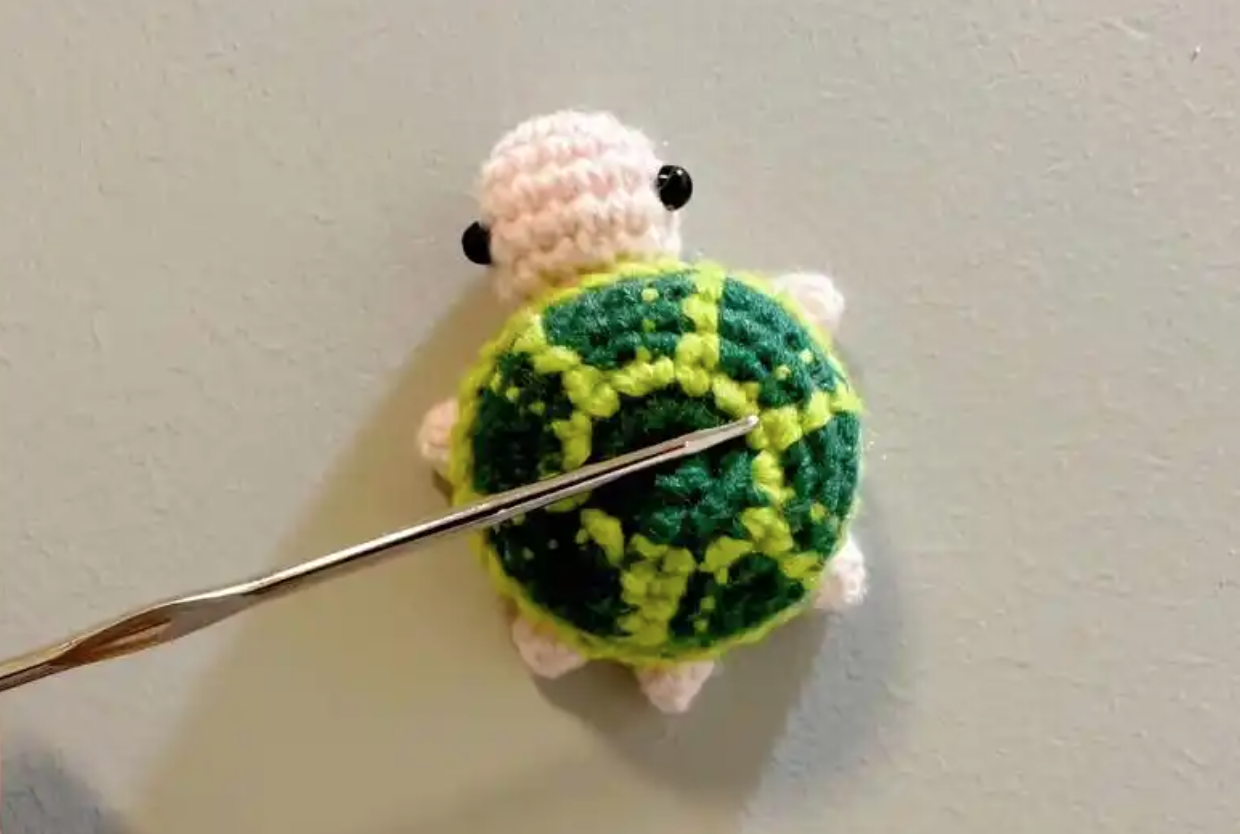
Part 1: Crochet Watermelon Keychain Pattern
Let’s start with the juicy watermelon slice! We will work in rows, creating a flat oval shape that we’ll fold and stuff.
Watermelon Slice Body
Start with Green yarn (Gazzal 3448).

- Row 1: Chain 17.
- Row 2: Starting from the 2nd chain from the hook, work 3 sc in the first stitch. Then, 15 sc across the chain. In the last chain, work 3 sc. Continue on the other side of the chain with 15 sc. (36)

- Row 3: (5 sc, inc) x 6. (42)
- Rows 4-5: sc in each stitch around for 2 rows. (42)
- Row 6: dec, 19 sc, dec, 19 sc. (40)

Tip: Change colors on the last yarn over of the final stitch in the row before the color change is indicated.
-
- Change to Light Green yarn (3457).

-
- Row 7: sc in each stitch around. (40)
- Change to White yarn (3410).

-
- Row 8: dec, 18 sc, dec, 18 sc. (38)
- Change to Pink yarn (3468).

- Row 9: sc in each stitch around. (38)
- Row 10: dec, 17 sc, dec, 17 sc. (36)
- Row 11: sc in each stitch around. (36)
- Row 12: dec, 16 sc, dec, 16 sc. (34)
- Row 13: dec, 15 sc, dec, 15 sc. (32)
- Row 14: sc in each stitch around. (32)
- Row 15: dec, 14 sc, dec, 14 sc. (30)
- Row 16: dec, 13 sc, dec, 13 sc. (28)
- Row 17: sc in each stitch around. (28)
- Row 18: dec, 12 sc, dec, 12 sc. (26)
- Row 19: dec, 11 sc, dec, 11 sc. (24)
Fold the piece in half and begin to stuff it firmly as you continue to close it.


Continue crocheting in the round to close the top.
- Row 20: sc in each stitch around. (24)
- Row 21: dec, 10 sc, dec, 10 sc. (22)
- Row 22: dec, 9 sc, dec, 9 sc. (20)
- Row 23: dec, 8 sc, dec, 8 sc. (18)
- Row 24: dec, 7 sc, dec, 7 sc. (16)
- Row 25: dec, 6 sc, dec, 6 sc. (14)
- Row 26: dec, 5 sc, dec, 5 sc. (12)
- Row 27: dec x 6. (6)
Cut the yarn, leaving a long tail. Thread the tail through the front loops of the remaining 6 stitches and pull tight to close the hole. Secure the yarn and weave in the end.


Finishing Touches
- Seeds: Using black thread, embroider small straight stitches or “V” shapes on the pink part to create seeds.


- Keychain Loop: Using a sturdy cotton thread, chain 80. Use a smaller hook to pull the chain through the center top of the watermelon slice.


- Tie a secure knot with the ends of the chain. Trim the excess. Gently pull the chain so the knot disappears inside the watermelon. Use your hook to tuck in any remaining ends.


Part 2: Crochet Pizza Keychain Pattern
Now for a slice of cheesy goodness! The construction is very similar to the watermelon.
Pizza Slice Body
Start with Beige yarn (3424) for the crust.

- Row 1: Chain 17.
- Row 2: Starting from the 2nd chain from the hook, work 3 sc in the first stitch. Then, 15 sc across the chain. In the last chain, work 3 sc. Continue on the other side of the chain with 15 sc. (36)

- Row 3: (5 sc, inc) x 6. (42)
- Rows 4-5: sc in each stitch around for 2 rows. (42)
- Row 6: dec, 19 sc, dec, 19 sc. (40)

-
- Change to Red yarn (3443) for the sauce.

- Row 7: sc in each stitch around. (40)
- Row 8: dec, 18 sc, dec, 18 sc. (38)
- Change to Yellow yarn (3417) for the cheese. Tie the loose ends on the inside.


- Row 9: sc in each stitch around. (38)
- Row 10: dec, 17 sc, dec, 17 sc. (36)
- Row 11: sc in each stitch around. (36)
- Row 12: dec, 16 sc, dec, 16 sc. (34)
- Row 13: dec, 15 sc, dec, 15 sc. (32)
- Row 14: sc in each stitch around. (32)
- Row 15: dec, 14 sc, dec, 14 sc. (30)
- Row 16: dec, 13 sc, dec, 13 sc. (28)
- Row 17: sc in each stitch around. (28)
- Row 18: dec, 12 sc, dec, 12 sc. (26)
- Row 19: dec, 11 sc, dec, 11 sc. (24)
Fold the piece in half and start stuffing.


- Row 20: sc in each stitch around. (24)
- Row 21: dec, 10 sc, dec, 10 sc. (22)
- Row 22: dec, 9 sc, dec, 9 sc. (20)
- Row 23: dec, 8 sc, dec, 8 sc. (18)
- Row 24: dec, 7 sc, dec, 7 sc. (16)
- Row 25: dec, 6 sc, dec, 6 sc. (14)
- Row 26: dec, 5 sc, dec, 5 sc. (12)
- Row 27: dec x 6. (6)
Cut yarn, leaving a tail. Weave the tail through the front loops of the final 6 stitches, pull tight to close, and secure the end inside the pizza slice.


Pizza Toppings (Appliqué)
Let’s make some tiny toppings to sew onto our pizza!
Basil Leaf
Use Green yarn (3448).

- Row 1: ch 6.
- Row 2: Starting in the 2nd ch from the hook: sl st, sc, dc, sc, sl st.
- Chain 2, then sl st into the 2nd chain from the hook (this creates a little point).
- Continue working on the other side of the foundation chain: sl st, sc, dc, sc, sl st.
- Join with a sl st to the base of the first stitch. Fasten off, leaving a tail for sewing.


Mushroom Slice
Use Light Beige yarn (3445).

- Row 1: ch 4.
- Row 2: Starting in the 2nd ch from hook, work 3 sc in each of the 3 chains. (9)
- Join with a sl st to form a semi-circle. Fasten off, leaving a tail for sewing.


Sausage/Pepperoni Slice
Use Red yarn (3443).

- Make a magic ring.
- Work 6 sc into the ring.
- Pull the ring tight and join with a sl st to the first sc. Fasten off, leaving a tail for sewing.


Greens/Bell Pepper
Use Light Green yarn (3457).

- Row 1: ch 4.
- Row 2: Starting in the 2nd ch from the hook, sc in each of the 3 chains. (3)
- Fasten off. Tie the starting and ending tails together and trim the ends. You can use sewing thread to attach this piece.


Assembly
Time to decorate your pizza!
- Arrange the toppings on the yellow “cheese” part of the pizza slice and pin them in place.


- Using matching sewing thread (or the yarn tails), carefully sew each topping onto the pizza.


- Keychain Loop: Just like with the watermelon, chain 80 with sturdy yarn. Pull it through the center of the pizza crust, tie a knot, and hide the ends inside.


Congratulations!
You’ve just crocheted your very own adorable foodie keychains! These make fantastic gifts, party favors, or just a cute accessory for yourself. Mix and match colors and toppings to create your own unique versions!