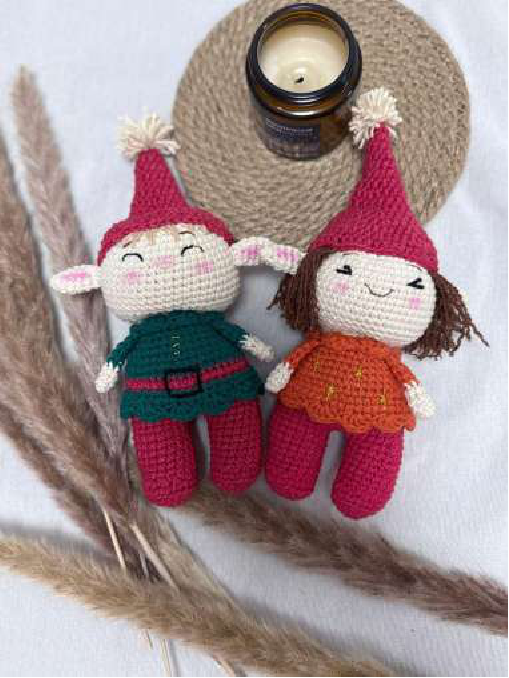
Crochet Adorable New Year’s Elf Pattern!
Welcome, fellow crocheters! Get ready to create a charming New Year’s Elf, perfect for the holidays or as a whimsical gift. This pattern assumes you have basic crochet skills and are familiar with terms like single crochet (sc), increase (inc), decrease (dec), and working in a magic ring.
This master class is my original design. Please respect intellectual property by not copying or reselling it. Thank you for your understanding! Your finished elf will be approximately 15-20 cm (6-8 inches) tall, depending on your yarn and tension.
Don’t forget to tag me when you share your finished works! Happy crocheting!
Materials You’ll Need:
- Yarn:
- YarnArt Jeans 26 (red) – approximately 0.5 skein
- YarnArt Jeans 03 (flesh-colored) – approximately 0.5 skein
- YarnArt Jeans (any color for clothing) – approximately 0.25 skein
- Black embroidery thread for eyes
- Acrylic powder or eyeshadow for face toning
- Gold thread for decorating clothes (optional)
- Scissors
- Crochet hook: 2.5 mm
- Stitch marker (highly recommended)
- Tapestry needle for sewing parts
- Stuffing material (polyester fiberfill)
Let’s Get Started! The Pattern:
Head (Make 1)
Using flesh-colored yarn:
- Start with 6 single crochets (sc) into a magic ring. (6 stitches)
- 6 increases (inc). (12 stitches)
- (1 sc, inc) repeat 6 times. (18 stitches)
- (2 sc, inc) repeat 6 times. (24 stitches)
- (3 sc, inc) repeat 6 times. (30 stitches)
- (4 sc, inc) repeat 6 times. (36 stitches)
- (5 sc, inc) repeat 6 times. (42 stitches)
- (6 sc, inc) repeat 6 times. (48 stitches)
- Sc in each stitch around for 9 rows. (48 stitches per row)
- (6 sc, 1 decrease (dec)) repeat 6 times. (42 stitches)
- (5 sc, dec) repeat 6 times. (36 stitches)
- (4 sc, dec) repeat 6 times. (30 stitches)
- (3 sc, dec) repeat 6 times. (24 stitches)
Fasten off, leaving a long tail for sewing the head to the body. Stuff the head firmly.
Eye Placement: Embroider or place safety eyes between rows 12 and 13, with approximately 7 single crochet stitches apart.

Ears (Make 2)
Using flesh-colored yarn:
- 6 sc into a magic ring. (6 stitches)
- Sc in each stitch around. (6 stitches)
- (1 sc, inc) repeat 3 times. (9 stitches)
- Sc in each stitch around for 2 rows. (9 stitches per row)
- (1 sc, dec) repeat 3 times. (6 stitches)
- Fold the ear flat and crochet 3 sc through both sides to close. (3 stitches)
Fasten off, leaving a long tail for sewing.
Legs (Make 2) and Body
Start with red yarn for the legs:
- 6 sc into a magic ring. (6 stitches)
- 6 increases (inc). (12 stitches)
- (1 sc, inc) repeat 6 times. (18 stitches)
- (2 sc, inc) repeat 6 times. (24 stitches)
- In back loops only (BLO): Sc in each stitch around. (24 stitches)
- 6 decreases (dec), then 12 sc. (18 stitches)
- Sc in each stitch around for 6 rows. (18 stitches per row)

Joining the Legs to Form the Body:
After finishing the first leg, cut the yarn and fasten off. For the second leg, do NOT cut the yarn. We will now join the legs to form the body.
-
- From the second leg, chain 3.
- Join to the first leg with a sc. Sc in each of the 18 stitches on the first leg.
- Sc into each of the 3 chain stitches.
- Sc in each of the 18 stitches on the second leg.
- Sc into each of the 3 chain stitches on the other side. (42 stitches total for the round)
- Sc in each stitch around for 5 rows. (42 stitches per row)
- Sc in back loops only (BLO) for this row. (42 stitches)
(Optional: If you want a dress for your elf like the orange one, change to your clothing color yarn here and crochet this row through BOTH loops, then proceed to the skirt instructions after the body is complete.)
-
- Change color to your chosen clothing color. Sc in each stitch around, working through BOTH loops. (42 stitches)
(If making a dress, this row would be BLO instead to create a ridge for the skirt.)
- (5 sc, dec) repeat 6 times. (36 stitches)
- Sc in each stitch around. (36 stitches)
- (4 sc, dec) repeat 6 times. (30 stitches)
- Sc in each stitch around. (30 stitches)
- (3 sc, dec) repeat 6 times. (24 stitches)
- Sc in each stitch around. (24 stitches)
Stuff the body firmly as you go. Fasten off and leave a long tail for sewing the head.
Collar
Locate the front loops of the row where you changed to clothing color (Row 11 of the body). Attach your clothing color yarn to one of these front loops.

Using the front loops, create a shell stitch border:
- Skip the next front loop.
- Into the following front loop: (4 double crochets (dc) into one stitch, 1 slip stitch (Sl St)).
- Skip the next front loop.
- Repeat step 2 all the way around the collar.
Fasten off and weave in ends.
Skirt (Optional – for a dress-wearing elf)

If you opted for a dress, you will have worked Row 11 of the body (42 sc) in BLO. Attach your clothing color yarn to the front loops of this row.
- Sc in each of the 42 front loops around. (42 stitches)
- Sc in each stitch around, working through both loops. (42 stitches)
Now, create the decorative skirt edge (similar to the collar):
- Skip the next stitch.
- Into the following stitch: (4 double crochets (dc) into one stitch, 1 slip stitch (Sl St)).
- Skip the next stitch.
- Repeat step 2 all the way around the skirt hem.
Fasten off and weave in ends.
Hat (Choose one option!)

First Hat Option (Pointier, using Single Crochet – sc)
Using red yarn:
- 6 sc into a magic ring. (6 stitches)
- Sc in each stitch around for 2 rows. (6 stitches per row)
- (1 sc, inc) repeat 3 times. (9 stitches)
- Sc in each stitch around for 3 rows. (9 stitches per row)
- (2 sc, inc) repeat 3 times. (12 stitches)
- Sc in each stitch around for 3 rows. (12 stitches per row)
- (3 sc, inc) repeat 3 times. (15 stitches)
- Sc in each stitch around for 3 rows. (15 stitches per row)
- (4 sc, inc) repeat 3 times. (18 stitches)
- Sc in each stitch around for 2 rows. (18 stitches per row)
- (5 sc, inc) repeat 3 times. (21 stitches)
- Sc in each stitch around. (21 stitches)
- (6 sc, inc) repeat 3 times. (24 stitches)
- (7 sc, inc) repeat 3 times. (27 stitches)
- (8 sc, inc) repeat 3 times. (30 stitches)
- (4 sc, inc) repeat 6 times. (36 stitches)
- Sc in each stitch around. (36 stitches)
- (5 sc, inc) repeat 6 times. (42 stitches)
- (6 sc, inc) repeat 6 times. (48 stitches)
- (7 sc, inc) repeat 6 times. (54 stitches)
- Sc in each stitch around. (54 stitches)
Fasten off, leaving a long tail for sewing.
Second Hat Option (Slightly more rounded, using Half Double Crochet – hdc)
Using red yarn:
- 6 sc into a magic ring. (6 stitches)
- 6 half double crochets (hdc). (6 stitches)
- (1 hdc, inc) repeat 3 times. (9 stitches)
- Hdc in each stitch around. (9 stitches)
- (2 hdc, inc) repeat 3 times. (12 stitches)
- Hdc in each stitch around. (12 stitches)
- (3 hdc, inc) repeat 3 times. (15 stitches)
- Hdc in each stitch around. (15 stitches)
- (4 hdc, inc) repeat 3 times. (18 stitches)
- Hdc in each stitch around. (18 stitches)
- (2 hdc, inc) repeat 6 times. (24 stitches)
- (3 hdc, inc) repeat 6 times. (30 stitches)
- (4 hdc, inc) repeat 6 times. (36 stitches)
- (5 hdc, inc) repeat 6 times. (42 stitches)
- (6 hdc, inc) repeat 6 times. (48 stitches)
- Hdc in each stitch around. (48 stitches)
Fasten off, leaving a long tail for sewing.
Arms (Make 2)
Start with flesh-colored yarn:
- 6 sc into a magic ring. (6 stitches)
- Sc in each stitch around for 3 rows. (6 stitches per row)
- Change to clothing color yarn: Sc in each stitch around for 4 rows. (6 stitches per row)
- Fold the arm flat and crochet 3 sc through both sides to close the opening. (3 stitches)

Fasten off, leaving a long tail for sewing.
Assembly – Bringing Your Elf to Life!
-
- Attach the Head: Using the long yarn tail from the head, sew the head securely to the body. Use a mattress stitch or whip stitch, going through the back loops of the body and corresponding stitches on the head. Stuff any gaps if needed before completely closing.
- Eye Indentation (Optional): If you want a more defined face, make a small eye indentation using a needle and thread. Insert the needle near one eye, come out near the other, pull gently, and secure.
- Face Toning: Use acrylic powder or eyeshadow to add rosy cheeks and gentle shading around the eyes for a cute look.
- Style the Hair: (Hair is not part of this pattern description, but if you add it, this is when you’d style it!)
- Sew on the Hat: Position the hat on the head and stitch it in place using the long tail from the hat.
- Attach the Ears: Pin the ears to the sides of the head, usually around rows 8-10 of the head, slightly angled. Sew them securely.

- Sew on the Arms: Attach the arms to the sides of the body, usually just below the collar. Make sure they are evenly placed.

Your adorable New Year’s Elf is now ready!
We’d love to see your finished creations! Please tag me when you publish your works on social media.
Happy crocheting!