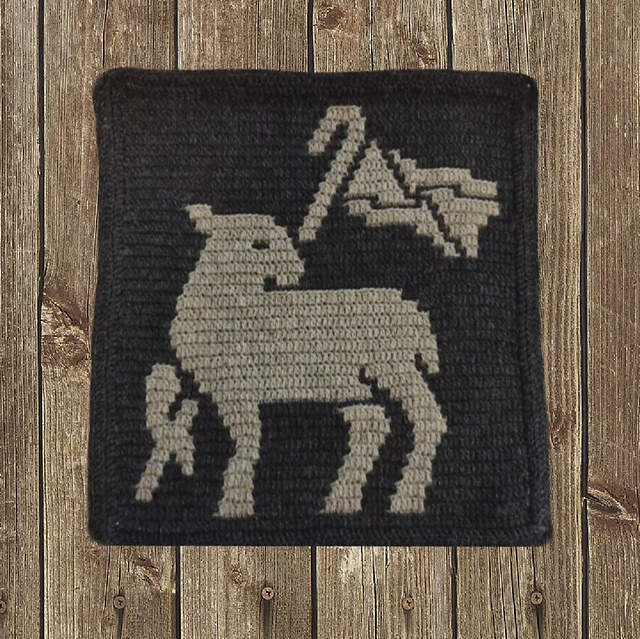
Woolly Wonders: How to Crochet a Stunning Mosaic Sheep Wall Hanging
“`html
How to Crochet a Mosaic Sheep Wall Hanging: Step-by-Step Overlay Pattern
Mosaic crochet is a fantastic technique for creating intricate, geometric designs without the need for complex color changes mid-row. This tutorial will guide you through creating a beautiful sheep-themed wall hanging using the overlay mosaic method. Whether you are a seasoned pro or new to mosaic crochet, this detailed guide will help you achieve a professional finish.
Materials Needed
To create this project, you will need the following supplies:
- Yarn: Two contrasting colors of 4-ply (fingering weight) yarn.
- Color A (Primary/Background): Approximately 80g (approx. 280 yards)
- Color B (Contrast): Approximately 40g (approx. 153 yards)
- Crochet Hooks:
- 3mm hook (for the main body of the square)
- 2mm hook (for the double border)
- Notions: Scissors and stitch markers.
Project Details
- Finished Size: Approximately 12.5″ wide x 13.5″ tall (without border).
- Gauge: 22 stitches and 22 rows = 10x10cm (4×4″) using a 3mm hook.
- Dimensions: 72 stitches wide by 77 rows tall.
Understanding the Technique (US Terms)
This pattern uses the Overlay Mosaic technique. The most important thing to remember is that you never turn your work; you always work from the right-hand side to the left-hand side on every row.
Key Stitches
- BS (Border Stitch): A single crochet (SC) worked through both loops of the stitch.
- SC (Single Crochet): Worked into the back loop only of the stitch in the row immediately below.
- DC (Double Crochet): Worked into the front loop only of the stitch two rows below. This is the “overlay” stitch that creates the pattern.
General Rules
- Every row is worked with only one color.
- Fasten off and snip the yarn after completing every row.
- Start every new row from the right-hand side.
Starting the Pattern
Row 1 (Color A): Chain 73. Work one SC in the 2nd chain from the hook and in each chain across (72 stitches total). Fasten off.
Row 2 (Color B): Attach yarn to the right-hand side. Work 1 BS, 70 SC in the back loops, 1 BS. Fasten off.
Row-by-Row Written Instructions
Follow these instructions carefully. All rows begin and end with a Border Stitch (BS) unless otherwise noted.
Rows 3 – 20
- Row 3 (A): BS. 70DC. BS.
- Row 4 (B): BS. 70SC. BS.
- Row 5 (A): BS. 18DC, 6SC, 5DC, 7SC, 11DC, 7SC, 16DC. BS.
- Row 6 (B): BS. 18SC, 6DC, 5SC, 6DC, 12SC, 6DC, 17SC. BS.
- Row 7 (A): BS. 18DC, 6SC, 5DC, 6SC, 12DC, 6SC, 11DC, 3SC, 3DC. BS.
- Row 8 (B): BS. 18SC, 5DC, 6SC, 5DC, 13SC, 5DC, 12SC, 3DC, 3SC. BS.
- Row 9 (A): BS. 17DC, 6SC, 5DC, 6SC, 13DC, 5SC, 11DC, 4SC, 3DC. BS.
- Row 10 (B): BS. 17SC, 5DC, 6SC, 5DC, 14SC, 5DC, 11SC, 3DC, 4SC. BS.
- Row 11 (A): BS. 17DC, 5SC, 5DC, 6SC, 14DC, 5SC, 5DC, 2SC, 3DC, 4SC, 4DC. BS.
- Row 12 (B): BS. 17SC, 4DC, 6SC, 5DC, 15SC, 4DC, 6SC, 2DC, 3SC, 3DC, 5SC. BS.
- Row 13 (A): BS. 16DC, 5SC, 5DC, 6SC, 14DC, 5SC, 6DC, 3SC, DC, 4SC, 5DC. BS.
- Row 14 (B): BS. 16SC, 4DC, 6SC, 5DC, 15SC, 4DC, 7SC, 3DC, SC, 3DC, 6SC. BS.
- Row 15 (A): BS. 15DC, 5SC, 5DC, 6SC, 15DC, 4SC, 7DC, 7SC, 6DC. BS.
- Row 16 (B): BS. 15SC, 5DC, 5SC, 6DC, 15SC, 4DC, 7SC, 6DC, 7SC. BS.
- Row 17 (A): BS. 14DC, 6SC, 4DC, 7SC, 15DC, 5SC, 6DC, 7SC, 6DC. BS.
- Row 18 (B): BS. 14SC, 6DC, 4SC, 7DC, 15SC, 5DC, 7SC, 6DC, 6SC. BS.
- Row 19 (A): BS. 14DC, 7SC, 3DC, 8SC, 14DC, 6SC, 5DC, 8SC, 5DC. BS.
- Row 20 (B): BS. 15SC, 6DC, 4SC, 7DC, 14SC, 6DC, 5SC, 3DC, SC, 4DC, 5SC. BS.
Rows 21 – 40
- Row 21 (A): BS. 15DC, 7SC, 3DC, 8SC, 13DC, 7SC, 3DC, 4SC, DC, 4SC, 5DC. BS.
- Row 22 (B): BS. 16SC, 6DC, 24SC, 7DC, 3SC, 3DC, 2SC, 4DC, 5SC. BS.
- Row 23 (A): BS. 16DC, 8SC, 3DC, 27SC, 2DC, 3SC, DC, 5SC, 5DC. BS.
- Row 24 (B): BS. 17SC, 7DC, 3SC, 27DC, 6SC, 5DC, 5SC. BS.
- Row 25 (A): BS. 17DC, 9SC, DC, 29SC, 3DC, 6SC, 5DC. BS.
- Row 26 (B): BS. 18SC, 8DC, 3SC, 27DC, 3SC, 6DC, 5SC. BS.
- Row 27 (A): BS. 15DC, 2SC, DC, 10SC, DC, 28SC, 2DC, 6SC, 5DC. BS.
- Row 28 (B): BS. 15SC, 2DC, 2SC, 9DC, SC, 28DC, 3SC, 4DC, 6SC. BS.
- Row 29 (A): BS. 15DC, 3SC, DC, 40SC, DC, 4SC, 6DC. BS.
- Row 30 (B): BS. 15SC, 3DC, SC, 40DC, 11SC. BS.
- Row 31 (A): BS. 15DC, 45SC, 10DC. BS.
- Row 32 (B): BS. 15SC, 45DC, 10SC. BS.
- Row 33 (A): BS. 15DC, 46SC, 9DC. BS.
- Row 34 (B): BS. 16SC, 45DC, 9SC. BS.
- Row 35 (A): BS. 16DC, 45SC, 9DC. BS.
- Row 36 (B): BS. 16SC, 45DC, 9SC. BS.
- Row 37 (A): BS. 16DC, 45SC, 9DC. BS.
- Row 38 (B): BS. 18SC, 42DC, 10SC. BS.
- Row 39 (A): BS. 18DC, 42SC, 10DC. BS.
- Row 40 (B): BS. 21SC, 39DC, 10SC. BS.
Rows 41 – 60
- Row 41 (A): BS. 21DC, 39SC, 10DC. BS.
- Row 42 (B): BS. 45SC, 14DC, 11SC. BS.
- Row 43 (A): BS. 39DC, 4SC, 2DC, 14SC, 11DC. BS.
- Row 44 (B): BS. 39SC, 4DC, 2SC, 13DC, 12SC. BS.
- Row 45 (A): BS. 38DC, 20SC, 12DC. BS.
- Row 46 (B): BS. 38SC, 19DC, 13SC. BS.
- Row 47 (A): BS. 7DC, 2SC, DC, 3SC, 25DC, 19SC, 13DC. BS.
- Row 48 (B): BS. 7SC, 2DC, 2SC, 2DC, 26SC, 17DC, 14SC. BS.
- Row 49 (A): BS. 7DC, 3SC, DC, 4SC, 24DC, 17SC, 14DC. BS.
- Row 50 (B): BS. 7SC, 3DC, 3SC, 2DC, 25SC, 4DC, 3SC, 8DC, 15SC. BS.
- Row 51 (A): BS. 7DC, 5SC, DC, 5SC, 18DC, 3SC, DC, 15SC, 15DC. BS.
- Row 52 (B): BS. 7SC, 5DC, 2SC, 4DC, 18SC, 3DC, 2SC, 13DC, 16SC. BS.
- Row 53 (A): BS. 5DC, 8SC, DC, 13SC, 8DC, 4SC, 2DC, 16SC, 13DC. BS.
- Row 54 (B): BS. 5SC, 8DC, 2SC, 12DC, 8SC, 3DC, 5SC, 14DC, 13SC. BS.
- Row 55 (A): BS. 3DC, 11SC, DC, 15SC, 4DC, 4SC, 5DC, 15SC, 12DC. BS.
- Row 56 (B): BS. 3SC, 11DC, 2SC, DC, 9SC, 4DC, 4SC, 3DC, 17SC, 4DC, 12SC. BS.
- Row 57 (A): BS. 3DC, 12SC, DC, SC, DC, 7SC, DC, 5SC, 2DC, 4SC, 17DC, 5SC, 11DC. BS.
- Row 58 (B): BS. 11SC, 4DC, 5SC, 5DC, 8SC, 3DC, 34SC. BS.
- Row 59 (A): BS. 3DC, 7SC, DC, 6SC, DC, SC, DC, 11SC, DC, 4SC, 34DC. BS.
- Row 60 (B): BS. 3SC, 7DC, 8SC, DC, 2SC, 9DC, 2SC, 3DC, 35SC. BS.
Rows 61 – 77
- Row 61 (A): BS. 3DC, 17SC, DC, 9SC, DC, 4SC, 35DC. BS.
- Row 62 (B): BS. 8SC, 12DC, 2SC, 7DC, 2SC, 3DC, 36SC. BS.
- Row 63 (A): BS. 8DC, 13SC, DC, 7SC, DC, 4SC, 36DC. BS.
- Row 64 (B): BS. 18SC, 3DC, 2SC, 5DC, 2SC, 3DC, 37SC. BS.
- Row 65 (A): BS. 18DC, 4SC, DC, 5SC, DC, 4SC, 37DC. BS.
- Row 66 (B): BS. 21SC, DC, 2SC, 3DC, 2SC, 3DC, 38SC. BS.
- Row 67 (A): BS. 21DC, 2SC, DC, 3SC, DC, 4SC, 2DC, 3SC, 33DC. BS.
- Row 68 (B): BS. 25SC, DC, 2SC, 3DC, 3SC, 3DC, 33SC. BS.
- Row 69 (A): BS. 25DC, SC, DC, 4SC, 2DC, 4SC, 33DC. BS.
- Row 70 (B): BS. 27SC, 3DC, 3SC, 3DC, 34SC. BS.
- Row 71 (A): BS. 27DC, 3SC, 2DC, 4SC, 34DC. BS.
- Row 72 (B): BS. 27SC, 3DC, 2SC, 3DC, 35SC. BS.
- Row 73 (A): BS. 27DC, 8SC, 35DC. BS.
- Row 74 (B): BS. 28SC, 6DC, 36SC. BS.
- Row 75 (A): BS. 28DC, 6SC, 36DC. BS.
- Row 76 (B): BS. 70SC. BS.
- Row 77 (A): BS. 70DC. BS.
Adding the Double Border
To hide the yarn ends and give your project a clean, professional edge, a double border is recommended. Switch to your 2mm hook to prevent the border from becoming wavy.
Step 1: Back Side Border
Starting on the back side at the bottom of the project, work front post double crochet (fpDC) around each stitch. When you reach a corner: work 2 fpDC, chain 2, then 2 fpDC around the next stitch. Continue this around all four sides until the first round is complete.
Step 2: Finishing the Back Border
Work a round of standard single crochet (SC) through both loops in every stitch around. In the corner chain-2 spaces, work (2 SC, ch 2, 2 SC).
Step 3: Front Side Border
Repeat Step 1 and Step 2 on the front side of the project.
Step 4: Joining the Borders
Join the front and back borders together using either a single crochet or a slip stitch. In the corner spaces, work (2 SC, ch 2, 2 SC) to ensure the corners remain square and flexible.
Finishing Touches
Once your border is complete, weave in any remaining ends. You can now mount your sheep mosaic on a wooden dowel or a canvas frame to create a beautiful piece of fiber art for your home!
“`