Create Your Own Little Farmyard Friend: Free Adorable Amigurumi Chicken Pattern
How to Crochet a Cute Amigurumi Chicken: Free Pattern and Step-by-Step Guide
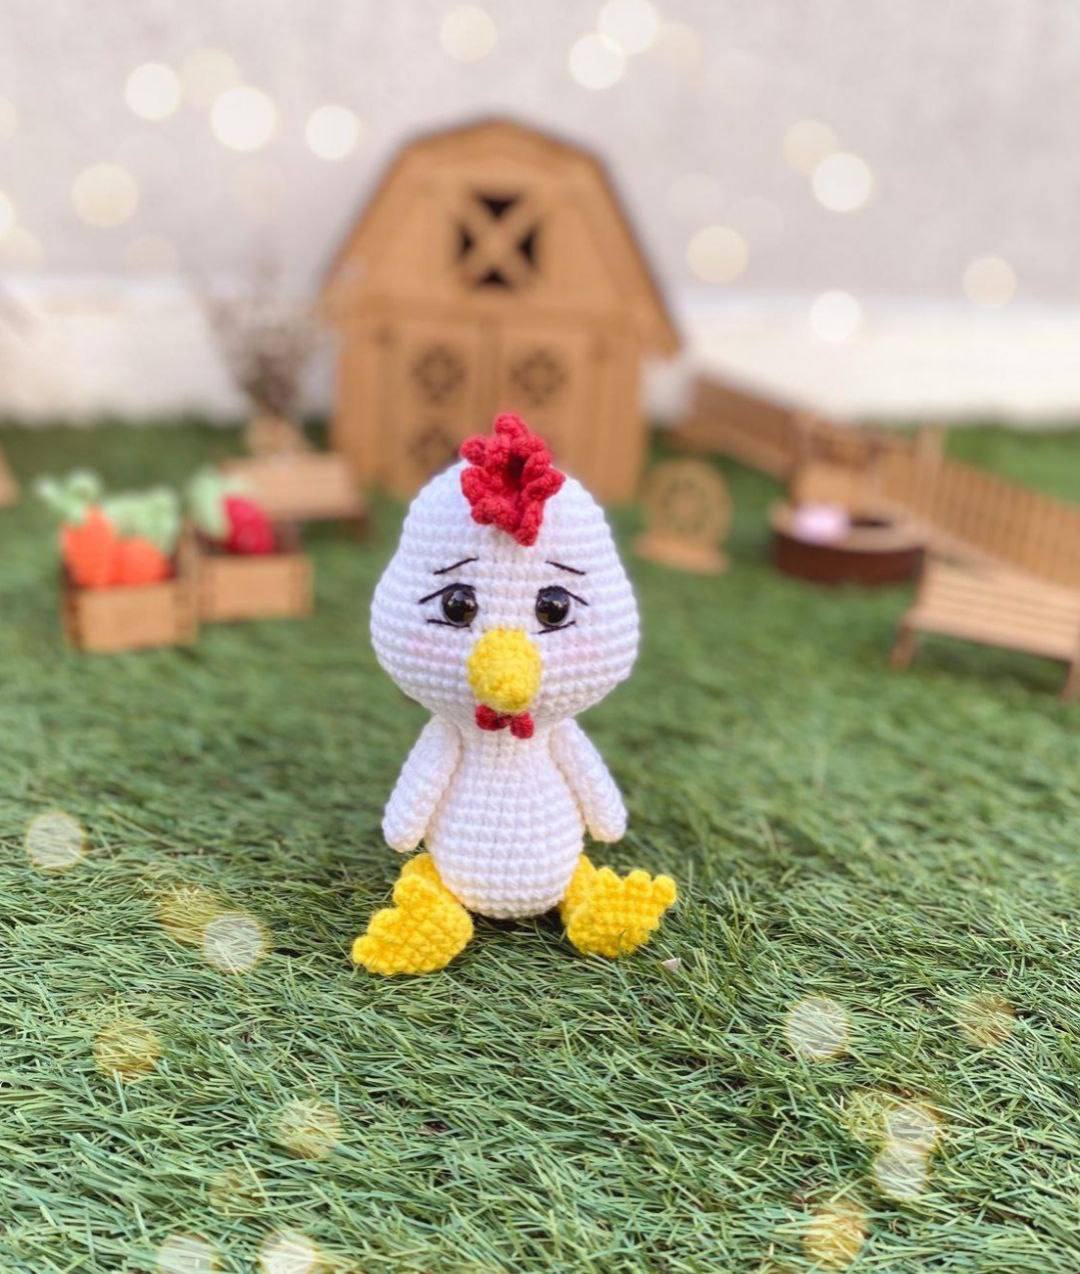
Looking for a charming farmyard addition to your crochet collection? This free amigurumi chicken crochet pattern is an adorable, beginner-friendly project that brings a sweet little hen to life. With plump cheeks, cute floppy legs, a bright red comb, and a tiny wattle, this handmade chicken is perfect for spring decor, nursery toys, or handmade gifts.
This tutorial uses standard US crochet terms and guides you step-by-step through creating the head, body, beak, wings, legs, and facial embroidery details.
Skill Level
Easy / Intermediate: Requires basic knowledge of working in the round, single crochet stitches, increases, decreases, and simple assembly.
Materials & Tools
- Yarn: Sport weight or fine cotton/acrylic blend yarn in:
- White (Body, Head, Wings, Tail)
- Yellow (Beak, Legs, Feet)
- Red (Comb, Wattle)
- Embroidery Floss: Black thread (for eyebrows/eyelashes) and white thread (for eye highlights)
- Crochet Hook: 2.0 mm (US Size B-1) or size appropriate for your yarn
- Safety Eyes: 9 mm safety eyes
- Stuffing: Polyester fiberfill
- Notions: Yarn needle, stitch markers, straight pins, and scissors
Crochet Abbreviations (US Terms)
- MR: Magic Ring
- ch: Chain
- sc: Single crochet
- inc: Increase (work 2 single crochets into the same stitch)
- dec: Invisible decrease (crochet 2 stitches together)
- sl st: Slip stitch
- BLO: Back loop only
- FLO: Front loop only
- st(s): Stitch(es)
- [ ] x N: Repeat instructions in brackets N times
- ( ): Total stitch count at the end of the round
Step-by-Step Amigurumi Chicken Pattern
1. Head and Body (Worked as One Piece)
Using White yarn. Work in continuous spiral rounds.
- Round 1: Work 6 sc into a MR (6)
- Round 2: 6 inc (12)
- Round 3: [1 sc, inc] x 6 (18)
- Round 4: [2 sc, inc] x 6 (24)
- Round 5: [3 sc, inc] x 6 (30)
- Round 6: [4 sc, inc] x 6 (36)
- Rounds 7–10 (4 rounds): 36 sc (36)
- Round 11 (Cheek Expansion): 6 sc, 6 inc, 12 sc, 6 inc, 6 sc (48)
- Rounds 12–17 (6 rounds): 48 sc (48)
Eye Placement: Insert 9 mm safety eyes between Rounds 12 and 13, spaced 6 stitches apart. Center them between the cheek increases made in Round 11.
- Round 18: 6 sc, 6 dec, 12 sc, 6 dec, 6 sc (36)
- Round 19: 36 sc (36)
- Round 20: [4 sc, dec] x 6 (30)
- Round 21: [3 sc, dec] x 6 (24)
- Round 22: [2 sc, dec] x 6 (18)
Stuff the head firmly with fiberfill.
- Round 23: FLO 18 sc (18)
- Rounds 24–25 (2 rounds): 18 sc (18)
- Round 26: [2 sc, inc] x 6 (24)
- Round 27: 24 sc (24)
- Round 28: [3 sc, inc] x 6 (30)
- Rounds 29–31 (3 rounds): 30 sc (30)
- Round 32: [4 sc, inc] x 6 (36)
- Rounds 33–35 (3 rounds): 36 sc (36)
- Round 36: [4 sc, dec] x 6 (30)
- Round 37: [3 sc, dec] x 6 (24)
- Round 38: [2 sc, dec] x 6 (18)
Stuff the body firmly with fiberfill.
- Round 39: [1 sc, dec] x 6 (12)
- Round 40: 6 dec (6)
Fasten off, weave the tail through the front loops of the remaining 6 stitches, pull tight to close, and weave in the end.
2. Beak & Wattle
Beak
Using Yellow yarn.
- Round 1: Work 4 sc into a MR (4)
- Round 2: [1 sc, inc] x 2 (6)
- Round 3: 6 sc (6)
- Round 4: 6 inc (12)
- Round 5: 12 sc (12)
Fasten off, leaving a long tail for sewing.
Wattle
Attach Red yarn to the last front loop (FLO) of the bottom of the beak:
- Work [ch 6, sl st into the same stitch] x 2 to form two small red loops.
Fasten off and weave in red ends. Sew the beak with attached wattle to the face between Rounds 14 and 17.
3. Comb (Head Feathers)
Using Red yarn.
- Row 1: Ch 6, starting in the 2nd ch from hook: work 5 sc (5)
- Row 2: Work [ch 6, sc] repeatedly around the edge of the base piece to create a ruffled comb effect.
Fasten off, leaving a long tail for sewing. Sew to the top of the head between Rounds 1 and 6.
4. Tail
Using White yarn.
- Step 1: Ch 11, sl st in the 1st ch to form a loop.
- Step 2: [Ch 10, sl st in the 1st ch] x 2 to form two additional feather loops (3 loops in total).
Fasten off, leaving a long tail. Sew the tail to the lower back of the body between Rounds 35 and 36.
5. Wings (Make 2)
Using White yarn. Do not stuff.
- Round 1: Work 6 sc into a MR (6)
- Round 2: 6 inc (12)
- Rounds 3–4 (2 rounds): 12 sc (12)
- Round 5: [3 sc, inc] x 3 (15)
- Rounds 6–7 (2 rounds): 15 sc (15)
- Round 8: [3 sc, dec] x 3 (12)
- Round 9: 12 sc (12)
- Round 10: 6 dec (6)
Fasten off, weave tight to close, and leave a long yarn tail. Sew wings to the sides of the body between Rounds 26 and 27.
6. Feet & Legs (Make 2)
Feet (Make 2)
Using Yellow yarn.
- Round 1: Work 6 sc into a MR (6)
- Round 2: 6 inc (12)
- Rounds 3–5 (3 rounds): 12 sc (12)
- Round 6: Flatten the piece in half. Across the folded top edge, create toes by working: [ch 4, sc back down, sc across edge] x 3 (6)
Fasten off and weave in loose ends.
Thighs / Upper Legs (Make 2)
Using Yellow yarn.
- Round 1: Work 6 sc into a MR (6)
- Round 2: [1 sc, inc] x 3 (9)
- Rounds 3–7 (5 rounds): 9 sc (9)
Stuff the leg lightly. Fasten off, leaving a tail.
- Sew the leg piece to the top of the foot between Rounds 1 and 3 of the foot piece.
- Sew the assembled leg structure to the bottom front of the body between Rounds 35 and 36 so the chicken sits upright.
Finishing Touches
- Eyebrows & Eyelashes: Using black embroidery floss, stitch small angled eyebrows and delicate eyelashes above each eye.
- Eye Highlights: Using white embroidery thread, stitch a small vertical arc on the outer edge of each safety eye to give them expression.
- Cheek Color (Optional): Add a touch of pink blush to the cheeks using soft pastels or makeup powder for extra cuteness!
Your adorable amigurumi chicken is finished and ready to display!