Craft Your Own Chaos: The Ultimate Dumpster Fire Crochet Pattern!
Feeling like life’s a bit of a… well, you know? Sometimes, the only way to cope is to embrace the chaos with a smile. And what better way to do that than by crocheting your very own Emotional Support Dumpster Fire? This adorable and hilarious amigurumi is the perfect desk buddy, a quirky gift, or just a fun project to capture the mood.
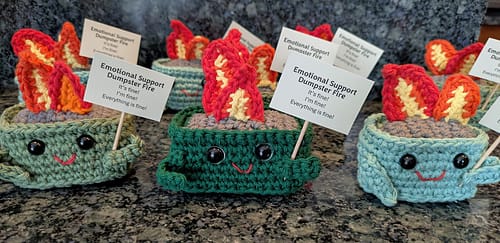
This dumpster fire crochet pattern is surprisingly straightforward and works up relatively quickly. So, grab your hooks and let’s get stitching – because everything is fine!(Image: The main photo of the finished Emotional Support Dumpster Fire from the PDF)
Caption: Your very own crocheted Emotional Support Dumpster Fire – it’s fine!

Why You’ll Love This Dumpster Fire Crochet Pattern:
- Hilariously Relatable: It’s the perfect metaphor for… those days.
- Quick & Fun Make: You can whip this up in an afternoon or two.
- Great for Gifting: Who wouldn’t appreciate an Emotional Support Dumpster Fire?
- Customizable: Play with flame colors and expressions!
Materials You’ll Need:
- 4 mm crochet hook
- Worsted weight yarn (4 weight cotton recommended) in:
- Green (for the dumpster body & arms)
- Grey (for the dumpster top/lid)
- Red, Yellow, and Orange (for the flames)
- Safety eyes (around 5mm is good)
- Stuffing
- Tapestry needle
- Embroidery floss for mouth (or one ply of yarn separated from a strand)
- For the sign (optional but highly recommended!):
- Paper
- Toothpick
- Hot glue
Abbreviations (US Crochet Terms):
- SC = Single Crochet
- SS = Slip Stitch
- CH = Chain
- HDC = Half Double Crochet
- BLO = Back Loop Only
- FLO = Front Loop Only
- st(s) = stitch(es)
- inc = increase (2 SC in the same stitch) – Note: Not explicitly used in original, but good to know for amigurumi.
- dec = decrease (SC two stitches together) – Note: Not explicitly used in original.
Dumpster Fire Crochet Pattern Instructions:
Let’s get this fire started!
Top (Make 1 in Grey)
This piece forms the lid/top rim of your dumpster.
- Row 1: CH 7. In 2nd CH from hook, SC x 6. (6 sts)
- Row 2: CH 1, turn work. SC x 6. (6 sts)
- Row 3 – 10: Repeat Row 2. (6 sts)
Fasten off and weave in ends.
Bottom (Make 1 in Green)
Leave a tail approximately two feet long for sewing later.
- Row 1: CH 7. In 2nd CH from hook, SC x 6. (6 sts)
- Row 2: CH 1, turn work. SC x 6. (6 sts)
- Row 3 – 10: Repeat Row 2. (6 sts)
Do not fasten off if you’re sewing immediately, or fasten off leaving the long tail.
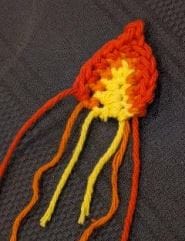
Flames (Make 2 or more)
Each flame will consist of 2 or 3 colors. Feel free to get creative! Here’s how to make a 3-colored flame:
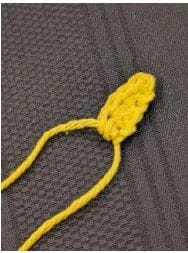
- Start with Yellow Yarn:
- CH 5. In 2nd CH from hook, SS, then SC, HDC, HDC. (4 sts total)
- Fasten off yellow, leaving a short tail to weave in or secure.
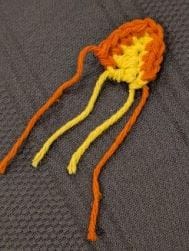
- Attach Orange Yarn:
- Attach orange yarn with a SS to the first stitch on the yellow layer.
- Make 4 SC along one side of the yellow stitches.
- CH 1 at the peak.
- Make 4 SC along the other side of the yellow.
- Fasten off orange, leaving a short tail.
- Attach Red Yarn:
- Attach red yarn to the 1st stitch of the orange layer with a SS.
- Make 5 SC along one side of the orange stitches.
- CH 2 at the peak, then SS in the second CH from the hook (this creates a pointier tip).
- Make 5 SC along the other side of the orange stitches.
- Fasten off, leaving long tails on all flames for attaching.
Attaching Flames: You will use the tails from the flames and put them through the grey top piece. Tie the ends together on the underside to secure.
Creative Tip: Different looking flames can be made by adjusting the colors used and the number of stitches used. Feel free to get creative!
Arms (Make 2 in Green)
- CH 7. In 2nd CH from hook, SC x 6. (6 sts)
Fasten off, leaving long tails for attaching to the body.
Body (Make 1 in Green – Stitches Worked in the Round)
The body is worked around the edge of the grey “Top” piece you made earlier.
- R1: Working around the edge of the grey top piece.
- Edge 1: With the short side of the grey top facing up, attach green yarn with a SS to the right corner. Make 6 SC along the short side. Place one additional SC in the same corner stitch. (7 sts on this edge)
- Edge 2: Continue working along the long side. Place 10 SC along the long edge, and one additional SC in the same corner stitch. (11 sts on this edge)
- Edge 3: On the next short edge, make 6 SC along the side. Place one additional SC in the same corner stitch. (7 sts on this edge)
- Edge 4: Continue around with 10 SC along the last edge. Place one additional SC in the corner stitch, then SS into your original stitch (the first SC of Edge 1, not the joining SS).
(11 sts on this edge. You should have 36 stitches in this first round total: 6+1+10+1+6+1+10+1 = 36)
- R2: CH 1 (does not count as a stitch), BLO 36 SC around. SS to first SC. (36 sts)
- R3 – R6: CH 1, SC in each st around. SS to first SC. (36 sts)
- Note: Your very last stitch in Row 6 will be a SS instead of an SC. This will help give the piece a flatter bottom when you attach the base.
- Top Edge (Dumpster Rim):
- Turn your piece so that the grey top is facing up.
- Reattach green yarn (or continue if you didn’t fasten off) to any stitch along the FLO of R1 (the round worked into the grey piece).
- CH 1, SC along the FLO that is exposed in the first loop around (from R1 of the body).
- Close that round with a SS.
- Fasten off. Use a tapestry needle and pull the tails to the inside of the piece.
Assembling Your Emotional Support Dumpster Fire:
- Flames: If you haven’t already, attach the flames to the top grey portion as described in the “Flames” section.
- Arms: Sew one arm onto each side. They can be placed on the front corners between the 2nd and 3rd row from the top of the green body. Tie the ends on the inside of the work.
- Eyes & Mouth:
- Place the safety eyes between the second and third row from the top (of the green body), with about 5 stitches between them.
- Using a tapestry needle and embroidery floss (or a single ply of yarn), sew a mouth. A simple straight line or a slightly downturned curve works well for that “everything is fine” look.
- Attach Bottom & Stuff:
- Line up the green “Bottom” piece with the opening at the base of the dumpster body.
- Using the long tail left on the bottom piece, sew it to the underside of the body (to the last round, R6).
- Once it is sewn on about ¾ of the way, add your stuffing firmly.
- Continue sewing the rest of the bottom piece closed and hide your tail.
- Create & Attach the Sign:
- Sign Text: “Emotional Support Dumpster Fire. It’s fine! I’m fine! Everything is fine!” (You can print the template from the original PDF if available, or handwrite it on a small piece of paper).
- Attach the sign to a toothpick.
- With a small drop of hot glue, place it in one of the “hands” (ends of the arms) and glue it to the body for stability.
Your piece is now complete and everything is fine!!
We hope you enjoyed this dumpster fire crochet pattern! It’s a fantastic way to add a bit of humor to your craft collection or to gift someone a much-needed laugh.
If you make your own Emotional Support Dumpster Fire, we’d love to see it! Share your pictures on social media and tag us, or let us know in the comments below! Happy crocheting!