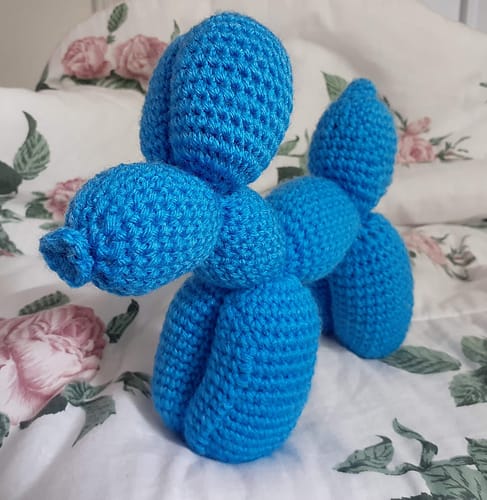
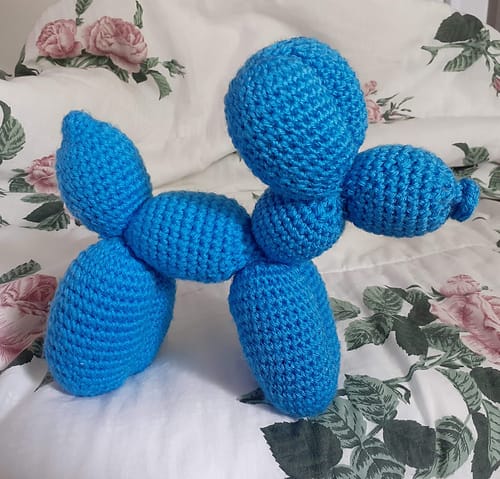
Your Own Adorable Crochet Balloon Dog!
Balloon animals are undeniably charming, bringing smiles to faces young and old. But let’s face it, their fleeting lifespan is a real downer! One minute you have a whimsical poodle, the next… a sad deflated lump. Sound familiar?
Well, fret no more! We’ve got the paw-fect solution: the Crochet Balloon Dog! This cuddly plush is just as fun and playful as its air-filled counterpart, but with the added bonus of lasting forever! This beginner-friendly pattern makes a fantastic project for anyone, whether you’re a seasoned crocheter or just picking up a hook for the first time. It’s also a thoughtful handmade gift for dog lovers, balloon animal enthusiasts, or anyone who needs a little extra cuteness in their life.


Ready to inflate some crochet fun? Let’s get started!
What You’ll Need to Get Started:
Before you embark on your balloon dog adventure, gather these materials:
- 5mm Crochet Hook: The trusty tool of our trade!
- Worsted Weight Yarn (about 200g): Choose your favorite color – classic blue balloon dog, vibrant pink, or maybe even a rainbow pup! The pattern suggests about 200g, but you might need a little more or less depending on your tension.
- Polyester Fiberfill: For stuffing and bringing your dog to life with huggable squishiness.
- Yarn Needle: For weaving in those pesky ends and adding a touch of finishing magic.
(Important Note on Materials): The beauty of crochet is its flexibility! Feel free to use different yarn weights and hook sizes. Just remember that this will affect the final size of your balloon dog. The pattern creator used the materials above to create a plush that’s about 8 ½ inches long and 8 inches tall – a perfect cuddle size!
Decoding the Crochet Lingo (Abbreviations):
Don’t worry if you’re new to crochet patterns! Here are the abbreviations we’ll be using:
- Sc: Single Crochet – the foundation stitch of many amigurumi projects!
- Inc: Increase Stitch – we’ll use this to make our dog wider and rounder.
- Dec: Decrease Stitch – time to shape things up and taper our dog.
(Psst! Pictures are on page 3 to show you what the finished product looks like!)
Let’s Get Crocheting! – The Pattern Breakdown:
We’ll be building our balloon dog piece by piece, starting from the tail and working our way up. Follow along, row by row, and you’ll be amazed at how quickly your pup takes shape!
1. The Tail – Wiggle Wiggle!
- Magic Ring: Start with a magic ring and work 6 single crochet (sc) stitches into it. (If you’re not familiar with a magic ring, there are tons of easy tutorials online!)
- Rows 1-4: Sc around (6): Just single crochet in each stitch around for these four rows. This creates the skinny “uninflated” tip of the tail. Feel free to add or subtract rows here to adjust the tail tip length to your liking!
- Row 5: Inc around (12): Increase in every stitch around. This means you’ll do 2 single crochet stitches in each stitch from the previous row. We’re starting to inflate!
- Row 6: Repeat Row 5 (24): Yep, increase in every stitch again! Your tail is getting nicely rounded.
- Pull yarn end from the magic ring tight and weave in before continuing: This is important to close up the center of the magic ring and secure your work.
- Rows 7-16: Sc around (24): Now for some steady single crocheting! Work 10 rows of single crochet around to create the main part of the tail.
- Row 17: Dec around (12): Time to decrease! Decrease in every stitch around. This means you’ll be working two stitches together as one to reduce the number of stitches. We’re narrowing the tail again.
- Stuff segment to preferred firmness: Start stuffing the tail with fiberfill. You want it firm but not bursting!
- Row 18: Dec around (6): Decrease in every stitch again to close up the tail end.
- Rows 19-22: Sc around (6): A few more rows of single crochet to finish off the tail tip.
2. Legs – Time to Stand Tall! (Well, almost…)
We’ll make four legs in total, two hind legs and two front legs. The pattern is the same for all of them!
- Row 23: Inc around (12): Magic ring and increase around, just like we did for the tail, to start the leg.
- Row 24: Repeat Row 23 (24): Increase around again!
- Rows 25-38: Sc around (24): Lots of single crochet rows to make the leg long and sturdy.
- Row 39: Dec around (12): Start decreasing to shape the leg.
- Stuff segment to preferred firmness: Stuff the leg like you did the tail.
- Row 40: Dec around (6): Decrease again to narrow the leg.
- Rows 41-44: Sc around (6): Finish off the leg tip.
Repeat to make the second hind leg, ending on Row 66. Just follow the leg pattern again for the second hind leg!
3. Body – Getting Bulky!
- Row 67: Inc around (12): Magic ring and increase to start the body section.
- Row 68: Repeat Row 67 (24): Increase around again!
- Rows 69-78: Sc around (24): Ten rows of single crochet for the main body.
- Row 79: Dec around (12): Start decreasing to shape the body before the neck.
- Stuff segment to preferred firmness: Stuff the body section nice and plump!
- Row 80: Dec around (6): Decrease again.
- Rows 81-84: Sc around (6): Finish off the body section.
Repeat Legs Pattern 2 more times to make the front legs. Ending on Row 128 with a total of 6 segments so far. Time to make two more legs using the same leg pattern. These will be the front legs!
4. Neck – Reaching for the Sky!
- Row 129: Inc around (12): Magic ring and increase for the neck.
- Row 130: Repeat Row 129 (24): Increase around again!
- Rows 131-138: Sc around (24): Single crochet rows for the neck length.
- Row 139: Dec around (12): Decrease to shape the neck.
- Stuff segment to preferred firmness: Stuff the neck section.
- Row 140: Dec around (6): Decrease again.
- Rows 141-144: Sc around (6): Finish off the neck.
5. Ears – Listen Up!
- Row 145: Inc around (12): Magic ring and increase for the ear.
- Row 146: Repeat Row 145 (24): Increase around again!
- Rows 147-156: Sc around (24): Single crochet rows for the ear shape.
- Row 157: Dec around (12): Decrease to shape the ear tip.
- Stuff segment to preferred firmness: Stuff the ear lightly.
- Row 158: Dec around (6): Decrease again.
- Rows 159-162: Sc around (6): Finish off the ear.
Repeat for the second ear, ending on Row 180. Crochet another ear using the same pattern!
6. Head – The Grand Finale!
- Row 181: Inc around (12): Magic ring and increase for the head.
- Row 182: Repeat Row 181 (24): Increase around again!
- Rows 183-190: Sc around (24): Single crochet rows for the head shape.
- Row 191: Dec around (12): Start decreasing to shape the head.
- Stuff segment to preferred firmness: Stuff the head nice and round!
- Row 192: Dec around (6): Decrease again.
- Row 193: Sc around (6): Single crochet row.
- Row 194: Inc around (12): Surprise! An increase row at the very end! This creates a little bit of a snout shape.
Secure yarn end and cut tail long enough to weave in. Fasten off and leave a long tail for sewing.
Putting It All Together – Twist and Shout (with Joy!)
Now for the fun part – shaping your balloon dog!
- Twist to form a dog shape as one would with a balloon: This is where the magic happens! The pattern creator recommends checking out this visual guide by Ohana Craft Amigurumi for twisting: https://youtu.be/HdbpN5B3a20 (Seriously, watch the video, it’s super helpful!)
- Once twisted, you can sew the joints for extra stability if you want. Use your yarn needle and the long tails you left to sew the different segments together at the “joints” where balloon animals are typically twisted. This will help your dog hold its shape even better!
Tips for Crochet Success:
- Count your stitches! Especially in the increase and decrease rows, it’s easy to lose track. Using stitch markers can be a lifesaver!
- Don’t be afraid to adjust: If you want a longer tail or bigger ears, feel free to add or subtract rows in those sections. This is your unique creation!
- Stuff firmly but not too tightly: You want your dog to be cuddly but not overstuffed and misshapen.
- Weave in those ends as you go: It makes finishing so much easier and cleaner!
- Embrace the imperfections! As the pattern creator says, “It’s the little differences that make our projects unique :)”
Enjoy Your New Plush Pet!
Congratulations! You’ve crocheted your very own balloon dog that will never deflate! Give it a name, find it a cozy spot, or gift it to someone special. We’d love to see your creations! Share photos of your crochet balloon dogs in the comments below or tag us on social media!
Happy crocheting! 🧶😊