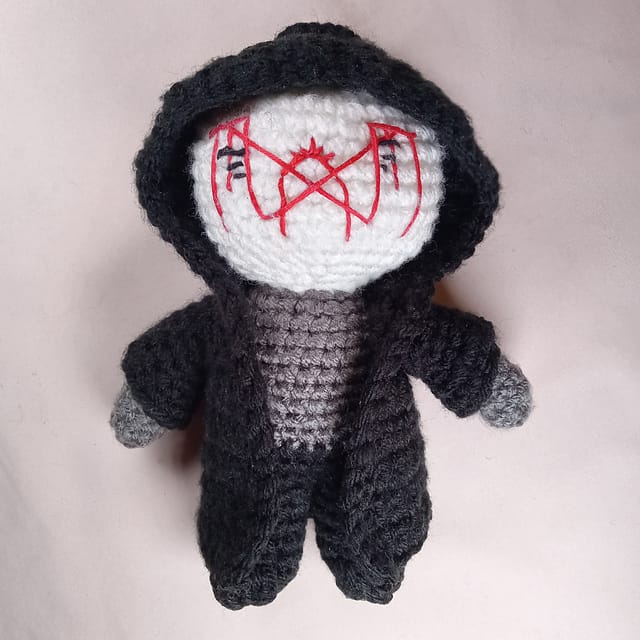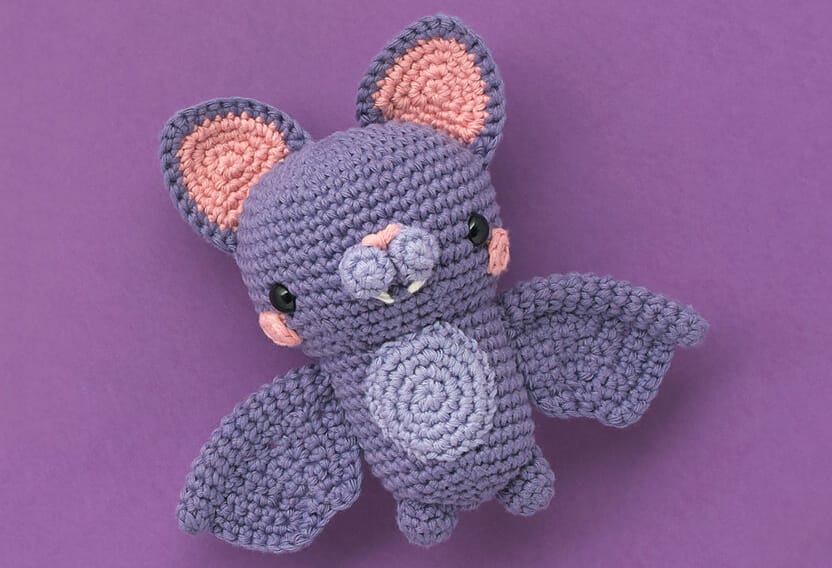
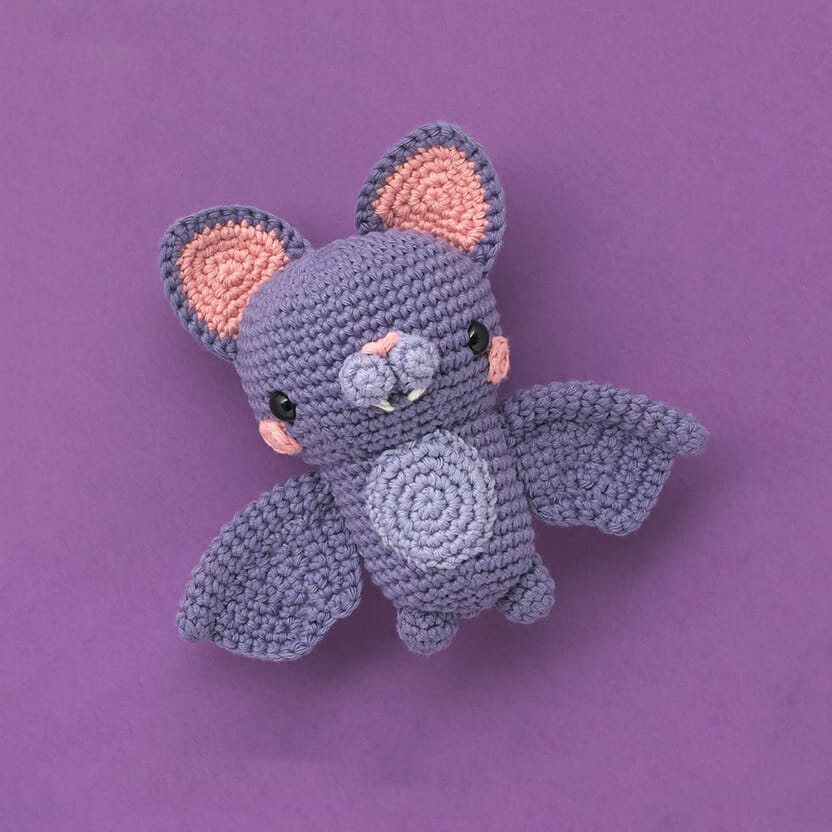
Crochet Oscar the Little Bat: A Free Halloween Amigurumi Pattern
Halloween is just around the corner, and what better way to celebrate than by crocheting your very own spooky (but oh-so-cute) little bat? Meet Oscar the Little Bat, a charming amigurumi friend designed by Irene Strange for Paintbox Yarns.
This free crochet pattern is perfect for intermediate crafters who love making small, huggable creatures. Oscar stands at 6 inches (15 cm) tall, making him the perfect size for little hands or a festive Halloween display.
Whether you’re making Oscar for yourself, a friend, or a little one who loves bats, this project is a fun and rewarding crochet adventure. Let’s get started!
Table of Contents
Materials You’ll Need
Before we dive into the pattern, let’s gather all the supplies:
Yarn
- Colorway 1 (Pastel)
- 1 ball Dusty Lilac (A)
- 1 ball Pale Lilac (B)
- 1 ball Blush Pink (C)
- Colorway 2 (Classic)
- 1 ball Granite Grey (A)
- 1 ball Pure Black (B)
- 1 ball Vanilla Cream (C)
Other Supplies
- US G/6 (4mm) crochet hook
- Stitch marker
- Pair of ¾-inch (10mm) black safety eyes
- Toy stuffing
- Yarn needle
- Small amount of white yarn (for teeth embroidery)
Crochet Abbreviations & Notes
Abbreviations
- ch = chain
- sc (dc) = single crochet (UK double crochet)
- inc = increase (2 sc in one stitch)
- dec = decrease (sc two stitches together)
- slst = slip stitch
- st(s) = stitch(es)
Pattern Notes
- Work in continuous rounds (no joining at the end of each round).
- Use a stitch marker to mark the start of each round.
- For invisible decreases, insert hook under the front loop of the first stitch and both loops of the second stitch, then complete as a regular sc.
- Stuff firmly as you go to avoid gaps.
Step-by-Step Crochet Instructions
Head and Body (Yarn A)
- Start with a magic ring, 8 sc in the ring. (8 sts)
- Round 2: Inc in each st around. (16 sts)
- Round 3: [1 sc, inc in next 2 sts, 1 sc] x4. (24 sts)
- Round 4: [2 sc, inc in next 2 sts, 2 sc] x4. (32 sts)
- Round 5: [3 sc, inc in next st] x8. (40 sts)
- Round 6: Sc around.
- Round 7: [4 sc, inc in next st] x8. (48 sts)
- Rounds 8–15: Sc around.
- Round 16: [Dec, 6 sc] x6. (42 sts)
- Continue decreasing until Round 33: [Dec] x6. (6 sts)
- Fasten off, leaving a tail to sew closed.
🔹 Tip: Add safety eyes between Rounds 13–14, spacing them about 11 stitches apart.
Ears (Make 2 Inner & 2 Outer)
Inner Ears (Yarn C)
- Magic ring, 6 sc.
- Round 2: [3 sc in next st, 1 sc] x3. (12 sts)
- Continue increasing until Round 4: [2 sc, 3 sc in next st, 3 sc] x3. (24 sts)
Outer Ears (Yarn A)
- Repeat same as inner ear.
- Round 5: Place inner ear on top and crochet through both layers.
🔹 Sew ears to the head between Rounds 4–10, leaving a small gap in the middle.
Muzzle, Feet, and Tummy
- Muzzle (Yarn B, Make 2): Magic ring, 5 sc → Inc around (10 sts). Sew between eyes.
- Feet (Yarn A, Make 2): Magic ring, 5 sc → Inc around → Stuff lightly and sew to body.
- Tummy (Yarn B): Magic ring, 6 sc → Increase until 24 sts. Sew to body under the head.
Cheeks, Arms, and Wings
- Cheeks (Yarn C, Make 2): Magic ring, 6 sc. Sew near eyes.
- Arms (Yarn A, Make 2): Magic ring, 6 sc → Sc for 12 rounds. Sew to body.
- Wings (Yarn A or B, Make 2): Work in rows, increasing and decreasing for shape.
🔹 Sew wings under the arms and along the body.
Finishing Touches
- Embroider a nose (Yarn C) between muzzle pieces.
- Add tiny white teeth at the bottom edge.