Crochet Stingray Amigurumi Pattern — Make the Cutest Ocean Plush You’ve Ever Seen
Picture this: you’re curled up in your favorite chair, a warm mug steaming on the side table, and this absolutely dreamy crochet stingray amigurumi taking shape in your hands. It’s soft, squishy, impossibly cute — and people are going to lose their minds over it. Whether you’re making it for a little ocean lover in your life or just because you deserve something ridiculously adorable on your shelf, this pattern delivers.
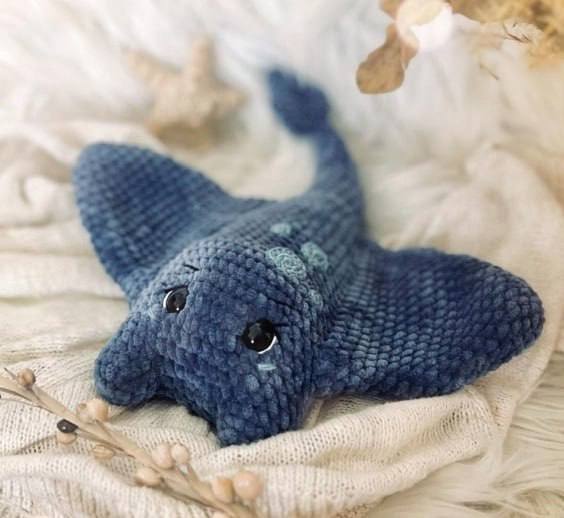
The finished stingray measures about the size of your hand, crocheted in ultra-soft chenille yarn that gives it that plush, velvety texture you’ll want to pet forever. Its wide pectoral fins, sweet embroidered cheeks, and glossy safety eyes make it look straight out of a fantasy aquarium.
By the end of this post, you’ll have everything you need to make this yourself — even if you’ve never crocheted an amigurumi before and your gauge is still a little rebellious.
Why You’ll Love This Crochet Stingray Pattern
- 🌊 Chenille yarn magic — that velvety, cloud-soft texture makes this stingray look extra luxurious and feel even better
- 🪡 Intermediate-friendly — if you know single crochet and basic increases/decreases, you’ve got this
- 🎁 A showstopper gift — ocean lovers, kids, nursery décor fans — this hits every gift list
- 🔵 Two-color construction — the denim blue top and soft gray belly make for a realistic, beautifully layered look
- ⏱️ Weekend project — expect about 8–12 hours from start to squishy finish
- 🧸 Fully 3D with character — embroidered eyebrows, blushing cheeks, and posable fins give this little guy a whole personality
Materials & Tools You’ll Need
Here’s your complete checklist. Gather everything before you start — you’ll thank yourself later!
Yarn:
- ☐ LEAMI Chenille Soft UNI (100% polyester, 120 m / 100 g) — Gray, color 108 — approx. 25 g
- Substitution tip: Any bulky chenille/velvet yarn works great here. Look for Lion Brand Pound of Love Velvet or Bernat Baby Velvet in a soft gray.
- ☐ Gründl Funny Uni (100% polyester, 120 m / 100 g) — Denim, color 30 — approx. 50 g
- Substitution tip: Paintbox Yarns Simply DK or Red Heart Soft in a denim/slate blue are great alternatives.
- ☐ Schachenmayr Catania (100% cotton, 125 m / 50 g) — Denim, color 421 (for the decorative belly spots)
- A small amount of any sport-weight cotton in a matching blue will work perfectly.
Tools & Notions:
- ☐ Crochet hook 4.0 mm / G-6 (for chenille yarn)
- ☐ Crochet hook 2.5 mm / B-1 (for cotton accent pieces)
- ☐ 16 mm black safety eyes — 2 pieces
- ☐ Polyester fiberfill / toy stuffing
- ☐ Embroidery floss in white and black (for facial details)
- ☐ Tapestry / yarn needle for sewing
- ☐ Stitch markers
- ☐ Pins (for placement before sewing)
- ☐ Scissors
💡 Note: All pattern pieces are worked in a continuous spiral unless otherwise stated. The side fins are attached after the body is complete.
Abbreviations & Stitch Guide
New to amigurumi abbreviations? Here’s your cheat sheet — plain English, no confusion.
| Abbreviation | Full Name | Notes |
|---|---|---|
| sc | Single Crochet | The main stitch throughout this pattern |
| inc | Increase | Work 2 sc in the same stitch — adds 1 stitch |
| dec | Decrease | Crochet 2 stitches together (invisible decrease recommended) — removes 1 stitch |
| sl st | Slip Stitch | Used to join rounds or fasten off cleanly |
| ch | Chain | Foundation stitches used to join the two head sections |
| MR / magic ring | Magic Ring (Magic Circle) | The classic amigurumi start — adjustable loop that closes tightly at the center. |
| st(s) | Stitch(es) | Refers to the stitch count in that round |
| [X] | Stitch count | Number in brackets = total stitches at the end of that round |
💡 Tricky stitch tip: For the invisible decrease, insert your hook under the front loops only of two consecutive stitches and pull through both, then yarn over and pull through 2 loops. This gives a much neater finish on chenille yarn than a regular decrease!
Step-by-Step Crochet Stingray Pattern Instructions
Part 1: Head & Body
The head and body are worked in one continuous piece. Start with denim yarn.
![stingray_img_2_1.jpeg — In-progress body piece showing the joined two-part head construction before the wings are added]
The head starts as two separate oval pieces that are then joined together — this is what gives the stingray its unique wide face shape. Don’t be intimidated! It looks fancier than it is.
Round 1: Work 6 sc into a magic ring. [6 sts]
Round 2: Work 1 inc in each stitch around. (6 increases total) [12 sts]
Round 3: Work 12 sc around. [12 sts]
🐟 Make this piece TWICE. For the first piece: finish with 1 sl st and cut yarn. For the second piece: do NOT cut yarn — keep going. You’ll join them next.
Joining the two head pieces: On the second piece (still attached), chain 6 (ch 6). This bridge connects the two ovals.
Round 4: Insert hook into the first stitch of the first piece — work 12 sc across it, then 6 sc back along the chain bridge, continue into the second piece with 12 sc, then 6 sc along the other side of the chain. [36 sts]
💡 Pro Tip: Place a stitch marker in Round 4 to track your round start — the spiral can get confusing right after joining!
Round 5: 30 sc, 6 sc. [36 sts]
Round 6: 29 sc, 7 sc. [36 sts]
Round 7: 1 sc, 7 sc, *[1 inc, 1 sc]; repeat from * 5 more times, 8 sc, 8 sc. [42 sts]
Round 8: 2 sc, 31 sc, 9 sc. [42 sts]
Round 9: 3 sc, 29 sc, 10 sc. [42 sts]
Round 10: 4 sc, 27 sc, 11 sc. [42 sts]
Round 11: 5 sc, 25 sc, 12 sc. [42 sts]
Rounds 12–14: 6 sc, 24 sc, 12 sc. (Repeat these counts for 3 rounds.) [42 sts]
👁️ Eye placement: After completing Round 9, attach your 16 mm safety eyes on either side of the head, with 8 visible stitches between them. Push the washers on firmly from the inside — once stuffed, you won’t be able to reach back in!
Round 15: 6 sc, 3 sc, *[1 dec, 1 sc]; repeat from * 5 more times, 3 sc, 12 sc. [36 sts]
Rounds 16–23: 6 sc, 18 sc, 12 sc. (Repeat for 8 rounds.) [36 sts]
💡 Check-in: Eight rounds of the same count means this is a great time to binge your favorite podcast. Count your stitches every other round just to stay on track!
Round 24: 6 sc, 1 sc, *[1 dec, 5 sc]; repeat from * once more, 1 dec, 1 sc, 12 sc. [33 sts]
Round 25: 2 sc, 1 dec, 2 sc, 15 sc, *[2 sc, 1 dec]; repeat from * once more, 4 sc. [30 sts]
Round 26: 5 sc, 15 sc, 10 sc. [30 sts]
Round 27: 5 sc, 16 sc, 9 sc. [30 sts]
Round 28: 1 sc, 1 dec, 1 sc, 2 sc, 1 dec, *[4 sc, 1 dec]; repeat from * once more, 2 sc, *[2 sc, 1 dec]; repeat from * once more. [24 sts]
Round 29: 2 sc, 17 sc, 5 sc. [24 sts]
Round 30: 1 sc, 23 sc. [24 sts]
Now switch to denim yarn only for the tail section.
Round 31: 24 sc. [24 sts]
Round 32: *[2 sc, 1 dec]; repeat from * 5 more times. [18 sts]
Rounds 33–35: 18 sc. (3 rounds.) [18 sts]
Round 36: *[4 sc, 1 dec]; repeat from * 2 more times. [15 sts]
Rounds 37–38: 15 sc. (2 rounds.) [15 sts]
Round 39: *[3 sc, 1 dec]; repeat from * 2 more times. [12 sts]
Rounds 40–42: 12 sc. (3 rounds.) [12 sts]
Round 43: *[2 sc, 1 dec]; repeat from * 2 more times. [9 sts]
Rounds 44–45: 9 sc. (2 rounds.) [9 sts]
🧸 Stuff now! Before you go further, fill the body firmly with polyester fiberfill. Push stuffing into the nose area and body with a pen or chopstick to get it nice and even. The tail does NOT get stuffed.
Round 46: *[1 sc, 1 dec]; repeat from * 2 more times. [6 sts]
Rounds 47–48: 6 sc. (2 rounds.) [6 sts]
Round 49: Work 6 inc around. [12 sts] (This starts the tail fin.)
Round 50: *[1 sc, 1 inc]; repeat from * 5 more times. [18 sts]
Round 51: 18 sc. [18 sts]
Round 52: *[1 sc, 1 dec]; repeat from * 5 more times. [12 sts]
Rounds 53–54: 12 sc. [12 sts]
Round 55: Work 6 dec around. [6 sts]
Round 56: 6 sc. [6 sts]
✅ The tail does NOT get stuffed. Fasten off and weave in the end. Use your needle to gently push in the safety eyes from the front to sink them slightly and give them that adorable deep-set look.
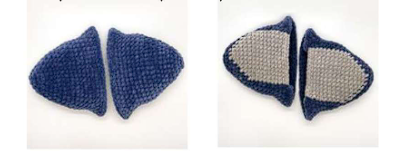
Part 2: Side Fins (Make 2)
![stingray_img_5_1.jpeg — Both completed side fins shown flat, one showing the denim side and one showing the gray belly side — front and back views]
These are the star of the show — those wide, graceful pectoral wings. Each fin is crocheted flat-ish in a rounded shape, and they’re not stuffed — just pinched flat along one edge before sewing on. Make two!
Start with denim yarn.
Round 1: 6 sc into a magic ring. [6 sts]
Round 2: 6 inc. [12 sts]
Round 3: *[1 sc, 1 inc]; repeat from * 5 more times. [18 sts]
🔵 Color switch: Beginning in Round 4, work the marked stitches in gray yarn to create the two-toned belly effect. The pattern alternates blue (top) and gray (belly) sections.
Round 4: 5 sc (denim), 3 sc (gray), 10 sc (denim). [18 sts]
Round 5: 3 inc (denim), 1 sc, 5 sc (gray), 1 sc, 3 inc (denim), 5 sc. [24 sts]
Round 6: 6 sc (denim), 7 sc (gray), 11 sc (denim). [24 sts]
Round 7: 1 sc, 3 inc, 1 sc (denim), 9 sc (gray), 1 sc, 3 inc, 6 sc (denim). [30 sts]
Round 8: 7 sc (denim), 11 sc (gray), 12 sc (denim). [30 sts]
Round 9: 6 sc (denim), 13 sc (gray), 11 sc (denim). [30 sts]
Round 10: 2 sc, 3 inc, 1 sc (denim), 13 sc (gray), 1 sc, 3 inc, 7 sc (denim). [36 sts]
Rounds 11–15: 9 sc (denim), 13 sc (gray), 14 sc (denim). (5 rounds.) [36 sts]
Round 16: 5 sc, 3 inc, 1 sc (denim), 13 sc (gray), 1 sc, 3 inc, 10 sc (denim). [42 sts]
Round 17: 12 sc (denim), 13 sc (gray), 17 sc (denim). [42 sts]
Round 18: 5 sc, *[1 inc, 1 sc]; repeat from * 2 more times, 1 sc (denim), 13 sc (gray), 1 sc, *[1 inc, 1 sc]; repeat from * 2 more times, 10 sc (denim). [48 sts]
Continue working sc until you reach the side edge of the fin (where it will be pinched shut). Finish with 1 sl st and cut yarn.
💡 Important: The fins are not stuffed. Simply pinch the open edge flat — this is what gives them that lovely flat wing shape — and you’ll sew them to the body that way.
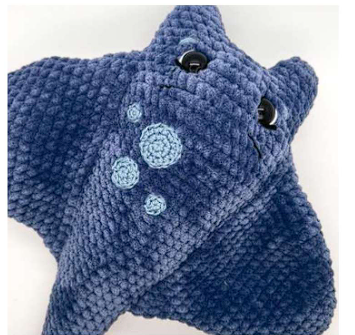
Part 3: Decorative Head Details
![stingray_img_6_1.jpeg — Close-up of the finished stingray’s face showing the small crocheted circles on the head, safety eyes, and embroidered facial features]
These tiny crocheted circles add the most charming spots to your stingray’s head — like little crochet polka dots of personality. Use denim yarn and your 2.5 mm / B-1 hook with cotton yarn for these.
Large circle (make 1): Start with MR, work 6 sc, increase to 12 sc, then finish with 1 sl st.
Medium circles (make 2): Start with MR, work 6 sc, finish with 1 sl st.
Smallest circle (make 1): Increase each round until you have 18 sc, then finish with 1 sl st.
Leave a long yarn tail on each circle for sewing. Arrange them decoratively on the top of the head — check the photo for placement inspiration! — then stitch them down.
Finishing & Assembly
You’re in the home stretch — and honestly? This part is so satisfying.
![stingray_img_3_1.jpeg — Assembled stingray body before the fins are attached, showing the shape of the head/body/tail from above]
Step 1: Attach the fins. Pin the fins to either side of the body, checking placement in a mirror or by eye to make sure they’re symmetrical. The pinched edge should sit flush against the body. Once you’re happy with the position, sew them on firmly using your tapestry needle and matching denim yarn. Take your time here — even stitching makes a huge difference.
Step 2: Sew on the head details. Stitch your little denim circles onto the top of the head, using the reference photo as a guide. You can cluster them however feels right — there’s no wrong answer!
Step 3: Embroider the face. Using your black embroidery floss, stitch small curved eyebrow lines above the safety eyes. With white floss, add tiny highlight dots or tear-drop shapes below the eyes for that sweet, emotive look. Add a hint of rosy pink or dusty blush embroidery for the cheeks — totally optional, but absolutely adorable.
Step 4: Weave in all ends. Thread each yarn tail onto your tapestry needle and weave it in and out through several nearby stitches in different directions. Give it a gentle tug to set it, then trim close. With chenille yarn, ends are very forgiving — they virtually disappear into the fabric.
Blocking? Not strictly necessary for chenille amigurumi, but if any seams look a little puckery, a gentle steam from a few inches away (no direct contact!) can smooth things out beautifully.
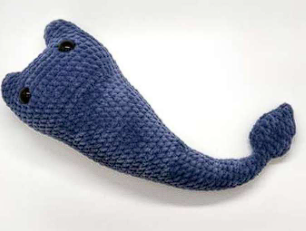
You did it! 🎉
Give your little stingray a squeeze — you just made something genuinely magical from yarn and love. Don’t worry if your first attempt looks slightly different from the photo. Every handmade piece has its own personality, and that’s exactly what makes it special.
Styling & Usage Ideas
Because this little guy deserves to be shown off!
- Ocean nursery décor — Hang your stingray from a mobile arm or tuck it into a woven basket on a shelf alongside other sea creature amigurumi. It’s pure magic for ocean-themed nurseries.
- The ultimate gift for a marine biology lover — Know someone obsessed with the ocean? This paired with a set of ocean-themed prints makes a stunning, handmade birthday package.
- Photography prop — Lay your stingray on a sandy background or white linen with some dried flowers and shells for a dreamy flat-lay photo. It’s practically begging for a Pinterest board.
- Start a crochet ocean collection — This stingray makes the perfect first piece in a whole handmade aquarium set. Add a crocheted shark, jellyfish, or whale next!