Chirp Into Spring: The Sweetest Free Crochet Bird Pattern You’ll Ever Make
Picture yourself curled up on the couch, a warm mug of tea beside you, and a
tiny, colorful friend taking shape in your hands. There’s something so
therapeutic about amigurumi—the rhythmic rounds, the way a little personality
emerges with just two safety eyes and a beak. Whether you’re looking to brighten
up a nursery shelf or you need a quick “just because” gift for a friend, this
free crochet bird pattern is exactly what your hook has been craving.
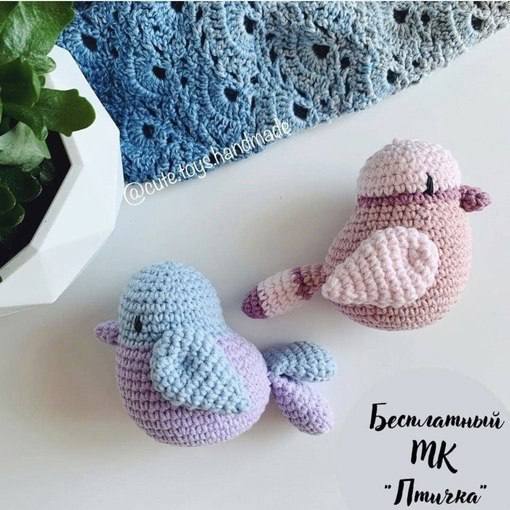
Meet our newest little mascot! This plump, squishy bird is designed with simple
stitches and a clever shape that makes it look far more complex than it actually
is. By the end of this post, you’ll have everything you need to make this
yourself—even if you’re still working on mastering your gauge consistency. Let’s
get those hooks ready!
Why You’ll Love This Pattern
- Quick & Satisfying: You can easily whip one up in a single afternoon.
- Scrap Friendly: Perfect for using up those leftover bits of yarn in your
stash. - Beginner-Friendly: Uses basic stitches like single crochet, increases, and
decreases. - Customizable: Change the colors to match your favorite songbird or room
decor! - Great for Gifting: These make adorable baby shower gifts or desk buddies.
Materials & Tools You’ll Need
To get started on your amigurumi bird tutorial, gather these supplies:
- Yarn: Medium weight (4) cotton or acrylic yarn. We love [LINK: Lion
Brand 24/7 Cotton] or [LINK: Red Heart Super Saver]. You’ll need two colors
(Main Color and Accent Color). - Hook: 2.5 mm or 3.25 mm (US D/3) — use a smaller hook than usual to keep
your stitches tight! - Safety Eyes: 6mm or 8mm black safety eyes.
- Stuffing: Polyester fiberfill.
- Tools: Yarn needle, stitch marker, and scissors.
Abbreviations & Stitch Guide (US Terms)
- MR: Magic Ring (or Magic Circle) – The foundation for most amigurumi.
- ch: Chain
- sc: Single Crochet
- inc: Increase (2 sc in the same stitch)
- dec: Decrease (Invisible decrease recommended: insert hook into front loops
of next 2 stitches, yarn over, pull through 2, yarn over, pull through 2) - sl st: Slip Stitch
- FLO: Front Loop Only
- st(s): Stitch(es)
💡 Pro Tip: When working amigurumi, always use a stitch marker at the beginning
of each round. It’s way too easy to lose track when you’re “in the zone!”
Step-by-Step Pattern Instructions
The Beak (Accent Color)
- Round 1: Create a MR and work 3 sc into it. — [3 sts]
- Round 2: 3 inc. — [6 sts]
- Round 3: 6 sc, sl st to finish. — [6 sts] Fasten off, leaving a long tail
for sewing.
The Wings (Make 2 – Accent Color)
- Round 1: MR, 6 sc. — [6 sts]
- Round 2: 6 inc. — [12 sts]
- Round 3: (2 sc, 1 inc) repeat 4 times. — [16 sts]
- Rounds 4–6: 16 sc (3 rounds). — [16 sts]
- Round 7: 2 sc, 2 dec, 4 sc, 2 dec, 2 sc. — [12 sts]
- Round 8: 2 sc, 1 dec, 4 sc, 1 dec, 2 sc. — [10 sts]
- Round 9: 10 sc. — [10 sts]
- Round 10: (Stuff lightly) 1 sc, 1 dec, 3 sc, 1 dec, 2 sc. — [8 sts]
- Round 11: 4 dec. — [4 sts] Fasten off and weave in ends.
The Tail (Main Color)
- Row 1: Ch 6 + 1 turning ch. — [7 sts]
- Row 2: Starting in 2nd ch from hook: 5 sc, 3 sc in the last ch (to turn the
corner), 4 sc, 1 inc. — [14 sts] - Round 3: 6 sc, 1 inc, 6 sc, 1 inc. — [16 sts]
- Round 4: 7 sc, 1 inc, 7 sc, 1 inc. — [18 sts]
- Rounds 5–6: 18 sc. — [18 sts]
- Round 7: 1 dec, 7 sc, 1 dec, 7 sc. — [16 sts]
- Round 8: 16 sc. — [16 sts]
- Round 9: 6 sc, 1 dec, 6 sc, 1 dec. — [14 sts]
- Round 10: 5 sc, 1 dec, 5 sc, 1 dec. — [12 sts]
- Round 11: 4 sc, 1 dec, 4 sc, 1 dec. — [10 sts] Stuff lightly. Fold flat and
sc 5 across the top to close.
The Body (Main & Head Colors)
- Round 1: MR, 6 sc. — [6 sts]
- Round 2: 6 inc. — [12 sts]
- Round 3: (1 sc, 1 inc) * 6. — [18 sts]
- Round 4: (2 sc, 1 inc) * 6. — [24 sts]
- Round 5: (3 sc, 1 inc) * 6. — [30 sts]
- Round 6: (2 sc, 1 inc, 2 sc) * 6. — [36 sts]
- Round 7: 36 sc. — [36 sts]
- Round 8: (5 sc, 1 inc) * 6. — [42 sts]
- Rounds 9–10: 42 sc. — [42 sts]
- Round 11: 5 sc, 5 sc (crocheting through both the body and the tail to
attach it), 32 sc. — [42 sts] - Rounds 12–14: 42 sc. — [42 sts]
- Round 15: (1 sc, 1 dec) * 5, 27 sc. — [37 sts]
- Round 16: Change Color for Head. (1 sc, 1 dec) * 4, 23 sc, 1 dec. — [32 sts]
- Round 17: (6 sc, 1 dec) * 4. — [28 sts]
- Round 18: (5 sc, 1 dec) * 4. — [24 sts]
- Round 19: (3 sc, 1 inc) * 6. — [30 sts]
- Rounds 20–22: 30 sc. — [30 sts]
- Round 23: (3 sc, 1 dec) * 6. — [24 sts] 💡 Pro Tip: Stop here to insert your
safety eyes between rounds 20 and 21, about 5-6 stitches apart. Start
stuffing the body firmly! - Round 24: (2 sc, 1 dec) * 6. — [18 sts]
- Round 25: (1 sc, 1 dec) * 6. — [12 sts]
- Round 26: 6 dec. — [6 sts] Fasten off and weave in ends.
Finishing & Assembly
You did it! You’ve got all the pieces of your feathered friend ready. Now, let’s
bring it to life:
- Beak Placement: Sew the beak right between the eyes. Center it so your bird
has a focused, cute expression. - Wing Placement: Sew the wings to the sides of the body around rounds 12–14.
Angling them slightly back gives the bird a “ready to fly” look! - Tidy Up: Weave in any remaining loose ends with your yarn needle. Give your
bird a little squish to distribute the stuffing evenly.
[LINK: How to sew amigurumi pieces together perfectly]
Styling & Usage Ideas
Now that your bird is finished, how should you show it off?
- The Nursery Mobile: Make 3 or 4 in pastel colors and hang them from a wooden
hoop for a handmade baby mobile. - The Desk Buddy: These are the perfect size to sit on a computer monitor or
bookshelf to keep you company while you work. - The Bag Charm: Add a keychain ring to the top of the head and clip it to
your favorite crochet project bag! - Seasonal Decor: Make them in bright yellows for Easter or deep reds for a
winter cardinal vibe.