Free Crochet Wasp Nest Pattern — DIY Decoy to Keep Wasps Away
Looking for a natural, chemical-free way to keep wasps away from your porch, yard, or garden? This crochet wasp nest pattern is one of the most surprisingly effective pest deterrents you can make at home — and it costs almost nothing.
Wasps are highly territorial insects. They won’t build a nest near an existing one, which means a realistic-looking fake nest hung near your outdoor spaces can send them packing before they ever settle in. This crochet wasp nest pattern mimics the papery, rounded shape of a real wasp nest beautifully — especially when worked in neutral, earthy tones.
Best of all? This project works up in just a couple of hours and holds up outdoors even after rain.
Why Wasp Nest Decoys Actually Work
Wasps establish territory around their colony and actively avoid areas where rival nests are present. By hanging a convincing fake nest near entryways, patios, swing sets, or garden beds, you create the impression that the space is already claimed — and wasps move on to find a new location.
Many crafters in online crochet communities swear by this trick, reporting weeks without a single wasp sighting after hanging just two or three decoys around their property.
What You’ll Need for This Crochet Wasp Nest Pattern
- Natural-colored yarn — tans, light brown, deep brown, taupe, or grey work best
- 7mm crochet hook
- Stuffing material — plastic grocery bags (recommended for a more organic shape), polyfill, or yarn scraps
- Scissors
- Tapestry needle

Tip: Plastic bag stuffing gives the decoy a slightly irregular, lumpy shape that looks more realistic than perfectly smooth polyfill.
Crochet Abbreviations
| Abbreviation | Meaning |
|---|---|
| CH | Chain |
| MC | Magic Circle |
| ST | Stitch |
| SC | Single Crochet |
| DC | Double Crochet |
| INC | Increase |
| DEC | Decrease |
| FPDC | Front Post Double Crochet |
Crochet Wasp Nest Pattern Instructions
Part 1 — Building the Body (Inside Out)
Work in continuous rounds unless otherwise noted.
- Create a MC, work 6 SC into the ring.
- DC INC in each stitch around — (12 sts)
- *DC x2, INC* repeat around — (18 sts)
- FPDC in each stitch around — (18 sts)
- *DC x2, INC* repeat around — (24 sts)
- FPDC in each stitch around — (24 sts)
- *DC x2, INC* repeat around — (32 sts)
- FPDC in each stitch around — (32 sts)
- *DC, INC* repeat around — (48 sts)
- FPDC in each stitch around — (48 sts)
- DC in each stitch around — (48 sts)
- FPDC in each stitch around — (48 sts)
- *DC in 6, DEC* repeat around — (42 sts)
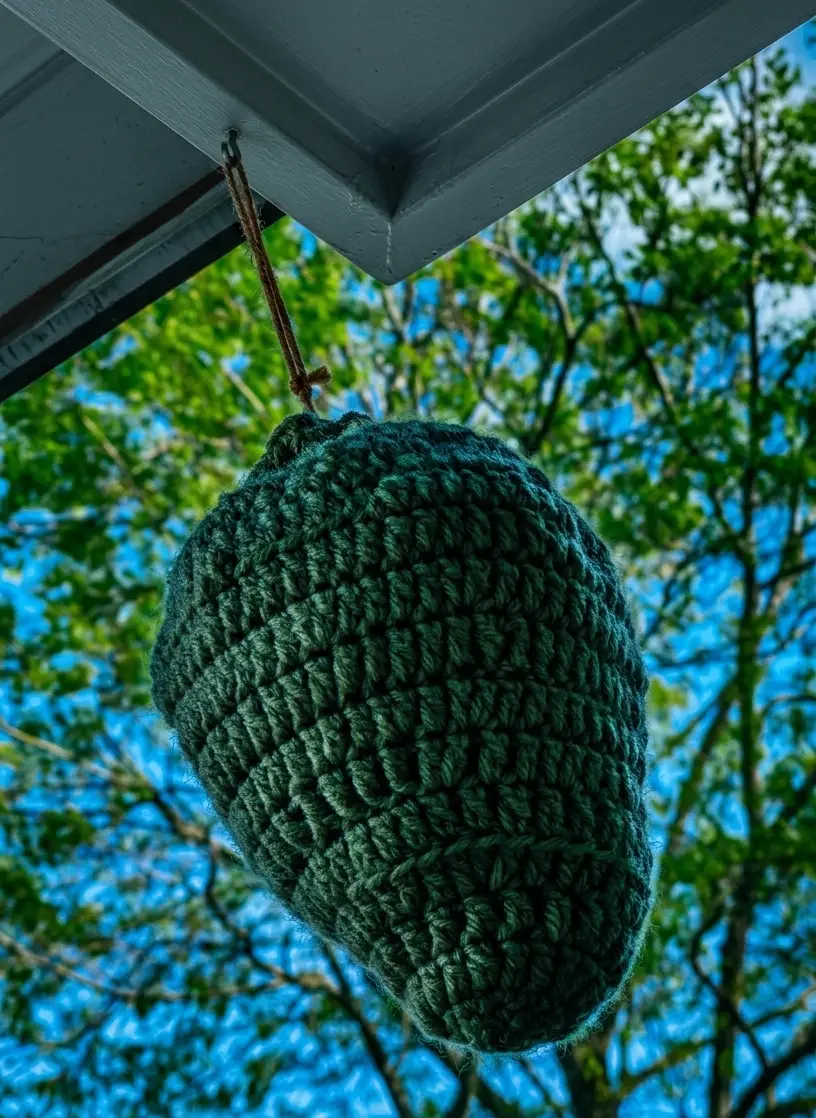
At this stage, you should clearly see the horizontal ridges created by your FPDC rounds — these are what give this crochet wasp nest pattern its realistic, nest-like texture. Flip your work inside out so those ridges face outward, then continue working on what is now the outside of the nest.
Part 2 — Closing the Nest
- *FPDC 5, DEC* repeat around — (36 sts)
- *DC 4, DEC* repeat around — (30 sts)
- *DC 3, DEC* repeat around — (24 sts)
- *DC 2, DEC* repeat around — (18 sts)
- *DC 1, DEC* repeat around — (12 sts) — Begin stuffing your nest now while the opening is still wide enough to reach inside easily.
- *SC, DEC* repeat around — (6 sts)
- Cut yarn, leaving a long tail (approximately 12–18 inches). Use your tapestry needle to sew the opening closed, then use the remaining tail to hang your finished nest.
How to Hang Your Finished Decoy
Thread the yarn tail through the top of the decoy and tie it off in a loop, or knot it directly around a hook, nail, or hanging bracket. Aim to position the decoy at or just above eye level — under eaves, porch ceilings, pergolas, or near doorframes are all ideal spots.
For best results, hang one near each main outdoor area you want to protect: front porch, back deck, children’s play area, garden entrance, etc.
Does This Crochet Wasp Nest Pattern Really Work?
Yes — and the results can be remarkable. Many crafters report zero wasp activity for weeks after hanging their decoys, even through rain and wind. The textured ridges are key: they replicate the layered, papery look of a real nest in a way flat or smooth decoys simply can’t.
Made three of them? So did we. One for the front porch, one for the back, and one near a child’s swing — and the difference was noticeable within days.
Tips & Variations
- Color matters. Stick to natural, muted tones. Avoid bright or saturated colors that don’t resemble actual nest material.
- Size it up. A larger decoy (work more increase rounds before closing) may be even more convincing to territorial wasps.
- Make multiples. Two or three decoys placed around your property give broader coverage — and this crochet wasp nest pattern is quick enough to make a whole set in an afternoon.
- Weatherproofing. Most yarn holds up well outdoors through light rain. If you want extra durability, lightly spritz the finished nest with a fabric protector spray.
Made one of your own? Share how it worked for you in the comments below! And if you’re new to crochet, check out our beginner tips guide and favorite places to shop for yarn and supplies.