how to crochet a baby blanket for beginners
How to Crochet a Baby Blanket for Beginners: Master the Super Easy Ripple Stitch
Welcome, aspiring crocheters! If you’ve been searching for an accessible and rewarding project like “how to crochet a baby blanket for beginners,” you’ve landed in the perfect spot. There’s nothing quite like the joy of creating a soft, handmade treasure for a little one, whether it’s for your own baby, a grandchild, or a cherished gift for an expectant friend.
In this comprehensive guide, we’ll walk you through crafting a beautiful and incredibly soft baby blanket using a stitch that’s surprisingly simple yet stunning: the Super Easy Ripple Stitch. This blanket isn’t just easy to make; it features a delightful texture with a raised, bubbly effect that’s both visually appealing and wonderfully squishy. Plus, it’s designed with beginners in mind, meaning you’ll be able to create a professional-looking result without feeling overwhelmed.
Why This Baby Blanket is Perfect for Beginners
Many beginner crochet projects can feel repetitive or intimidating, but this ripple baby blanket pattern is different. The secret to its simplicity lies in a clever one-row repeat. That’s right – once you master a single row, you’ll simply repeat it throughout the entire blanket! This makes it an ideal project for:
- Learning Basic Stitches: You’ll primarily use single crochet (sc) and double crochet (dc), fundamental stitches every crocheter should know.
- Building Confidence: Seeing a beautiful, textured fabric emerge from simple repetitions is incredibly encouraging.
- Mindful Crafting: The repetitive nature of the ripple stitch is wonderfully relaxing and meditative.
- A Quick Win: Despite its impressive look, this blanket works up relatively quickly, giving you that satisfying finished project feeling sooner.
The Heart of the Project: The Super Easy Ripple Stitch
The ripple stitch, also known as the chevron stitch, creates a wavy or zigzag pattern. In this “super easy” version, we achieve a lovely, textured ripple with minimal fuss. The resulting fabric is:
- Soft and Squishy: Perfect for a baby’s delicate skin.
- Textured: The raised, bubble-like effect adds depth and interest.
- Versatile: While we’re making a baby blanket, this stitch can be adapted for throws, scarves, or even garments!
Materials You’ll Need to Crochet Your Baby Blanket
Choosing the right materials is key, especially when you’re learning how to crochet a baby blanket for beginners. For this project, you’ll need:
- Yarn: We recommend Yarn Bee Simply Thick (Category 5 Bulky Yarn). The original project used the color “Duck Egg Blue,” but feel free to choose any color that sparks joy!
- Why Bulky Yarn? It works up fast, making it great for impatient beginners, and creates a wonderfully plump and cozy fabric.
- Fiber Choice: Look for soft acrylics, cotton blends, or superwash wools that are easy to care for and gentle on baby skin.
- Crochet Hook: A 6.5 mm (US K-10.5) crochet hook. This size complements the bulky yarn perfectly.
- Other Notions:
- Yarn needle (for weaving in ends)
- Scissors
- Measuring tape (to check your blanket’s size)
- Optional: Pom-pom maker (if you want to add cute pom-poms to the corners!)
Getting Started: The Foundation Chain
The foundation chain is the starting point of your blanket. For this Super Easy Ripple, your foundation chain needs to be a multiple of 3 plus 1, and then you add an additional chain for the turning chain (so, effectively, a multiple of 3 + 2 total). If you’re aiming for a baby-sized blanket (approx. 28 x 28 inches), you’ll want to chain 80 stitches.
Pro Tip for Beginners: Chain loosely! A tight foundation chain can make your first row difficult to work into and might cause your blanket to pucker at the bottom.
Crochet Pattern: Step-by-Step Instructions
Let’s dive into the core of “how to crochet a baby blanket for beginners” with this simple pattern!
Row 1: The Foundation Single Crochet
- Work one single crochet (sc) into the second chain from your hook.
- Continue to work one single crochet into each chain across the entire foundation row.
- At the end of Row 1, you should have 79 stitches if you started with a chain of 80. Your work will look like a flat row of single crochet stitches.
Row 2: Introducing the Ripple
- Chain 2 (ch 2), then turn your work. This chain 2 counts as your first stitch.
- Work two double crochets (dc) into the very first stitch (the same stitch where your chain 2 originates).
- Now, for the repeat: Skip the next two stitches.
- In the following stitch, work one single crochet (sc) AND two double crochets (dc) – all into the same stitch.
- Repeat this sequence (“skip 2 stitches, then (1 sc, 2 dc) into the next stitch”) all the way across Row 2 until you have three stitches remaining at the end of the row.
- To finish the row: Skip the next two stitches. Work one single crochet (sc) into the very last stitch.
Row 3: Continuing the Ripple Pattern
Row 3 is your repeat row for the rest of the blanket! This is where the ripple truly comes to life.
- Chain 2 (ch 2), then turn your work. Again, this chain 2 counts as your first stitch.
- Work two double crochets (dc) into the very first stitch (the same stitch where your chain 2 originates).
- Now, for the repeat: Skip the next two double crochet stitches (these are the two double crochets from the previous row’s cluster).
- In the next stitch (which should be a single crochet from the previous row), work one single crochet (sc) AND two double crochets (dc) – all into the same stitch.
- Repeat this sequence (“skip 2 double crochet stitches, then (1 sc, 2 dc) into the next single crochet stitch”) all the way across Row 3 until you have three stitches remaining at the end of the row.
- To finish the row: Skip the two double crochet stitches. Work one single crochet (sc) into the top of the turning chain (the chain 2) from the previous row.
Repeating for Length
Simply repeat Row 3 until your blanket measures approximately 27 inches (69 cm) long. This will give you a lovely square blanket of 28×28 inches once the border is added.
For a fantastic visual aid to help you through these steps, check out the video tutorial below by Amanda. Watching the stitches being formed can make all the difference, especially when you’re learning how to crochet a baby blanket for beginners!
Adding the Perfect Finishing Touch: The Simple Border
Once your blanket body is complete, it’s time to add the simple yet elegant border. This border consists of four rounds of single crochet stitches, which beautifully frames the ripple pattern.
- Round 1: Working Around the Blanket
- When you reach the end of your last row, work two additional single crochets into the very last stitch (for a total of three single crochets in that corner stitch).
- Work single crochet stitches evenly down the first side of your blanket. Aim for roughly one single crochet per row, placing them into gaps or the sides of stitches to keep it neat.
- When you reach the next corner, work three single crochets into that corner stitch.
- Continue working single crochets evenly along the foundation chain edge (one sc per chain stitch).
- Repeat the three single crochets in the next corner.
- Work single crochets evenly up the last side of the blanket.
- Work three single crochets in the final corner.
- To join the round, slip stitch (sl st) into the first single crochet you made.
- Rounds 2-4: Building the Border
- Chain 1. This chain does not count as a stitch.
- Work single crochet stitches all the way around the blanket.
- When you reach a corner (identified by the middle stitch of the three single crochets from the previous round), work three single crochets into that middle stitch. This ensures your corners remain crisp and flat.
- Continue single crocheting around, working three single crochets in each corner.
- At the end of each round, skip the initial chain 1 and slip stitch into the first single crochet to join.
- Repeat this for a total of four rounds.
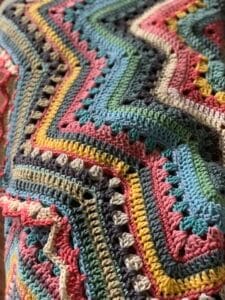
This simple border provides a clean, polished finish to your beautiful ripple blanket. For a touch of whimsy, the original pattern added an optional pom-pom to each corner – a lovely detail for a baby blanket! Here’s a closer look at the finished border and texture:

Essential Tips for Beginner Crocheters
Learning “how to crochet a baby blanket for beginners” is a fantastic journey. Here are some extra tips to help ensure your success:
- Check Your Gauge: While not strictly necessary for a blanket (as exact sizing isn’t critical), paying attention to your tension will result in an even fabric. If your work is too tight, your stitches will be hard to work into; too loose, and your blanket might be flimsy.
- Count Your Stitches! This is the golden rule of crochet. Regularly count your stitches at the end of each row, especially in the beginning. This helps prevent your blanket from getting wider or narrower unintentionally.
- Use Stitch Markers: Place a stitch marker in the first and last stitch of your row, or in the turning chain, to make it easier to identify where to work your stitches on the next row.
- Don’t Be Afraid to “Frog”: “Frogging” is crochet slang for unraveling your work (“rip it, rip it”). Everyone makes mistakes! It’s better to undo a few rows than to continue with an error that will bother you later.
- Watch Tutorials: Visual learners will benefit immensely from watching video tutorials. Slow down the playback speed if needed.
- Practice Basic Stitches: If single crochet and double crochet feel new, practice them on a small swatch before diving into the blanket.
Why Crochet a Baby Blanket? More Than Just a Gift!
Beyond learning the techniques of “how to crochet a baby blanket for beginners,” there’s a deeper satisfaction in creating such an item:
- A Personal Touch: A handmade blanket is infused with your love and care, making it an incredibly meaningful gift that will be cherished for years, perhaps even becoming a family heirloom.
- Unique and Custom: You choose the colors, the yarn, and every stitch is unique to your hands. No two handmade blankets are exactly alike!
- A Mindful Hobby: Crocheting is known for its therapeutic benefits, reducing stress and promoting a sense of calm.
- Practical and Loved: Babies adore soft, cuddly blankets for comfort, warmth, and playtime. Your blanket will be used and loved daily.
Start Your Crocheting Journey Today!
You now have all the tools and knowledge needed to tackle “how to crochet a baby blanket for beginners.” This ripple blanket pattern is an excellent starting point, offering both simplicity and stunning results. Imagine the joy of wrapping a little one in something you’ve created with your own hands!
We hope you enjoyed this tutorial. If you found it helpful, consider giving the original video a thumbs-up and subscribing to Amanda’s channel so you don’t miss any future creative projects. Happy crocheting!