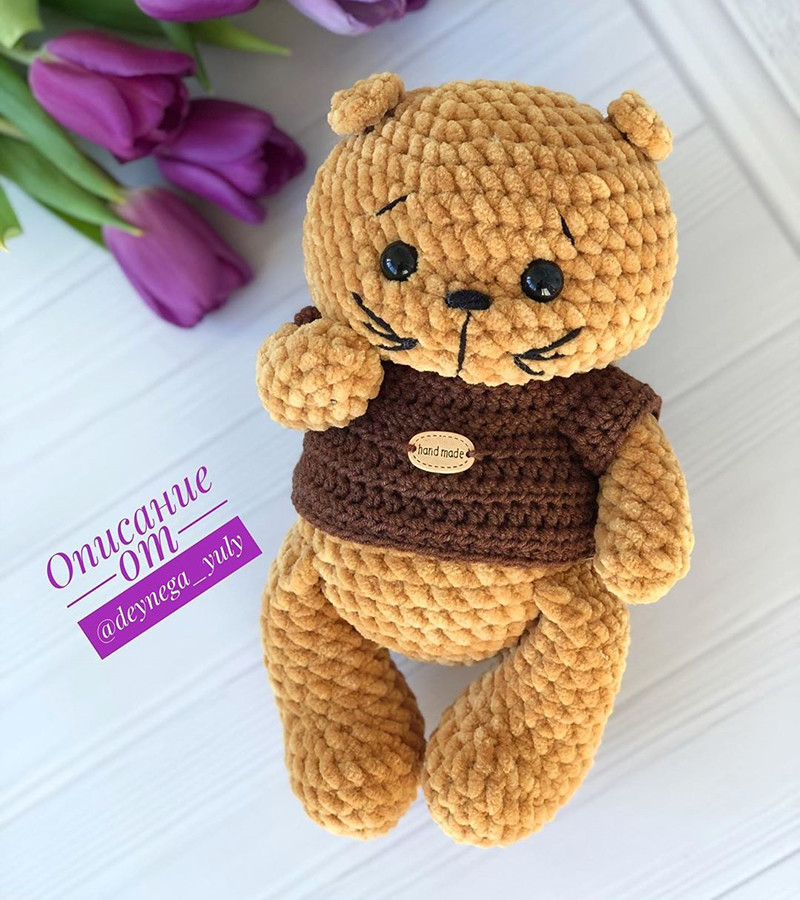
How to Crochet the Sweetest Plush Teddy Bear (Free Amigurumi Pattern!)
Get ready to create the most adorable, squishy teddy bear with this detailed amigurumi pattern! Perfect for gifting or simply adding a touch of handmade charm to your home, this plush bear is surprisingly easy to make. We’ll guide you step-by-step through crocheting each part of the bear and even a cute little sweater to go with it.
Using soft, plush yarn, your finished teddy bear will be irresistibly huggable. Let’s gather our supplies and get started on this fun crochet adventure!
Materials You’ll Need:
- Plush/Velvet yarn in your chosen color for the bear (e.g., light brown)
- Plush/Velvet yarn in a contrasting color for the sweater (e.g., dark brown)
- Appropriate size crochet hook for your yarn (e.g., 4.0mm – 5.0mm for plush yarn)
- 12-14mm safety eyes
- Polyester fiberfill for stuffing
- Tapestry needle for sewing and weaving in ends
- Stitch markers
- Scissors
Crochet Abbreviations Used:
- ch: chain
- sc: single crochet
- inc: increase (2 sc in one stitch)
- dec: decrease (single crochet 2 together, sc2tog)
- hdc: half double crochet
- dc: double crochet
- sl st: slip stitch
- R: Round/Row
- st(s): stitch(es)
- ( ) x N: Repeat instructions in parentheses N times
Let’s Make Our Teddy Bear!
Head
Using your bear-colored yarn.
- R1: Ch 6. Starting in the 2nd ch from hook: 4 sc, 3 sc in the last ch. Turn and work along the other side of the foundation chain: 3 sc, 1 inc in the first ch. (12 sts)
- R2: 1 inc, 3 sc, 3 inc, 3 sc, 2 inc. (18 sts)
- R3: (2 sc, 1 inc) x 6. (24 sts)
- R4: (3 sc, 1 inc) x 6. (30 sts)
- R5: (4 sc, 1 inc) x 6. (36 sts)
- R6: (5 sc, 1 inc) x 6. (42 sts)
- R7-13: Sc in each st around. (42 sts for 7 rounds)
- Insert safety eyes (12-14mm) between R9 and R10, with 7 stitches apart. Begin to stuff the head firmly.
- R14: (5 sc, 1 dec) x 6. (36 sts)
- R15: (4 sc, 1 dec) x 6. (30 sts)
- R16: (3 sc, 1 dec) x 6. (24 sts)
- R17: (2 sc, 1 dec) x 6. (18 sts)
Fasten off, leave a long tail for sewing. Finish stuffing the head firmly.
Body
Using your bear-colored yarn.
- R1: Ch 2. 6 sc in the 2nd ch from hook. (6 sts) (Alternatively, use a magic ring and 6 sc into it.)
- R2: 6 inc. (12 sts)
- R3: (1 sc, 1 inc) x 6. (18 sts)
- R4: (2 sc, 1 inc) x 6. (24 sts)
- R5: (3 sc, 1 inc) x 6. (30 sts)
- R6: (4 sc, 1 inc) x 6. (36 sts)
- R7-9: Sc in each st around. (36 sts for 3 rounds)
- R10: (4 sc, 1 dec) x 6. (30 sts)
- R11: Sc in each st around. (30 sts)
- R12: (3 sc, 1 dec) x 6. (24 sts)
- R13-14: Sc in each st around. (24 sts for 2 rounds)
- R15: (2 sc, 1 dec) x 6. (18 sts)
- R16-17: Sc in each st around. (18 sts for 2 rounds)
Fasten off, leave a long tail for sewing. Stuff the body firmly.
Arms (Make 2)
Using your bear-colored yarn.
- R1: Ch 2. 5 sc in the 2nd ch from hook. (5 sts) (Alternatively, use a magic ring and 5 sc into it.)
- R2: 5 inc. (10 sts)
- R3: Sc in each st around. (10 sts)
- R4: 2 dec, 6 sc. (8 sts)
- R5-12: Sc in each st around. (8 sts for 8 rounds)
Stuff only the bottom part of the arm up to R4. Fold the opening flat and single crochet 4 stitches through both layers to close. Fasten off, leave a long tail for sewing. Sew the arms to the sides of the body, along the seam where the head and body will be joined, with 5 stitches between them.
Legs (Make 2)
Using your bear-colored yarn.
- R1: Ch 5. Starting in the 2nd ch from hook: 1 inc, 2 sc, 3 sc in the last ch. Turn and work along the other side of the foundation chain: 3 sc. (10 sts)
- R2: 3 inc, 2 sc, 3 inc, 2 sc. (16 sts)
- R3: (1 sc, 1 inc) x 3, 2 sc, (1 sc, 1 inc) x 3, 2 sc. (22 sts)
- R4-5: Sc in each st around. (22 sts for 2 rounds)
- R6: 3 dec, 2 sc, (1 sc, 1 dec) x 3, 5 sc. (16 sts)
- R7: 2 dec, 2 sc, (1 sc, 1 dec) x 2, 4 sc. (12 sts)
- R8-14: Sc in each st around. (12 sts for 7 rounds)
Work 4 more sc to bring the closing to the side/center. Stuff the leg fully. Fold the opening flat and single crochet 6 stitches through both layers to close. Fasten off, leave a long tail for sewing. Sew the legs to the body between R8 and R9 of the body.
Tail
Using your bear-colored yarn.
- Join yarn between R6 and R7 of the body. Ch 6. Starting in the 2nd ch from hook, 5 sc.
Fasten off and weave in ends.
Ears (Make 2)
Using your bear-colored yarn.
- Ch 4. Starting in the 2nd ch from hook: 2 sc, 3 sc in the last ch. Turn and work along the other side of the chain: 2 sc. (7 sts)
Fasten off, leave a long tail for sewing. Sew the ears to the top of the head.
Assemble Your Bear:
Carefully sew the head to the body. Ensure all parts are securely attached and stuffed to your liking. Your adorable bear is now complete!
Crochet a Little Sweater for Your Bear!
Using your contrasting yarn for the sweater. This sweater is worked in turning rows.
- R1: Ch 37.
- R2: Dc in the 3rd ch from hook and in each ch across. (35 dc)
- R3: Ch 2 (counts as 1st hdc), turn. (4 hdc, 1 inc) x 7. (42 hdc)
- R4: Ch 1, turn. 6 sc, ch 8 (skip 8 sts), 14 sc, ch 8 (skip 8 sts), 6 sc. (This creates armholes)
- R5: Ch 1, turn. Sc in each st, including working 8 sc into each ch-8 space. (42 sc)
- R6: Ch 2 (counts as 1st hdc), turn. Hdc in each st across. (42 hdc)
- R7: Ch 2 (counts as 1st hdc), turn. (5 hdc, 1 inc) x 6, then hdc in the remaining 6 stitches. (48 hdc)
- R8: Ch 2 (counts as 1st hdc), turn. Hdc in each st across. (48 hdc)
- R9: Ch 2 (counts as 1st hdc), turn. Hdc in each st across. (48 hdc)
- R10: Ch 2 (counts as 1st hdc), turn. Hdc in each st across. (48 hdc)
Fasten off. Single crochet around the entire outer edge of the sweater (excluding the neckline) for a neat finish.
Sweater Sleeves (Make 2)
Join yarn to one of the armholes. Ch 2 (counts as 1st hdc). Work 3 rounds of hdc in the round, making sure to work 8 hdc into the chain-8 space, 8 hdc into the skipped body stitches, and 1 hdc at each “corner” where the chain meets the body of the sweater, for a total of 18 hdc per round. (18 hdc for 3 rounds)
Fasten off and weave in ends.
Finishing the Sweater:
Place the sweater on your teddy bear. If the back seam is open (as implied by working in rows), sew the edges of the back together to close. Adjust the sweater as needed.
Congratulations! You’ve successfully crocheted a wonderful teddy bear complete with its own sweater. Enjoy your new cuddly friend!