Rocky the Eridian Crochet Pattern (Project Hail Mary)
If you have read Project Hail Mary, you already know this is not just “a little alien side character.” Rocky is basically the emotional center of the book. The engineer. The friend. The guy who makes you laugh and then two pages later you are weirdly misty about a space spider who talks in musical chords.
So yeah. People want a Rocky crochet pattern.
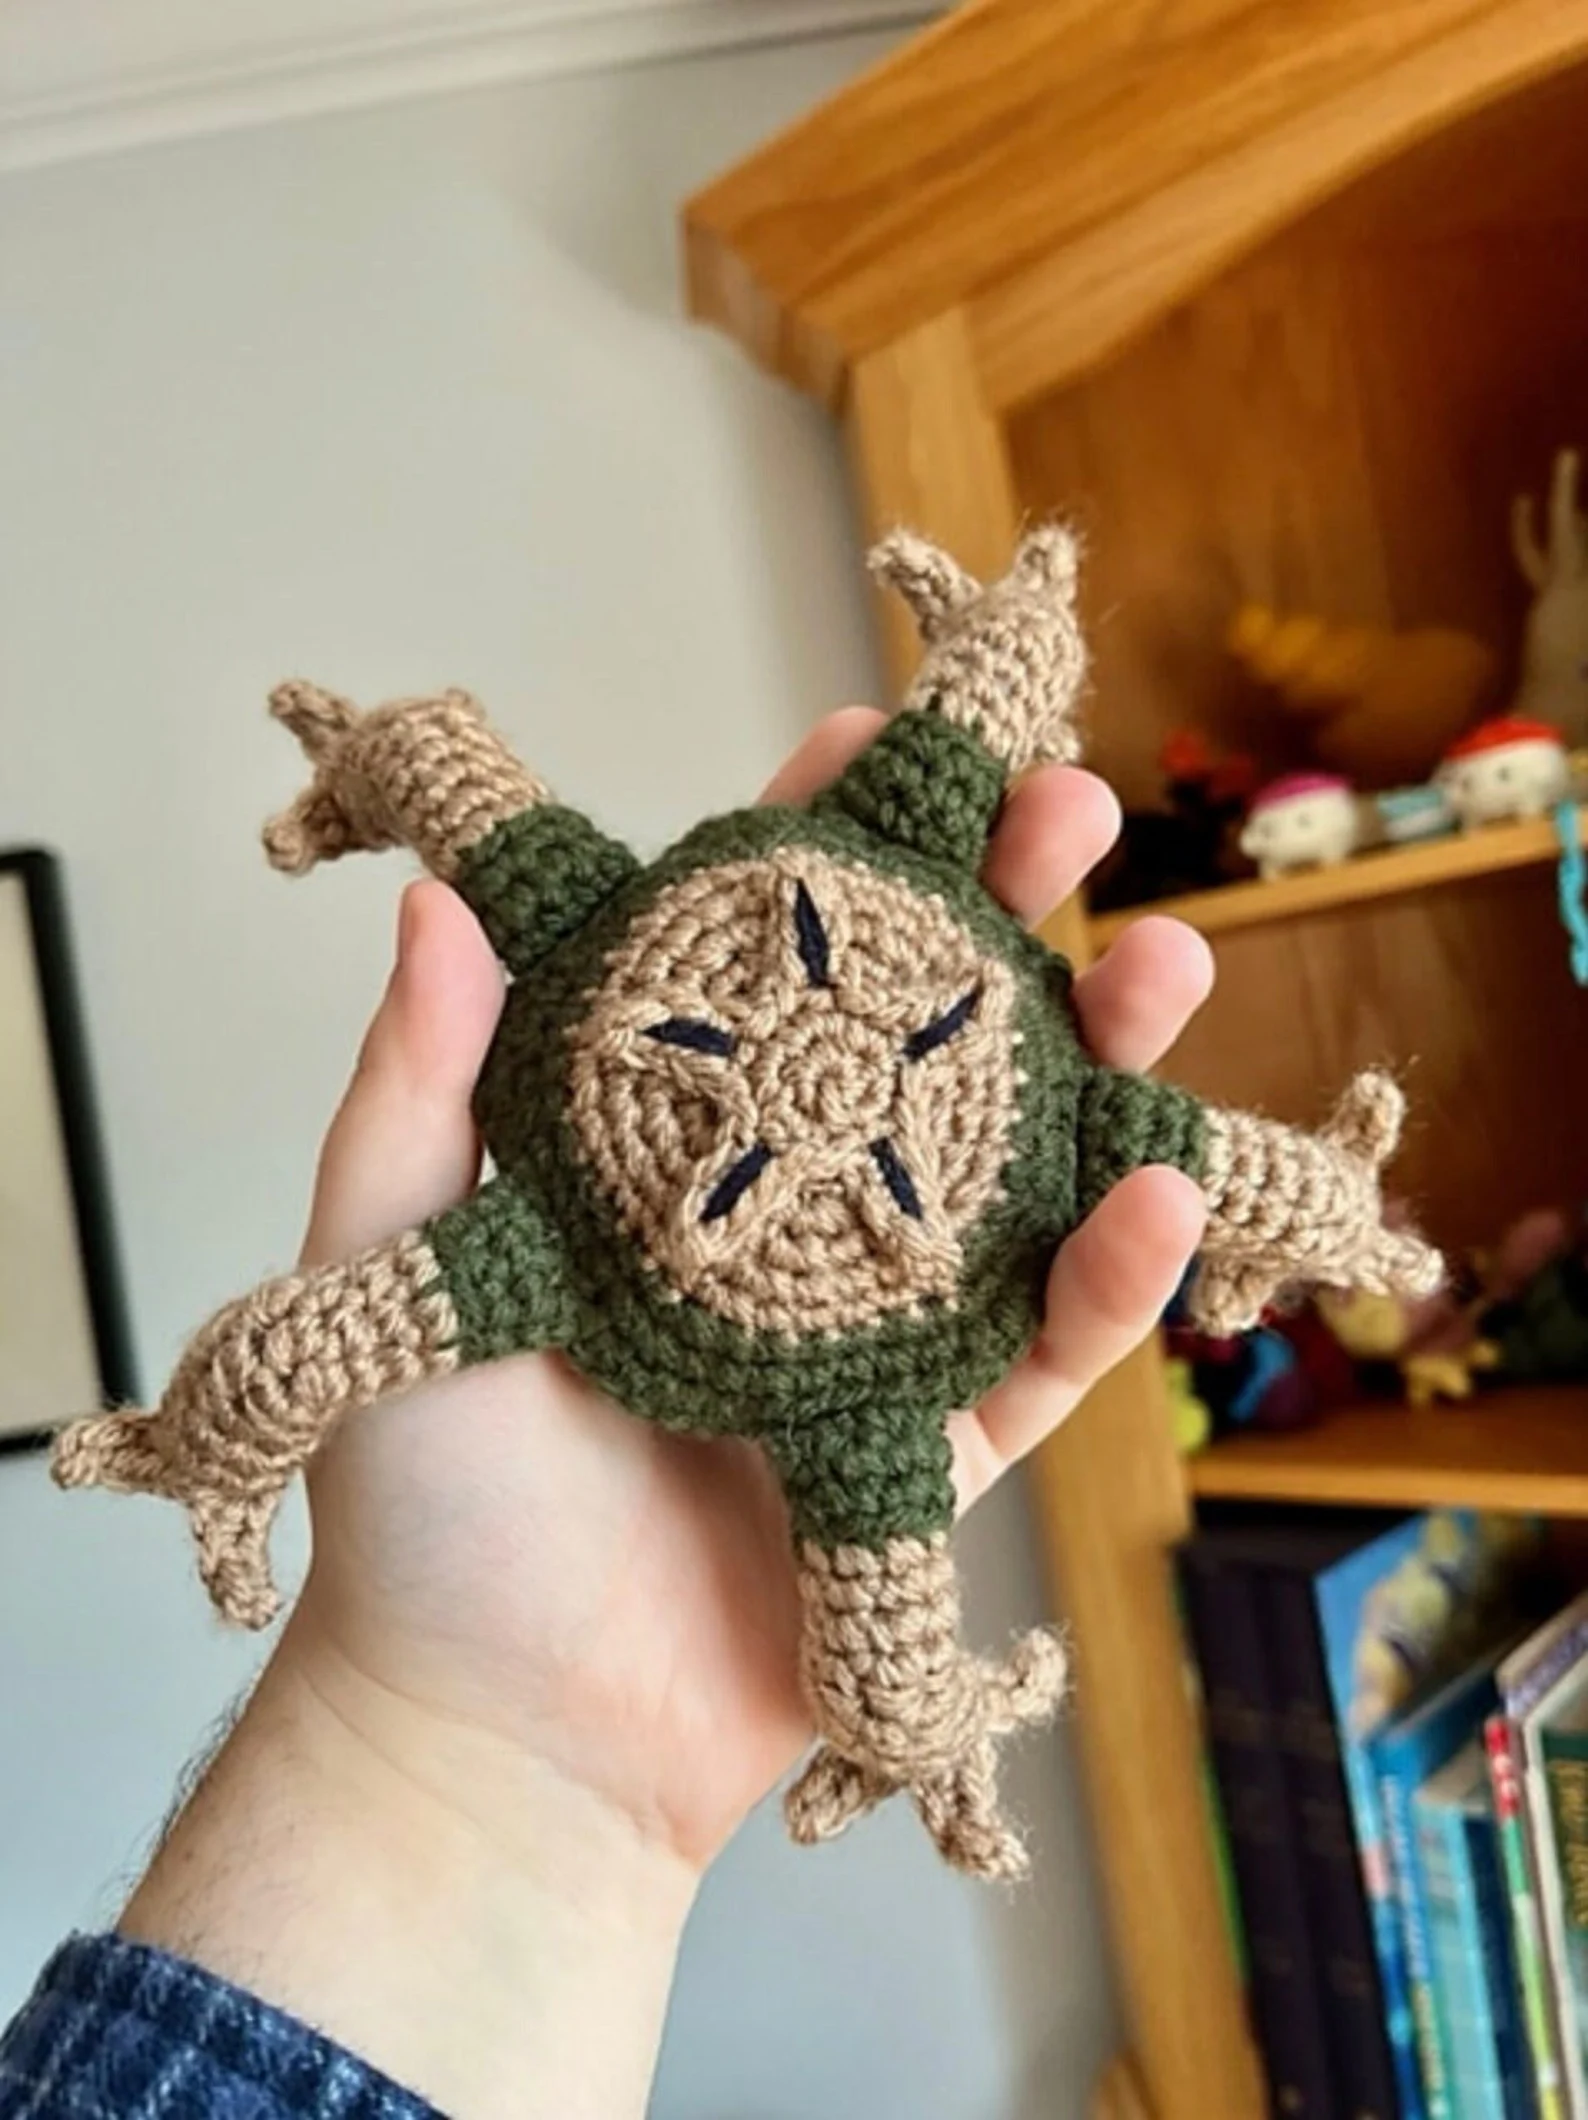
Also, I have seen a lot of attempts where Rocky ends up looking like. a brown blob with arms. Which is… fine. But if you want something that reads as Rocky immediately, you need a few specific things: the round, plated body segments, the “fist” hands, the five-limbed vibe, and that slightly squat, strong posture. Not tall. Not cute like a plush bear. More like a compact, competent space mechanic.
This pattern is my attempt to land right in that zone.
A quick note before we start: this is fan art. I’m not affiliated with Andy Weir or the publisher. Also, Rocky’s exact anatomy is described in a way that leaves room for interpretation, so this is a “crochet translation” of the character, not a museum replica. Ok. Let’s make him.
What you’ll end up with
A Rocky-inspired amigurumi, about 6.5 to 8 inches tall depending on yarn and tension. Big segmented body, five limbs total, chunky hands, and optional little “tool belt” details if you want him to look like he is about to fix a leak in your spaceship.
Skill level
Confident beginner to intermediate.
You should know:
- working in the round
- single crochet increases and decreases
- how to attach pieces cleanly
- how to keep your stuffing from looking lumpy (not mandatory but it helps)
Materials
Yarn (worsted weight / aran recommended):
- Main body color: medium brown, cocoa, or warm gray brown (Rocky tends to read “rocky” in earthy tones)
- Accent color: slightly lighter brown or tan (for segment ridges and details)
- Optional: darker brown for shadow lines
Hook: 3.25 mm to 4.0 mm
Use the smallest hook that still feels good with your yarn. You want tight stitches so stuffing doesn’t show.
Other:
- polyester fiberfill
- tapestry needle
- stitch marker
- scissors
- optional: pipe cleaner or floral wire (for poseable limbs)
- optional: felt scraps for small detail patches
- optional: embroidery thread (tan and dark brown)
Safety eyes?
Honestly… I would skip them. Rocky doesn’t have “cute teddy eyes” in the book. If you really want an eye area, we’ll do a subtle stitched panel. More alien, less plush.
Crochet abbreviations (US terms)
- MR = magic ring
- sc = single crochet
- inc = increase (2 sc in same stitch)
- dec = decrease (invisible decrease preferred)
- sl st = slip stitch
- ch = chain
- BLO = back loop only
- FLO = front loop only
- ( ) = repeat instructions in parentheses
- = stitch count at end of round
Work in continuous rounds unless stated.
Overall build plan
You will crochet:
- Body (one piece, segmented)
- Limb sockets (built into body)
- 5 limbs (all similar, one slightly “dominant” arm if you want)
- Hands (chunky mitt shapes)
- Optional: chest panel detail and tool strap
Then assemble. And then you stare at him for a minute because it’s Rocky and that’s just what happens.
1) Body (segmented shell look)
Use main body color.
R1: MR, 6 sc [6]
R2: inc around [12]
R3: (sc, inc) around [18]
R4: (2 sc, inc) around [24]
R5: (3 sc, inc) around [30]
R6: (4 sc, inc) around [36]
R7: (5 sc, inc) around [42]
R8: (6 sc, inc) around [48]
Now we start building that plated, segmented feel. The trick is alternating a normal round with a BLO round. The BLO rounds create a ridge that looks like a body plate edge.
R9: sc around [48]
R10: BLO sc around [48]
R11: sc around [48]
R12: BLO sc around [48]
R13: sc around [48]
R14: BLO sc around [48]
Now taper slightly. Rocky reads stocky, but not perfectly spherical. More like an oval-ish capsule.
R15: (6 sc, dec) around [42]
R16: sc around [42]
R17: BLO sc around [42]
R18: (5 sc, dec) around [36]
R19: sc around [36]
R20: BLO sc around [36]
R21: (4 sc, dec) around [30]
R22: sc around [30]
R23: BLO sc around [30]
Stuff as you go. Like, start now. Do not wait until it is a tiny opening and then regret your choices.
Now we create the underside and base. Rocky stands kind of low. A flatter base helps.
R24: (3 sc, dec) around [24]
R25: sc around [24]
R26: (2 sc, dec) around [18]
R27: sc around [18]
Add more stuffing, firm but not stretched.
R28: (sc, dec) around [12]
R29: dec around [6]
Fasten off, close hole.
2) Optional segment edging (makes him pop)
If you want stronger “plate lines,” take your accent color and surface crochet or embroider along the BLO ridges. Not every ridge. Just pick 2 or 3.
Simple approach: whip stitch around the ridge line in a loose spiral. It adds definition without making him look striped.
3) Limb placement (five sockets, no panic)
Rocky has five limbs. The book description can make your brain trip over itself, so here is a clean crochet interpretation:
- 2 upper arms (left and right)
- 2 lower arms (left and right)
- 1 “central” limb (bottom front-ish), can read as a leg/arm depending on pose
You can sew limbs directly to the body. Or you can crochet little socket pads first, which gives a more mechanical look.
I like socket pads. They make attachment sturdier and kind of match the “engineered” vibe.
Socket pads (make 5)
Accent color or main color, your call.
R1: MR 6 sc [6]
R2: inc around [12]
R3: sc around [12]
Fasten off with a long tail for sewing.
Sew 4 sockets around the “midline” of the body, roughly between rounds 12 to 18. Space them evenly. Then place the 5th socket slightly lower on the front, around rounds 18 to 21.
Do not overthink symmetry. Rocky is not a cute doll. Slightly uneven is… honestly more believable.
4) Limbs (make 5)
Use main body color.
Each limb is a short thick tube that narrows slightly, then connects to a hand.
R1: MR 6 sc [6]
R2: inc around [12]
R3-R5: sc around [12]
R6: (4 sc, dec) twice [10]
R7-R9: sc around [10]
Stuff lightly.
If using wire: insert a pipe cleaner folded in half, twist ends inside the hand area later. Keep the ends rounded so they don’t poke out.
Fasten off, leave tail for attaching to socket or body.
5) Hands (make 5)
Rocky’s hands in the book are not human hands. They are described more like chunky gripping ends. For crochet, a simple “mitten claw” reads right.
Use main body color or slightly darker shade.
R1: MR 6 sc [6]
R2: (sc, inc) around [9]
R3: sc around [9]
R4: (2 sc, inc) around [12]
R5-R7: sc around [12]
Stuff firmly.
Now create a slight pinch so it looks like a gripping end.
R8: (4 sc, dec) twice [10]
R9: sc around [10]
R10: (3 sc, dec) twice [8]
Fasten off, leave tail.
Sew each hand onto a limb end. Slightly flatten the hand while sewing so it looks like a paddle-grip, not a ball.
6) Assembly
This is where it becomes Rocky instead of “round thing with tubes.”
Attach limbs
Sew each limb to a socket pad. Or sew directly to body. Use sturdy stitching, go around twice. These limbs get tugged constantly.
Recommended positions:
- Upper left and upper right: around body round 13 to 15
- Lower left and lower right: around body round 16 to 18
- Central limb: front lower, around round 19 to 21
Posture tip
When attaching, angle limbs slightly downward, like they are meant to brace and work. If you attach them straight out, he looks like a starfish. Which is not the goal.
7) The “face” area (subtle, alien, no cartoon eyes)
Rocky communicates with musical language and senses. A literal face is optional. But it helps to give him a front.
Pick a “front” of the body. On that side, add a small chest panel.
Chest panel (optional)
Use accent color.
R1: ch 5
Row 1: sc in 2nd ch from hook and across (4 sc)
Row 2-4: ch 1, turn, sc across (4 sc)
Fasten off, sew panel onto the front, centered between rounds 12 and 17.
Then add 2 to 3 short vertical embroidery lines on the panel, like vents or plating seams. Minimal. Just enough.
If you really want “eyes,” do two tiny angled stitches above the panel, spaced wide. Like slits. Not circles. Circles make him look like a mascot.
8) Extra details (small things that make it feel like Project Hail Mary)
You do not need these, but they add a lot.
A little tool strap
With dark brown yarn:
- ch 26 to 32 depending on body circumference
- sl st into first chain to form a loop
- sew on diagonally like a bandolier
- add a tiny rectangle pouch on one side
Texture nubs
Rocky is described with a kind of hard body texture. You can add tiny nubs using French knots or bobble stitches randomly on the upper body. Not too many. 8 to 12 is plenty.
“Metal” accents
If you have gray yarn, add a couple of small patches to limbs like protective pads. Just sew small ovals.
Sizing changes (if you want him bigger)
- Use bulky yarn and a 5.0 mm hook, keep the same stitch counts.
- Or keep worsted yarn and add 1 more increase round for the body (go up to 54 stitches) before starting the ridge sequence.
Bigger Rocky is very satisfying, not going to lie. More presence on the shelf.
Common mistakes (and how to fix them)
He looks like a ball.
Add more taper. Do one extra decrease round earlier, around where you go from 48 to 42. Or stuff the bottom firmer than the top.
He looks like a starfish.
Angle the limbs down and forward when sewing. Also make the limbs shorter. One less “sc around” round in the limb tube helps.
The segments aren’t visible.
Use a contrast yarn and stitch along the ridges. Even just one ridge line makes the whole thing read as plated.
He won’t stand.
Flatten the base by shaping it with your hands after stuffing. Or add a little weighted pouch (poly pellets inside a sewn fabric scrap) in the bottom before closing.
Final thoughts, because I have to say it
Rocky is one of those characters where you can feel the writer smiling through the page. It’s rare. And crocheting him is oddly calming because you’re basically building a friend out of stitches. A slightly terrifying friend. But still.
If you make this pattern, take a photo from slightly above, with the limbs posed like he is mid repair. That’s when it clicks. That’s when he looks like he belongs on a spaceship next to a half-open panel and a problem nobody else can solve.
And if your Rocky comes out a little lopsided. Good. He’s a working engineer. Not a showroom model.
Pattern summary (quick checklist)
- Body: 1
- Socket pads: 5
- Limbs: 5
- Hands: 5
- Chest panel: optional
- Strap and pouches: optional
If you want, tell me what yarn weight you’re using and how tall you want Rocky to be, and I can adjust the stitch counts so the proportions stay right.
FAQs (Frequently Asked Questions)
Who is Rocky in Project Hail Mary and why is he significant?
Rocky is a key character in Project Hail Mary, serving as the emotional center of the book. He is an engineer, a loyal friend, and provides both humor and heartfelt moments, making him much more than just a minor alien side character.
What are the essential features to capture when crocheting a Rocky amigurumi?
To make a recognizable Rocky crochet figure, focus on his round, plated body segments, ‘fist’ hands, five-limbed structure, and his slightly squat, strong posture. He should look like a compact, competent space mechanic rather than tall or plush bear-like.
What skill level is required to crochet the Rocky amigurumi pattern?
The pattern is suitable for confident beginners to intermediate crocheters. You should be familiar with working in the round, single crochet increases and decreases, attaching pieces cleanly, and stuffing techniques to avoid lumps.
What materials are recommended for making the Rocky crochet doll?
Use worsted weight or aran yarn in earthy tones like medium brown, cocoa, or warm gray brown for the main body. Accent colors like lighter brown or tan highlight segment ridges. A 3.25 mm to 4.0 mm hook is ideal for tight stitches. Additional supplies include polyester fiberfill, tapestry needle, stitch marker, scissors, and optional items like pipe cleaners for poseable limbs and embroidery thread for details.
Why are safety eyes not recommended for the Rocky amigurumi?
Rocky doesn’t have ‘cute teddy eyes’ in the book; instead of safety eyes, a subtle stitched panel is suggested to represent his eye area. This approach keeps the alien appearance authentic and less plush-like.
How is Rocky’s segmented body constructed in this crochet pattern?
The body is crocheted as one piece with built-in limb sockets using alternating rounds of single crochet and back loop only (BLO) stitches to create ridged segments that mimic his plated shell look. The shape tapers slightly from a round base to an oval-ish capsule form to reflect his stocky but compact physique.