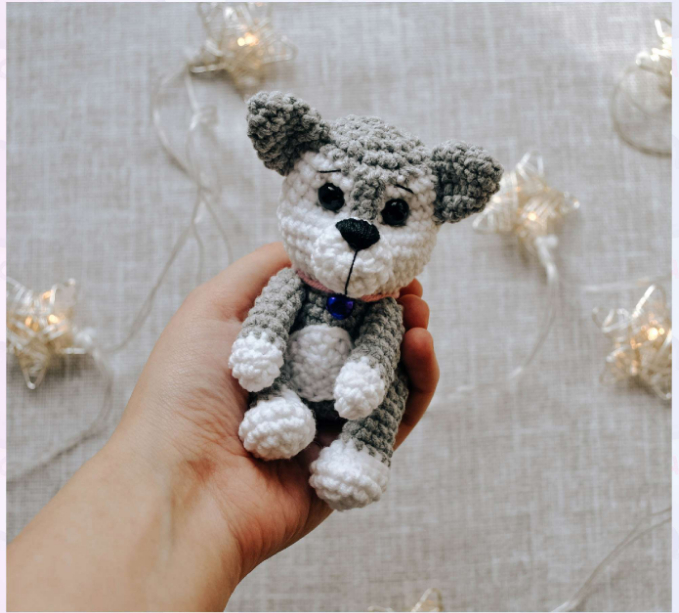
Crochet ‘Husky Chik’: Margevich’s Adorable Amigurumi Master Class.
Welcome, fellow crochet enthusiasts, to a delightful journey into creating your very own “Husky Chik”! Here at Crochetto, we believe in the joy of crafting, and this adorable pattern from Natalia Margevich (@MARGEVICH_TOY) is sure to bring a smile to your face. Get ready to bring this charming little husky to life with your hook and yarn. Let’s dive in!

Important Notes
- This master class is of medium difficulty.
- The master class does not contain lessons on crochet basics.
- Distribution of this master class is prohibited.
- When publishing works made using this master class, please credit the author.
Author: Natalia Margevich
Instagram: @MARGEVICH_TOY
Thank you for your understanding and respect for others’ work.

Materials
Yarn:
- Main Yarn: (Less than one skein needed)
- YarnArt Jeans (Gray, Color 46)
- YarnArt Jeans (White, Color 01)
- Nose: Black thread
- Collar: Any yarn
- Eye Tightening: White thread
Tools
- Eyes: 5 mm (safety eyes)
- Scissors
- Needles
- Stitch Markers
- Crochet Hook: Size 2
- Bell
Attention: You can change the materials to suit your preferences.

Abbreviations
- SC: Single Crochet
- CH: Chain Stitch
- INC: Increase (make two SC from one SC)
- DEC: Decrease (crochet 2 SC together)
- SL ST: Slip Stitch
- CH: Turning Chain
- (*6): Repeat this action 6 times
Happy Crocheting!

Instructions
BODY/HEAD
(Using main yarn and Hook size 2)
- Make an Amigurumi ring of 6 SC.
- 6 INC = 12 SC.
- 12 INC = 24 SC.
- (3 SC + 1 INC) * 6 = 30 SC.
- Crochet 5 rows of 30 SC each.
- (3 SC + 1 DEC) * 6 = 24 SC.
- Crochet 5 rows of 24 SC each.
- (2 SC + 1 DEC) * 6 = 18 SC.
- Attach white yarn.
- 18 INC = 36 SC.
- Begin stuffing the body.
- Crochet 4 rows of 36 SC each.
- (4 SC + 1 DEC) * 6 = 30 SC.
- Crochet 3 rows of 30 SC each.
Attention: At this stage of crocheting, we insert the eyes.
- Insert eyes between the second and third rows of 30 SC.
- The distance between the eyes should be 3 SC.

- Attach gray yarn.
- Crochet 1 row of 30 SC.
- (3 SC + 1 DEC) * 6 = 24 SC.
- (2 SC + 1 DEC) * 6 = 18 SC.
- Stuff the item.
- (1 SC + 1 DEC) * 6 = 12 SC.
- 6 DEC.
- Leave a long end of the thread.
- Cut the remaining thread.
- Sew the hole closed.
- Secure the thread and hide it inside the item.


BRIDGE OF NOSE
(Using gray yarn)
- Chain 5 stitches.
- Do not count the first chain stitch.
- Crochet 1 row of 4 SC using a turning chain.
- Leave a long end of thread for sewing.
- Cut the remaining thread.

BELLY
(Using white yarn)
- Make an Amigurumi ring of 6 SC.
- 6 INC = 12 SC.
- Crochet 1 row of 12 SC.
- Leave a long end of thread for sewing.
- Cut the remaining thread.

MUZZLE
(Using white yarn)
- Make an Amigurumi ring of 6 SC.
- 6 INC = 12 SC.
- Crochet 3 rows of 12 SC each.
- Leave a long end of thread for sewing.
- Cut the remaining thread.

LEGS (Make 2)
(Using white yarn)
- Make an Amigurumi ring of 6 SC.
- 6 INC = 12 SC.
- (1 SC + 1 INC) * 6 = 18 SC.
- Crochet 1 row of 18 SC.
- 6 DEC + 6 SC = 12 SC.
- 2 SC + 1 DEC + 4 SC + 1 DEC + 2 SC = 10 SC.
- Attach gray yarn.
- Crochet 7 rows of 10 SC each.
- Stuff the feet.
- 5 DEC.
Important:
- If you are NOT using the thread attachment option (for assembly):
- Leave a long end of thread for sewing.
- Cut the remaining thread.
- Sew the hole closed.
- If you ARE using the thread attachment option for parts:
- Cut the end of the thread.
- Sew the hole closed.
- Hide the remaining thread inside the part.

ARMS (Make 2)
(Using white yarn)
- Make an Amigurumi ring of 4 SC.
- 4 INC = 8 SC.
- Crochet 2 rows of 8 SC each.
- Attach gray yarn.
- Crochet 8 rows of 8 SC each.
- 4 DEC.
Important: (Same as for Legs)
- If you are NOT using the thread attachment option (for assembly):
- Leave a long end of thread for sewing.
- Cut the remaining thread.
- Sew the hole closed.
- If you ARE using the thread attachment option for parts:
- Cut the end of the thread.
- Sew the hole closed.
- Hide the remaining thread inside the part.

EARS (Make 2)
(Using gray yarn)
- Make an Amigurumi ring of 4 SC.
- 4 INC = 8 SC.
- Crochet 1 row of 8 SC.
- (1 SC + 1 INC) * 4 = 12 SC.
- Crochet 2 rows of 12 SC each.
- Leave a long end of thread for sewing.
- Cut the remaining thread.

TAIL
(Using white yarn)
- Make an Amigurumi ring of 4 SC.
- 4 INC = 8 SC.
- Crochet 2 rows of 8 SC each.
- Attach gray yarn.
- Crochet 4 rows of 8 SC each.
- Leave a long end of thread for sewing.
- Cut the remaining thread.

Assembly
Now for the exciting part – bringing all your crocheted pieces together to form your adorable Husky Chik!
-
- Sew on the Belly.

-
- Sew on the Bridge of Nose.

-
- Sew on the Legs.

-
- Sew on the Arms.

- Sew on the Muzzle.
- Embroider the Nose.
- Sew on the Ears.
- Make a Collar with a bell.
- Sew on the Tail.
- Create tightening under the eyes.
Congratulations!
Our little one is ready!
HEIGHT OF THE FINISHED ITEM: 10 CENTIMETERS

We hope this master class was a joyful and rewarding experience for you. Your new Husky Chik is a testament to your creativity and skill! Don’t forget to share your finished projects with us on social media by tagging @Crochetto. We love seeing your beautiful creations and celebrating your crafting success. Happy hooking, and we look forward to inspiring your next project!