Turn Yarn Scraps Into Adorable Crochet Curio!
Welcome, fellow crafters, to a delightful journey with Crochetto! Are you looking for a charming project to use up those lovely yarn scraps? Look no further! Our ‘Curio’ free pattern is here to help you transform even the smallest bits of yarn into an adorable, quirky little friend. This pattern is not just a joy to make; it’s a wonderful way to give new life to forgotten fibers, perfect for anyone who loves creating unique, handmade treasures. Get ready to dive into some professional SEO crochet patterns content that’s both fun and easy to follow

Materials You’ll Need
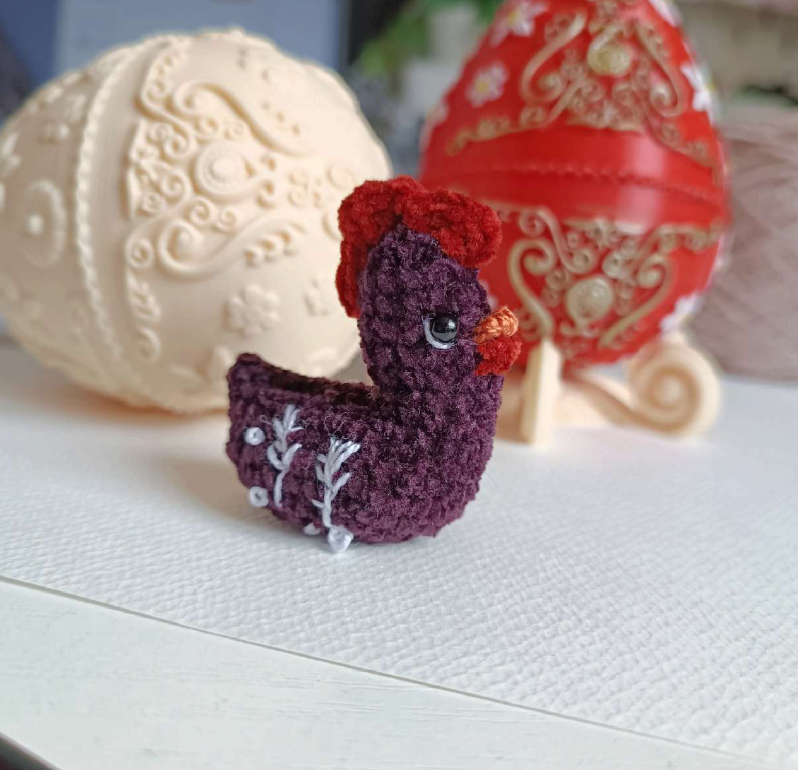
Curio can be crocheted from any yarn scraps. The example uses thin bobbin velour, with a 1.1 mm hook. For the eyes, 3 mm black plastic half-bead eyes are used.
- Yarn scraps (e.g., thin bobbin velour)
- 1.1 mm crochet hook (or appropriate size for your chosen yarn)
- 3 mm black plastic half-bead eyes
- Stuffing material
- Tapestry needle
- Thin cotton or sewing thread (for beak and eye whites)
- Dark red yarn (for comb and wattles)
Abbreviations Used
This pattern uses standard crochet abbreviations:
- MR: Magic Ring
- sc: Single Crochet
- inc: Increase (2 single crochet stitches in one stitch)
- dec: Decrease (single crochet 2 stitches together)
- ch: Chain
- dc: Double Crochet
- hdc: Half Double Crochet
- sl st: Slip Stitch
Let’s Crochet Curio: Head & Body
We’ll begin by creating the main body and head of your Curio. Remember to stuff firmly as you go!

- MR 6 sc (6 stitches)
- 6 inc = 12 (12 stitches)
- (Sc, inc) 6 = 18 (18 stitches)
- (2 sc, inc) 6 = 24 (24 stitches)
- (3 sc, inc) 6 = 30 (30 stitches)
- (4 sc, inc) 6 = 36 (36 stitches)

- 7 – 10. 4 rounds without changes = 36 (36 stitches)
- 11. Work 12 sc, skip 24 stitches and close.
- 12 – 15. Work 4 rounds without changes = 12 (12 stitches)
- 16. 6 dec = 6 Close the opening with a needle and add stuffing.
Thread yarn onto a needle and sew the remaining opening on the back through the loops. Don’t forget to add stuffing there too!

Adding Curio’s Features
Now that the main body is done, let’s bring Curio’s personality to life with these delightful details!

Eyes and Beak
Glue the eyes on the 5th round of the head, with 4 stitches between the eyes. Embroider the beak as a stitch using thin cotton or sewing thread, at eye level.

The Comb
Make the comb from dark red yarn. Secure it in the center of the head, 3 stitches up from the beak. Work 3 ch, 2 dc – into one stitch, sc, 3 dc – into one stitch, sc, hdc, sl st.

Wattles
Bring the yarn out under the beak, make small stitches (wattles, like a hen’s, and larger ones for a rooster). Secure the yarn and cut.

Final Touches and Decoration
Decorate Curio as desired! The example suggests:
- Embroider the whites of the eyes with white thread.
- At the level of the wings, make simple embroidery instead of actual wings (E).
Give life to yarn scraps!


We hope you’ve enjoyed creating your very own Curio! It’s so rewarding to see how a few yarn scraps can transform into such a unique and charming character. Don’t forget to share your finished Curio with us on social media by tagging @Crochetto – we absolutely love seeing your wonderful creations come to life!
Happy hooking, and remember, there are always more exciting projects waiting for you!