Hexi Cardigan Crochet Pattern (Beginner-Friendly)
Hexi Cardigan Crochet Pattern (Beginner-Friendly)
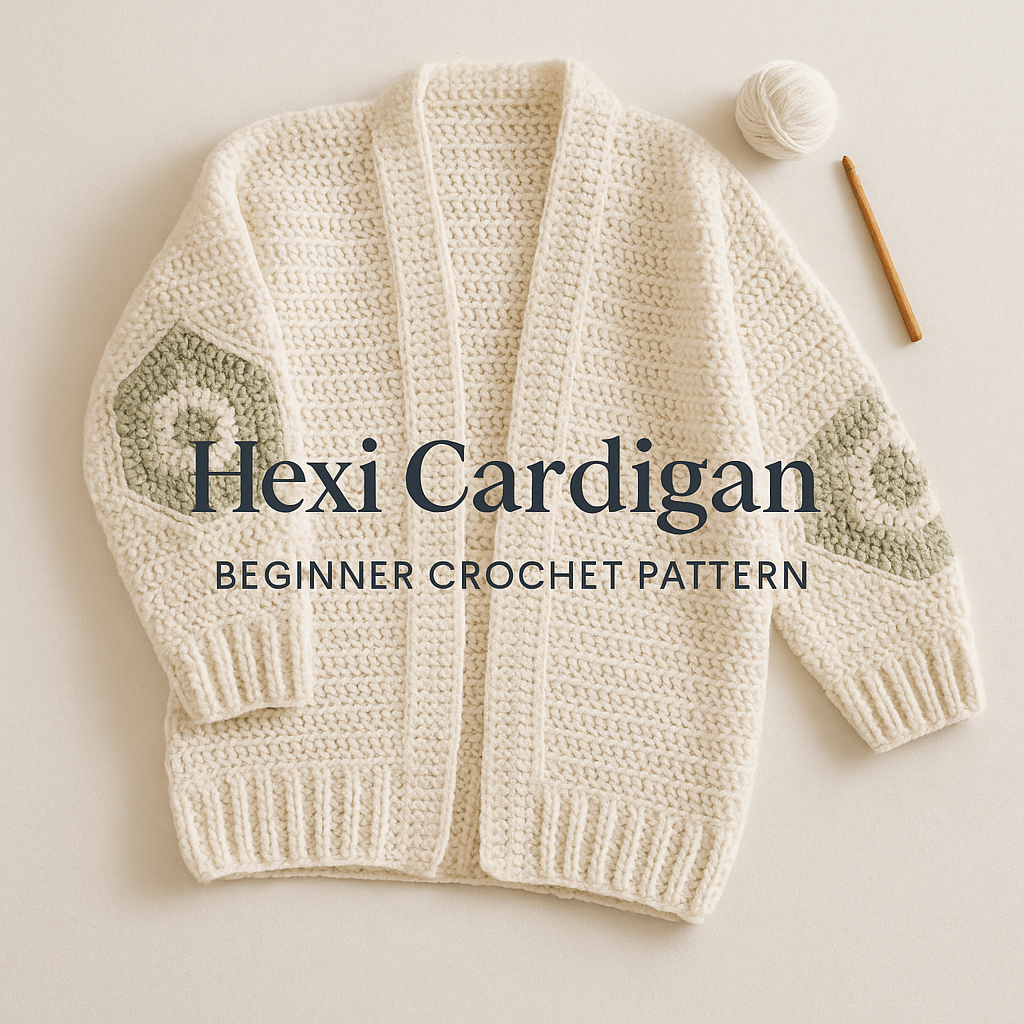
It is cozy, forgiving, and surprisingly fast because the entire body starts as two simple hexagons. You crochet them bigger and bigger, fold them, seam a couple of edges, and suddenly it looks like a real cardigan. No complicated armholes. No sleeve caps. No “why is this side longer than the other” panic.
This guide is written for beginners, with plain steps, sizing help, and the little tips that make the difference between “it technically fits” and “I actually want to wear this.”
What is a hexi cardigan?
A hexi cardigan (short for hexagon cardigan) is made from two crochet hexagons. Each hexagon is worked in the round. Then you fold each hexagon into an L-shape to create a sleeve and half the body. After that, you seam the two pieces together across the back and add a few finishing touches like length, cuffs, and optional ribbing.
It is popular because:
- The shape is simple and repetitive.
- The fit is adjustable as you go.
- It works with a lot of yarn types.
- It looks impressive without being complicated.
Skill level and what you should know first
This is beginner-friendly if you can do:
- Chain (ch)
- Slip stitch (sl st)
- Double crochet (dc)
- Work in the round
- Count to six corners
If you are brand new, practice a small granny square first. The motion is similar, but the hexi uses six corners instead of four.
Materials (simple and flexible)
Yarn
Pick a yarn you will actually want to wear. For your first cardigan, these are the easiest options:
- Worsted weight (Category 4): easiest to handle, quick progress
- Chunky/Bulky (Category 5): fastest, super cozy, slightly heavier drape
- DK (Category 3): lighter, more “store-bought” look, takes longer
How much yarn do you need? (approximate, depends on length and yarn)
- XS–S: 900–1200 yards (825–1100 m)
- M–L: 1200–1600 yards (1100–1460 m)
- XL–2XL: 1600–2200 yards (1460–2010 m)
- 3XL–5XL: 2200–3000+ yards (2010–2750+ m)
Hook
Use the hook size recommended on your yarn label, then adjust for drape. For most worsted yarn, 5.0 mm to 6.0 mm is common.
Notions
- Scissors
- Tapestry needle
- Stitch markers (or scrap yarn)
- Measuring tape
Before you start: get the “feel” right (quick gauge check)
Gauge is not scary here, but drape matters. You want a fabric that bends nicely, not stiff like a basket.
Crochet a small swatch of granny-style dc clusters. If it feels stiff, go up a hook size. If it feels floppy and holey, go down a hook size.
You will also “size” the cardigan by trying it on while you build the hexagons, so you are not locked into one number.
The stitch pattern (classic hexi clusters)
We will use a simple granny-style cluster:
- A dc cluster is 3 double crochets in the same space.
- Corners are made with (3 dc, ch 2, 3 dc) in the same corner space.
This makes clean, flexible corners that fold well into the cardigan shape.
Hexi Cardigan Crochet Pattern
Construction overview
- Crochet two identical hexagons.
- Fold each into an L-shape to form sleeve + body panel.
- Seam the two pieces together at the back and center.
- Add length, cuffs, and optional ribbing.
Pattern notes (read this once, it helps a lot)
- The hexagon has 6 corners. Mark them so you do not lose track.
- Each round increases the size evenly as long as you keep corners consistent.
- You can stop increasing when the folded piece fits your arm comfortably and reaches the center of your back.
Abbreviations
- ch: chain
- sl st: slip stitch
- dc: double crochet
- sp: space
- sk: skip
Step 1: Crochet Hexagon #1
Round 1 (center)
Make a magic ring (or ch 4 and join to form a ring).
Into the ring:
Ch 3 (counts as dc), 2 dc, ch 2
(3 dc, ch 2) five times.
Join with sl st to the top of the starting ch 3.
You now have 6 sides and 6 ch-2 corner spaces.
Place a stitch marker in each corner space if you can.
Round 2
- Slip stitch into the first corner space.
- Chain 3, then work 2 double crochets, chain 2, and 3 double crochets in the same corner space (corner made).
- In the next corner space, repeat: (3 double crochets, chain 2, 3 double crochets).
- Continue this pattern in all corners.
- Join with a slip stitch.
Round 3 and onward (repeat round)
- Slip stitch to the next corner space.
- In each corner space, repeat: (3 double crochets, chain 2, 3 double crochets).
- Between corners (in the side spaces), work 3 double crochets in each space.
That’s it! Keep going to make a bigger hexagon.
Important: As your hexagon gets bigger, each side will have more spaces. Remember to always do:
- Corners: (3 double crochets, chain 2, 3 double crochets)
- Side spaces: (3 double crochets)
Step 2: Crochet Hexagon #2 (match the size)
Make a second hexagon that is exactly like the first one. Use the same number of rounds.
If you want a neat symmetry, count the rounds. If you prefer a more relaxed approach, lay them flat and make sure they match edge-to-edge.
How big should each hexagon be? (the beginner-friendly fitting method)
This is what makes the hexi cardigan so forgiving.
- Fold one hexagon in half so it forms an L-shape (two sides become the sleeve).
- Hold it up to your body like a cardigan half.
- Check two things:
- Does the sleeve opening feel comfortable around your upper arm?
- Does the body portion reach to the center of your back (or close)?
If the sleeve feels tight: crochet more rounds.
If it feels roomy but the body is short: crochet more rounds.
If it is already wide enough but you want a longer cardigan: stop the hexagon and add length later at the hem.
A common “first cardigan” stopping point is when the folded sleeve opening is about 10–14 inches (25–36 cm) across (depends on size and desired ease). But trying it against your body is more reliable than any chart.
Step 3: Fold and seam each hexagon into an L
Lay a hexagon flat. Imagine it as a pizza cut into 6 slices.
Fold it so that two adjacent sides line up to form the sleeve seam. You will see an “L” shape appear. Repeat for the second hexagon.
Seam the sleeve
Using a tapestry needle and yarn tail (or use sl st crochet seam), seam along the aligned edges to form the sleeve tube.
Do this for both hexagons.
Tip: A mattress stitch gives a cleaner, less bulky seam. A slip stitch seam is easier and still looks good, especially with chunky yarn.
Step 4: Join the two halves together
Now you have two L-shaped pieces.
- Place them so the back edges meet.
- Seam the back center from neckline down to the hem (or as far as you want, depending on how open you want the cardigan to be).
- Optionally seam a small section at the top to shape a simple back neck.
Try it on as you go. You can adjust where the neckline sits by seaming a bit more or a bit less at the top.
Step 5: Add length to the body (optional but common)
If you want a longer cardigan, add rounds along the bottom edge.
Easy method
Attach yarn at the bottom hem. Work granny-style clusters around the hem edge, placing 3 dc into each space you see. At corners, keep the corner logic consistent so it lies flat.
Stop when you like the length.
Step 6: Add cuffs (recommended for a polished look)
Cuffs make sleeves feel intentional.
Simple cuff option (no ribbing)
Attach yarn around the sleeve edge. Work 1–3 rounds of:
- (3 dc in a space) around evenly
- Join each round.
Ribbed cuff option (still beginner-friendly)
- Attach yarn to sleeve edge and work 1 round of single crochet evenly (optional but helps).
- Make ribbing separately:
- Ch enough to match cuff length (usually 8–12 chains).
- Work single crochet back and forth, using back loop only for ribbing texture.
- Seam ribbing strip into a loop and attach to sleeve.
Repeat for the other sleeve.
Step 7: Add a front border (optional, but makes it look “finished”)
A border helps the front edges sit nicely.
Attach yarn at the bottom front corner and work a simple border up one front edge, around the neck, and down the other edge.
Beginner border ideas:
- Single crochet border (clean and subtle)
- Half double crochet border (slightly thicker)
- Granny cluster border (matches the body)
If your border ripples, use fewer stitches. If it pulls tight, add a few.
Customization ideas (quick wins)
- Short + boxy: stop hexagons sooner, add minimal hem
- Long + cozy: stop when sleeves fit, then add length at hem
- Balloon sleeves: add extra rounds only to sleeve edge before cuffs
- Color changes: change yarn every round for stripes, or every 2–3 rounds for calmer bands
- Pockets: crochet two rectangles and sew onto the front

Finishing: weave in ends and block (yes, even beginners)
Weave in all ends securely. Then block it lightly.
Blocking does three magical things:
- Softens the fabric
- Helps seams relax
- Makes corners lay flatter
For acrylic yarn, steam blocking is often enough. For wool, wet blocking works beautifully.
Common beginner mistakes (and how to fix them fast)
1) My hexagon is turning into a bowl
Your corners might be too tight. Make sure you are doing ch 2 at each corner. If it still cups, go up a hook size.
2) It looks wavy and ruffly
You might be adding extra clusters on the sides. Remember: sides only get clusters in the spaces, not randomly.
3) The sleeves feel tight
Keep crocheting rounds. The sleeve opening grows as the hexagon grows.
4) The cardigan is wide but too short
Stop increasing and add length at the hem instead.
FAQ: Hexi Cardigan Crochet Pattern
How many rounds do I need for a hexi cardigan?
There is no universal number. Most people land somewhere around 10–18 rounds per hexagon with worsted yarn, but your yarn, hook, and size change everything. The best method is to fold and test the sleeve fit as you go.
Can I make this cardigan with chunky yarn?
Yes, and it is one of the easiest ways to get a fast result. Use a larger hook and expect a heavier, warmer cardigan with more drape.
Do I have to seam with a needle?
No. You can seam with a slip stitch using your hook. Needle seaming usually looks cleaner, but slip stitch is very beginner-friendly and sturdy.
How do I make the neckline smaller?
Seam a bit more at the top of the back join, or add a tighter border around the neck opening.
How do I add buttons?
Add a thicker front border, then sew on buttons and create button loops using chains (for example, ch 8–12, sl st back to the edge to form a loop). Place loops evenly along one side.
Can I use a self-striping or variegated yarn?
Absolutely. Hexi cardigans look great in self-striping yarn because the rounds create natural color bands without extra effort.
Why is my cardigan twisting or sitting weird?
Usually it is uneven hexagon sizes, inconsistent corners, or uneven seaming. Lay both hexagons flat, count rounds, confirm corners match, and re-seam if needed. A light block also helps a lot.
If you want, tell me your yarn weight (DK, worsted, bulky) and about what size you are making, and I will suggest a starting hook size and a rough round range to aim for.