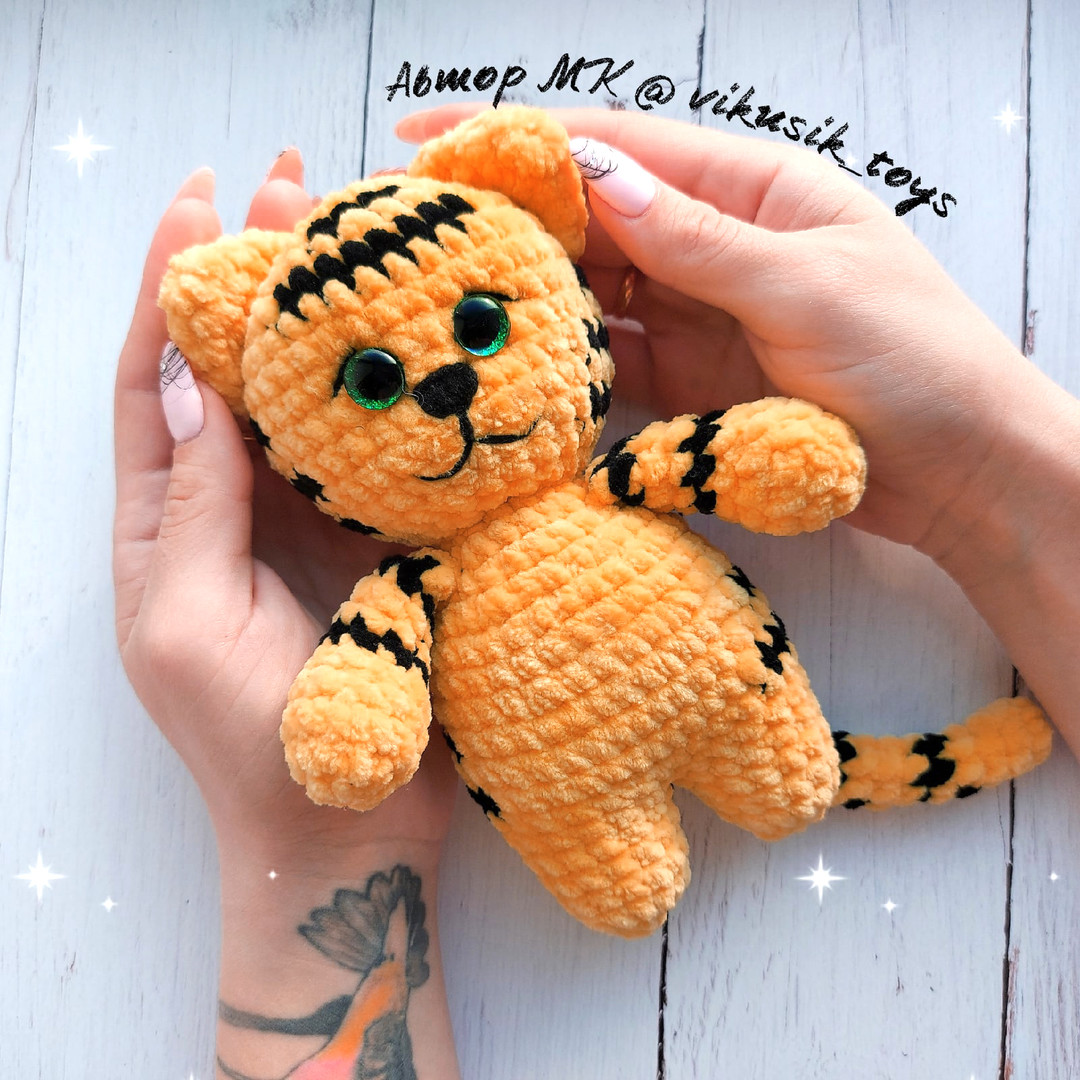
Crochet the Cutest Cuddle Buddy: Easy Plush Baby Tiger Pattern
Adorable Plush Tiger Amigurumi: Step-by-Step Crochet Pattern
Are you looking for your next cute and cuddly crochet project? This adorable plush baby tiger is the perfect companion! Made with super soft chenille yarn, this huggable little tiger is quick to make and absolutely delightful to hold. Standing at about 7 inches tall, it is a fantastic project for using up leftover yarn and makes a wonderful gift for kids or baby showers.
This pattern is written using standard US crochet terminology. Grab your hook, put on your favorite show, and let’s get crocheting!
Materials & Tools
- Main Color Yarn (MC): Super bulky chenille/plush yarn (e.g., Himalaya Dolphin Baby or Bernat Blanket) in Orange or Yellow (approx. 50g)
- Contrasting Color Yarn (CC): Super bulky chenille/plush yarn in Black for the stripes (small amount)
- Embroidery Yarn: Sport weight black cotton yarn (e.g., YarnArt Jeans) for facial features and eyelashes
- Crochet Hook: Size 3.5 mm (US E-4) or 4.0 mm (US G-6)
- Safety Eyes: 12 mm glitter or standard safety eyes
- Stuffing: Polyester fiberfill
- Other Tools: Tapestry needle, strong thread for eye sculpting, stitch markers, scissors, and sewing pins
Crochet Abbreviations (US Terms)
- MR: Magic Ring
- ch: Chain
- sc: Single crochet
- inc: Increase (2 single crochets in the same stitch)
- dec: Decrease (single crochet 2 stitches together, invisible decrease recommended)
- sl st: Slip stitch
- MC: Main Color (Orange/Yellow)
- CC: Contrasting Color (Black)
Step-by-Step Pattern
Ears (Make 2)
Using Main Color (MC). Do not shift stitches.
Round 1: 6 sc in MR (6)
Round 2: (1 sc, inc) x 3 (9)
Round 3: (2 sc, inc) x 3 (12)
Round 4: (2 sc, inc) x 4 (16)
Round 5: Fold the ear in half and work 8 sc through both layers to close. Fasten off and leave a tail for sewing.
Arms (Make 2)
Stuff only the first 5 rounds lightly. Do not shift stitches.
Round 1: 6 sc in MR using MC (6)
Round 2: 6 inc (12)
Round 3–4: 12 sc (12) – 2 rounds
Round 5: (2 sc, dec) x 3 (9)
Round 6: Switch to CC, 9 sc (9)
Round 7–8: Switch to MC, 9 sc (9) – 2 rounds
Round 9: Switch to CC, 9 sc (9)
Round 10: Switch to MC. Crochet 2 extra sc so that the color transitions face toward the inner side of the arm. Fold the top of the arm in half and work 4 sc through both layers. Fasten off, leaving a tail for sewing.
Tail
Do not stuff.
Round 1: 6 sc in MR using MC (6)
Round 2–4: 6 sc using MC (6) – 3 rounds
Round 5: 6 sc using CC (6)
Round 6–8: 6 sc using MC (6) – 3 rounds
Round 9: 6 sc using CC (6)
Round 10–13: 6 sc using MC (6) – 4 rounds
Round 14: 6 sc using CC (6)
Round 15–18: 6 sc using MC (6) – 4 rounds
Round 19: Fold the tail in half and work 3 sc through both layers. Fasten off, leaving a tail for sewing.
Head & Body (Worked in One Piece)
We will start at the top of the head and work down to the body and legs. When switching colors, you can either carry the yarn along or cut and knot the ends together securely.
Round 1: 6 sc in MR using MC (6)
Round 2: 6 inc (12)
Round 3: (1 sc, inc) x 6 (18)
Round 4: Using MC: 2 sc, 3 inc, 2 sc; Switch to CC: 4 sc; Switch to MC: 2 sc, 3 inc, 2 sc (24)
Round 5: (3 sc, inc) x 6 (30) (Make sure to align your stitch marker; the stripe stripes should be directly opposite the marker)
Round 6: Using MC: 2 sc, (inc, 2 sc) x 2, inc, 1 sc; Switch to CC: 8 sc; Switch to MC: 1 sc, (inc, 2 sc) x 2, inc, 4 sc (36)
Round 7–8: 36 sc using MC (36) – 2 rounds
Round 9: Align marker (unravel 1 sc if needed). Using MC: 8 sc; CC: 3 sc; MC: 14 sc; CC: 3 sc; MC: 8 sc (36)
Round 10: 36 sc using MC (36)
Round 11: Using MC: 7 sc; CC: 5 sc; MC: 12 sc; CC: 5 sc; MC: 7 sc (36)
Round 12: (4 sc, dec) x 6 (30) (Align your marker; shift by +1 sc if needed)
Round 13: Using MC: 7 sc; CC: 3 sc; MC: 10 sc; CC: 3 sc; MC: 7 sc (30)
At this point, insert the 12 mm safety eyes between Rounds 9 and 10, leaving 4 stitches between them. Stuff the head firmly, distributing the fiberfill evenly from the center to the sides.
Round 14: (3 sc, dec) x 6 (24)
Round 15: (2 sc, dec) x 6 (18)
Round 16: (1 sc, dec) x 6 (12)
Do not fasten off. We will now transition to the body. Stuff the neck section very firmly to ensure the head does not wobble.
Round 17: (1 sc, inc) x 6 (18)
Round 18: (2 sc, inc) x 6 (24)
Round 19: 24 sc using MC (24)
Round 20: (3 sc, inc) x 6 (30)
Round 21–22: 30 sc using MC (30) – 2 rounds
Round 23: (4 sc, inc) x 6 (36)
Round 24: Align marker to the center of the back (shift 2 sc if needed). Using MC: 8 sc; CC: 3 sc; MC: 14 sc; CC: 3 sc; MC: 8 sc (36)
Round 25: 36 sc using MC (36)
Round 26: Using MC: 7 sc; CC: 5 sc; MC: 12 sc; CC: 5 sc; MC: 7 sc (36)
Round 27: (4 sc, dec) x 6 (30)
Round 28: 30 sc using MC (30)
Check that your stitch marker is located exactly in the center of the back before dividing for the legs.
Round 29: Crochet 15 sc, then insert your hook into the first stitch of this round to form a separate circle of 15 stitches for the first leg. Place a new marker here.
Legs (Make 2)
Work each leg one at a time. Do not stuff the legs until instructed.
Round 1–5: 15 sc (15) – 5 rounds
Note: If you prefer shorter legs, work only 4 rounds of 15 sc here.
Stuff the leg to medium firmness, keeping the feet symmetrical.
Round 6: 7 dec, 1 sc (8)
Fasten off and pull the yarn through the loop. Thread the tail through the front loops of the remaining stitches and pull tight to close. Hide the end inside the leg.
Second Leg:
Attach the MC yarn with a slip knot to the back of the body where the first leg divided. Crochet 15 sc around the remaining opening of the body. Join to the first stitch of this round, place a marker, and repeat the leg pattern (Rounds 1–6) as written above.
After completing the legs, there will be a small opening left between them. Pack extra stuffing up into the body through this gap, and then sew the opening closed using a tapestry needle and orange yarn.
Assembly & Finishing Touches
1. Eye Sculpting (Indentations)
To give your tiger’s face a sweet, professional expression, we need to sculpt the eye sockets:
- Thread a long needle with a strong, matching thread. Insert the needle into the base of the head (between Rounds 16 and 17, centered at the neck) and bring it out at the outer corner of the left eye.
- Insert the needle into the inner corner of the left eye and bring it back down to the neck.
- Pull the thread gently to indent the eye. Tie a secure knot at the neck.
- Repeat the same process for the right eye. Tie the yarn ends together securely at the neck and hide them inside the head.
2. Facial Details
- Eyelashes: Using your thin black embroidery yarn, embroider delicate eyelashes next to the safety eyes.
- Nose & Mouth: Embroider a small triangle nose in the center of the face, centered slightly below the eyes. Stitch a vertical line down from the nose and split it into a gentle “W” shape for a classic sweet smile.
3. Sewing the Ears
Position the ears symmetrically on top of the head. Pin them along Round 3 from the crown down to Round 8, keeping them aligned with the side stripes on the head. Sew securely in place.
4. Sewing the Arms
Pin the arms to the sides of the body just below the neck line (around Round 18). Angle them slightly forward so your tiger looks ready to give a big hug, then sew them in place.
5. Sewing the Tail
Pin the tail to the back of the tiger, approximately 10 to 11 rounds up from the leg division. Sew it securely to the body.
Your plush baby tiger is now finished and ready to cuddle! Enjoy your cute new creation!