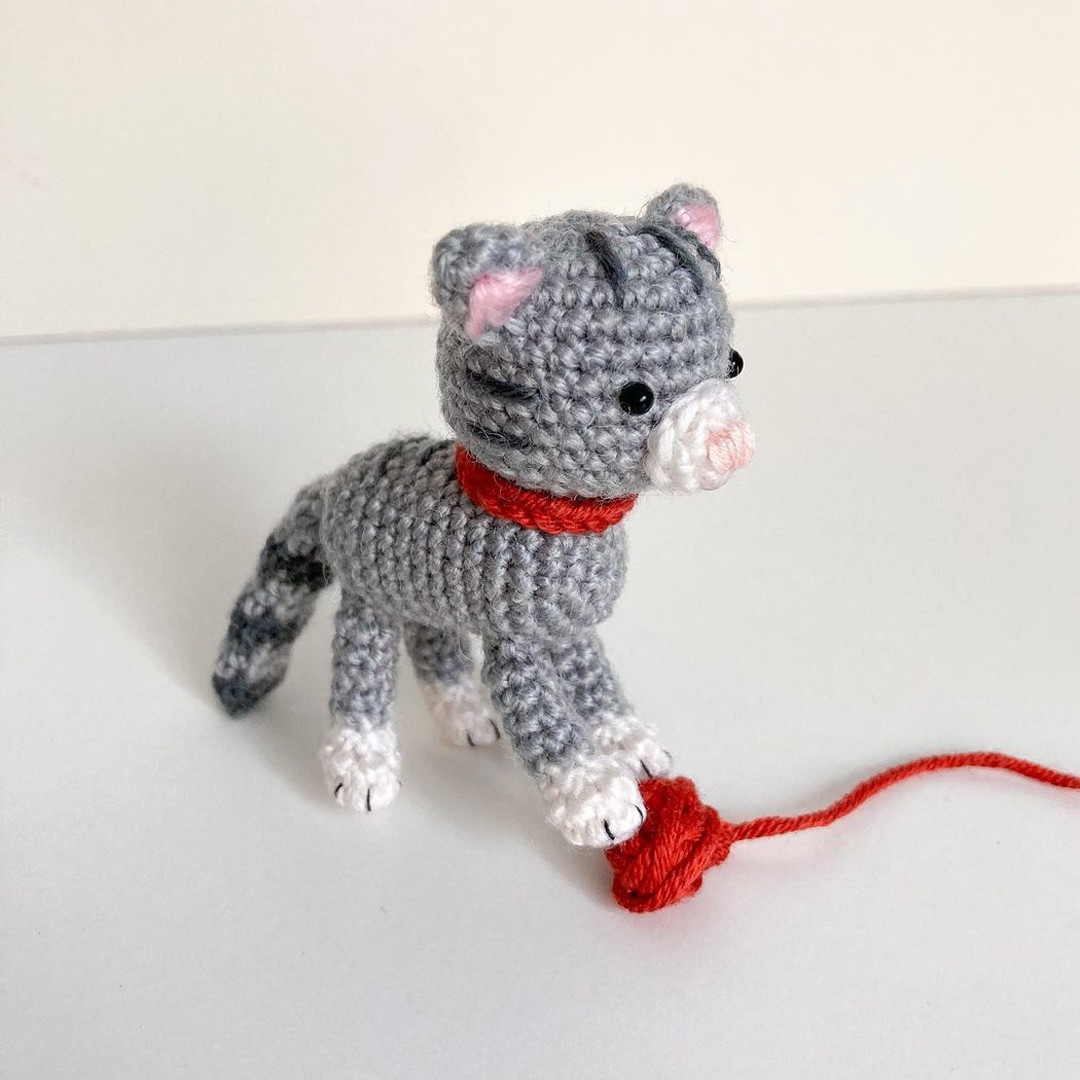
Pocket-Sized Perfection: How to Crochet an Adorable Mini Kitten
Create your own tiny companion with this detailed crochet pattern for a mini kitten. This project is perfect for beginners and experienced crocheters alike, resulting in a cute plushie approximately 6 cm in size.
Materials Needed
- Yarn: Fingering or Sport weight yarn (Recommended: 55% acrylic, 45% wool blend). You will need colors in gray (or black), white, and a small amount of pink and black thread for details.
- Crochet Hook: 1.5 mm
- Eyes: 3 mm plastic safety eyes
- Stuffing: Fiberfill
- Tools: Sewing needle, pins, scissors, and glue.
Abbreviations (US Terms)
- MR: Magic Ring
- ch: Chain
- sc: Single crochet
- hdc: Half double crochet
- inc: Increase
- dec: Decrease
- slst: Slip stitch
Step-by-Step Crochet Pattern
The Head (Gray)
Round 1: 6 sc in MR (6)
Round 2: 6 inc (12)
Round 3: (1 sc, inc) * 6 (18)
Round 4: (2 sc, inc) * 6 (24)
Round 5: (3 sc, inc) * 6 (30)
Rounds 6-11: 30 sc (6 rounds)
Round 12: (3 sc, dec) * 6 (24)
Round 13: (2 sc, dec) * 6 (18)
Round 14: (1 sc, dec) * 6 (12)
Stuff the head firmly with fiberfill.
Round 15: 6 dec (6)
Fasten off. Tighten the opening and weave in the ends.
The Ears (Make 2 – Gray)
Round 1: 6 sc in MR (6)
Round 2: 6 sc (6)
Round 3: (1 sc, inc) * 3 (9)
Sew the edges together with a needle to create a triangle shape. Leave a long tail for sewing. Use pink thread to embroider the inner part of the ear.
The Muzzle (White)
Round 1: 6 sc in MR (6)
Round 2: (1 inc, 1 sc) * 3 (9). Finish with a slst.
Fasten off, leaving a tail for sewing. Add a tiny bit of stuffing during the assembly process.
The Body (Gray)
Round 1: 6 sc in MR (6)
Round 2: 6 inc (12)
Round 3: (1 sc, inc) * 6 (18)
Round 4: (5 sc, inc) * 3 (21)
Rounds 5-14: 21 sc (10 rounds)
Round 15: (5 sc, dec) * 3 (18)
Round 16: (1 sc, dec) * 6 (12)
Stuff the body.
Round 17: 6 dec (6)
Fasten off, leaving a long tail to sew the head to the body.
The Paws (Make 4 – White/Gray)
Using White Yarn:
Round 1: 6 sc in MR (6)
Round 2: 6 inc (12)
Round 3: 4 dec, 4 sc (8)
Round 4: 2 dec, 4 sc (6)
Change to Gray Yarn:
Rounds 5-9: 6 sc (5 rounds)
Stuff the top of the paw slightly. Fasten off, leaving a tail for sewing. Use a fine black thread to embroider 3 small claws on each paw.
The Tail (Striped/Gray)
Note: If making a tabby cat, change colors every 2 rounds. Start with dark gray.
Round 1: 6 sc in MR (6)
Round 2: (2 sc, inc) * 2 (8)
Rounds 3-12: 8 sc (10 rounds)
Round 13: 3 hdc, slst (incomplete round)
Do not stuff the tail. Fasten off and leave a tail for sewing.
Assembly Guide
- Ears: Sew the ears onto the sides of the head between rounds 4 and 7.
- Eyes: Insert and glue the safety eyes between rounds 8 and 9, leaving a distance of 5-6 sc between them.
- Muzzle: Sew the muzzle onto rounds 9-12. Embroider a small pink nose in the center.
- Head to Body: Sew the head onto rounds 4-6 of the body.
- Paws: Attach front paws to rounds 5-7 of the body and hind paws to rounds 13-15. Tip: Use pins to position the legs first to ensure the kitten can stand steadily.
- Tail: Sew the tail to the back of the toy with the hdc stitches facing upward.
- Face Details:
- For Tabby Cats: Embroider stripes on the forehead (rounds 3-5) and on the sides (between rounds 8-9 and 10-11).
- For Black Cats: Embroider whiskers on rounds 10-11.
- Collar: Chain 17 (or adjust to fit your kitten’s neck). Tie it around the neck and weave the ends into the body of the toy.
“`