Ultra-Soft Cuddles: Free Floppy-Eared Plush Bunny Crochet Pattern
Free Long-Eared Plush Bunny Crochet Pattern (Amigurumi Floppy Ears Bunny)
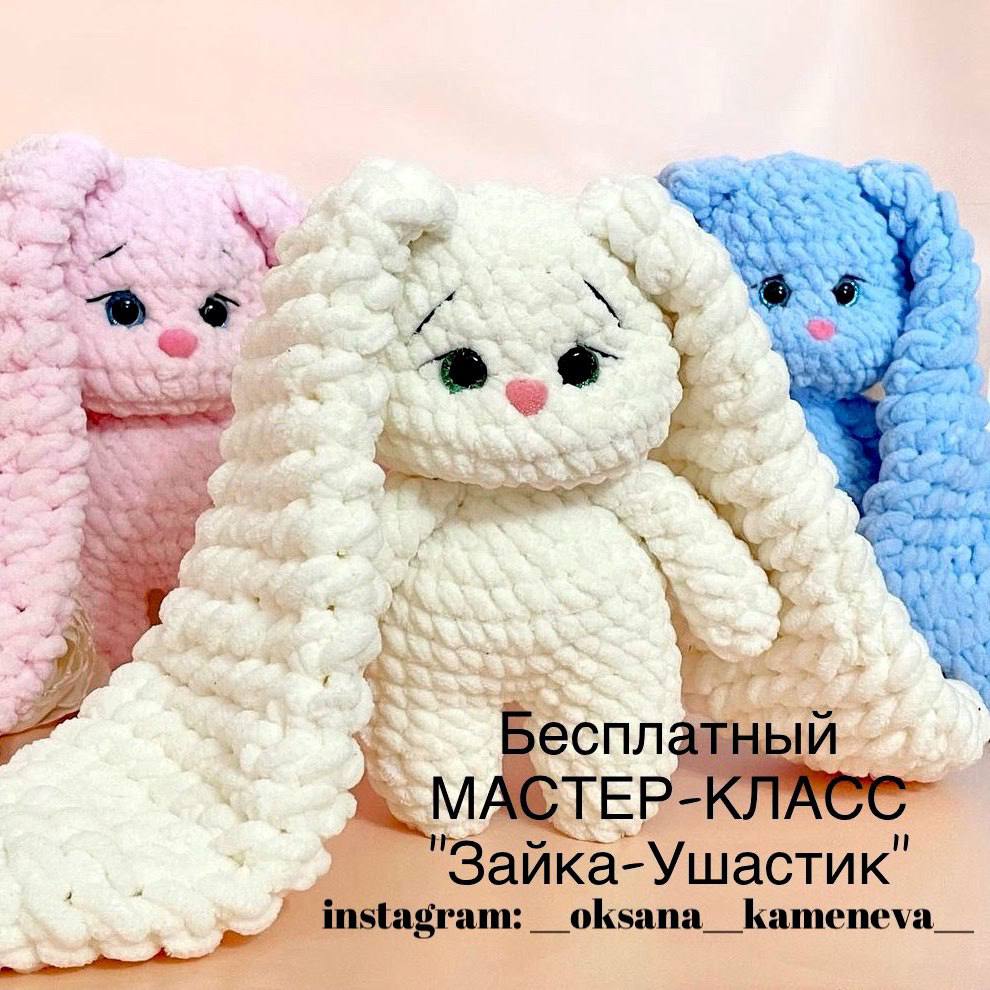
Create your very own ultra-soft, huggable floppy-eared bunny with this detailed step-by-step crochet pattern. Designed using cozy plush chenille yarn, this adorable amigurumi bunny features seamless construction where the legs, body, head, arms, and ears are joined together as you stitch. Perfect as a gift for babies, kids, or plushie collectors, this cute bunny brings a touch of handmade warmth to any room.
Skill Level and Finished Size
Skill Level: Intermediate / Easy (familiarity with amigurumi joining techniques is recommended)
Finished Size: Approximately 9 to 10 inches (23–25 cm) tall, excluding the extra-long floppy ears.
Materials & Tools Needed
- Yarn: Super Bulky Plush Yarn / Velvet Chenille (such as Alize Velluto, Premier Parfait Chunky, or Bernat Velvet) — less than 3 skeins total.
- Crochet Hooks:
- 4.0 mm (US G/6) crochet hook for the body, head, arms, legs, and tail.
- 7.0 mm crochet hook for the long floppy ears.
- Safety Eyes: 15 mm safety eyes
- Safety Nose: 12–14 mm triangular velvet or plastic safety nose
- Embroidery Thread: Thin black cotton embroidery floss for eyelashes and eyebrows; strong thread or matching yarn for face sculpting.
- Stuffing: Polyester fiberfill
- Tools: Tapestry needle, stitch markers, and scissors
Crochet Pattern Abbreviations (US Terms)
- MR: Magic Ring
- ch: Chain
- sc: Single crochet
- hdc: Half double crochet
- inc: Increase (2 stitches in the same stitch)
- dec: Decrease (single crochet 2 stitches together)
- st / sts: Stitch / Stitches
- ( … )*N: Repeat instructions in brackets N times
- [ Count ]: Total stitch count at the end of the round
Step-by-Step Crochet Pattern
1. Long Floppy Ears (Make 2)
Use the 7.0 mm crochet hook and plush yarn. The ears are worked primarily in half double crochet (hdc) to keep them soft and flexible.
- Round 1: 5 hdc into a MR [5]
- Round 2: 5 hdc inc [10]
- Round 3: (4 hdc, hdc inc)*2 [12]
- Round 4: (5 hdc, hdc inc)*2 [14]
- Round 5: (6 hdc, hdc inc)*2 [16]
- Round 6: (7 hdc, hdc inc)*2 [18]
- Rounds 7–9: 18 hdc (3 rounds) [18]
- Round 10: (7 hdc, dec)*2 [16]
- Rounds 11–13: 16 hdc (3 rounds) [16]
- Round 14: (6 hdc, dec)*2 [14]
- Round 15: 14 hdc [14]
- Round 16: (5 hdc, dec)*2 [12]
- Rounds 17–18: 12 hdc (2 rounds) [12]
- Round 19: (4 hdc, dec)*2 [10]
- Rounds 20–21: 10 hdc (2 rounds) [10]
Finishing the Ears: Do not stuff the ears. Fold the top opening flat and work 5 single crochets across both layers to seal the top. Fasten off and weave in the tail.
2. Arms (Make 2)
Switch to the 4.0 mm crochet hook.
- Round 1: 6 sc into a MR [6]
- Round 2: (1 sc, inc)*3 [9]
- Rounds 3–9: 9 sc (7 rounds) [9]
Finishing the Arms: Do not stuff the arms. Fold the top opening flat and crochet 4 sc across both edges to close. Fasten off and weave the end inside the arm.
3. Legs (Make 2)
Use the 4.0 mm crochet hook.
- Round 1: 6 sc into a MR [6]
- Round 2: (1 sc, inc)*3 [9]
- Round 3: (2 sc, inc)*3 [12]
- Round 4: (3 sc, inc)*3 [15]
- Rounds 5–6: 15 sc (2 rounds) [15]
First Leg: Fasten off and cut yarn.
Second Leg: Do not cut yarn. Continue directly into joining the legs for the body.
4. Lower Body & Upper Body
Continuing from the second leg with the 4.0 mm hook:
- Round 7: Chain 2, join to the first leg with a single crochet.
- Round 8: Work 15 sc around the first leg, 2 sc along one side of the chain, 15 sc around the second leg, and 2 sc along the opposite side of the chain [34]
- Place a stitch marker here to mark the start of rounds.
- Rounds 9–11: 34 sc (3 rounds) [34]
Shift Stitch Note: Work shift single crochets (approx. 7 sc) so that the end of the round aligns neatly along the side of the body.
- Round 12: (dec, 15 sc)*2 [32]
- Round 13: 32 sc [32]
- Round 14: (dec, 14 sc)*2 [30]
- Round 15: (3 sc, dec)*6 [24]
- Round 16: (2 sc, dec)*6 [18]
- Round 17: (4 sc, dec)*3 [15]
- Round 18 (Attaching the Arms): Crochet 3 sc along the front, join the first arm with 4 sc through both body and arm, work 4 sc across the back, and join the second arm with 4 sc through both body and arm [15]
Stuff the legs and lower body firmly with fiberfill before continuing to the head.
5. Head
Worked continuously from the neck:
- Round 19: 15 inc [30]
- Round 20: 30 sc [30]
- Round 21: (4 sc, inc)*6 [36]
- Round 22: (5 sc, inc)*6 [42]
- Round 23: 42 sc [42]
- Round 24: (5 sc, dec)*6 [36]
- Round 25: (4 sc, dec)*6 [30]
- Rounds 26–27: 30 sc (2 rounds) [30]
Safety Eyes & Nose Placement:
- Insert the 15 mm safety eyes between Rounds 25 and 26, spaced 5 stitches apart.
- Insert the safety nose between Rounds 24 and 25, centered right between the eyes.
- Round 28: (3 sc, dec)*6 [24]
- Round 29: (2 sc, dec)*6 [18]
- Round 30 (Attaching the Ears): Crochet 4 sc across the front, join the first ear with 5 sc through both head and ear, work 4 sc across the back, and join the second ear with 5 sc through both head and ear [18]
- Stuff the head completely with fiberfill.
- Round 31: (1 sc, dec)*6 [12]
- Round 32: 6 dec [6]
Fasten off, thread the tail through the front loops of the remaining 6 stitches, pull tight to close, and hide the end inside the head.
6. Tail
Use the 4.0 mm crochet hook.
- Round 1: 6 sc into a MR [6]
- Round 2: 6 inc [12]
- Round 3: 12 sc [12]
- Round 4: 6 dec [6]
Fasten off, leaving a long tail for sewing. Lightly stuff the tail and sew it centered onto the lower back of the bunny.
Face Sculpting & Expressive Finishing Touches
Needle sculpting brings your bunny’s face to life with a cute, expressive look!
- Thread a long needle with strong thread or white yarn.
- Insert the needle at the bottom base of the head/neck area.
- Bring it out at the inner corner of the right eye, re-insert at the outer corner of the right eye, and pull back out at the base of the neck. Pull tight to create an eye socket indentation. Tie a knot to secure.
- Repeat the process for the left eye: insert at the neck base, bring out at the inner corner of the left eye, re-insert at the outer corner, and pull back out at the neck base. Pull tight and secure with a knot.
- Using thin black cotton thread, embroider fine eyelashes along the sides of the safety eyes and delicate eyebrows above each eye.
Pro Tips for Working with Plush Velvet Yarn
- Use Stitch Markers: Stitches can be hard to see in plush yarn. Keep track of the first stitch of every round.
- Hook Size Dual Technique: Using a larger 7.0 mm hook for the ears gives them a soft, floppy texture, while the smaller 4.0 mm hook for the body keeps stitches tight so fiberfill doesn’t show through.
- Stuffing: Stuff the body and head evenly to maintain smooth contours.