Stitch Your Own Winter Wonder: Festive Snowman Amigurumi Pattern
Festive Crochet Snowman Amigurumi Pattern
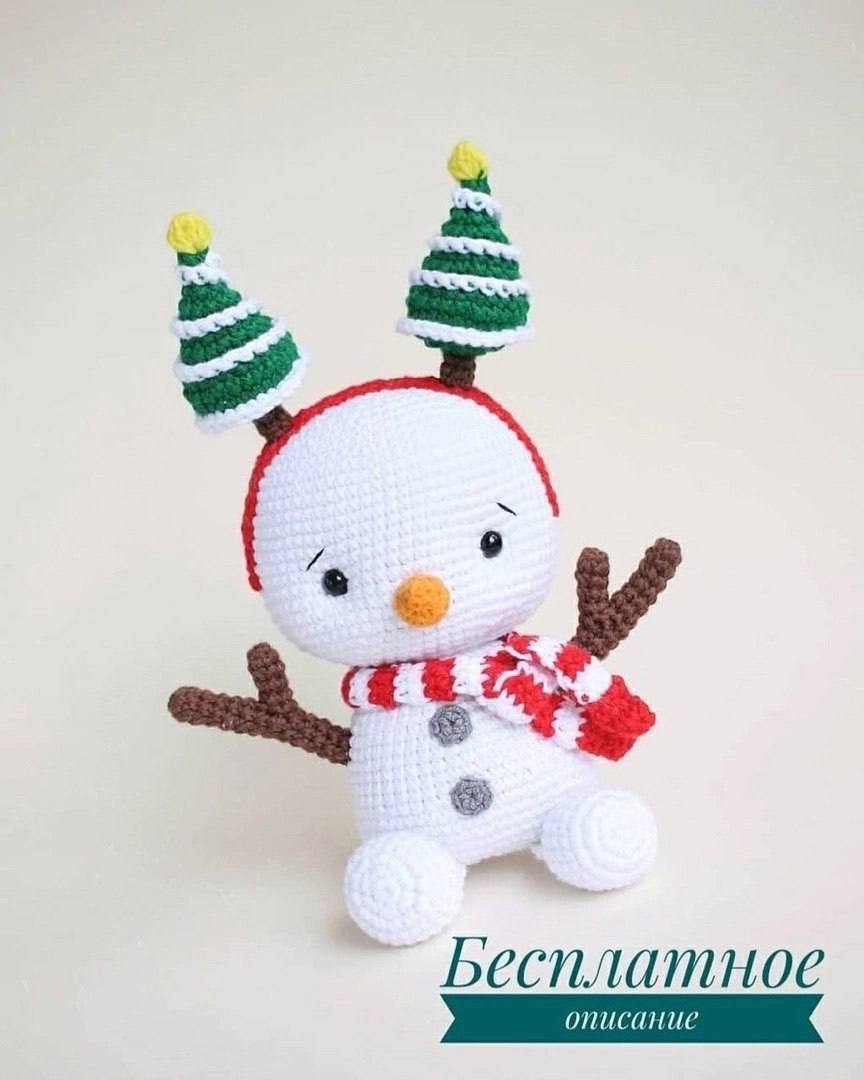
Bring holiday cheer into your home with this delightful festive snowman amigurumi! Adorned with a cute Christmas tree headband, twig arms, and a cozy striped scarf, this winter plushie makes a perfect holiday decoration or handmade Christmas gift. Follow this detailed, step-by-step crochet pattern to make your very own holiday snowman.
Skill Level & Craft Details
- Skill Level: Intermediate
- Language: US Crochet Terminology
- Finished Size: Approx. 7–8 inches (depending on yarn weight and hook size)
Materials Needed
- Yarn: Medium/DK weight yarn in White, Red, Green, Brown, Orange, Yellow, and Gray.
- Crochet Hook: 2.5 mm or 3.0 mm crochet hook
- Safety Eyes: 7 mm or 8 mm safety eyes
- Stuffing: Fiberfill polyester stuffing
- Notions: Yarn needle, stitch markers, scissors, and sewing pins
Crochet Abbreviations (US Terms)
- MR: Magic Ring
- ch: Chain
- sc: Single crochet
- inc: Increase (2 single crochet in the same stitch)
- dec: Decrease (single crochet 2 together)
- dc: Double crochet
- sl st: Slip stitch
- BLO: Back loops only
- FLO: Front loops only
- st(s): Stitch(es)
- ( … ) * x: Repeat instructions in brackets ‘x’ times
Step-by-Step Crochet Instructions
1. Head
Use White yarn. Stuff firmly as you go.
Insert safety eyes between Rounds 20 and 21, spaced 12 stitches apart.
- Round 1: 7 sc in MR [7]
- Round 2: 7 inc [14]
- Round 3: (1 sc, inc) * 7 [21]
- Round 4: (2 sc, inc) * 7 [28]
- Round 5: (3 sc, inc) * 7 [35]
- Round 6: 2 sc, inc, (4 sc, inc) * 6, 2 sc [42]
- Round 7: (5 sc, inc) * 7 [49]
- Round 8: 3 sc, inc, (6 sc, inc) * 6, 3 sc [56]
- Round 9: (7 sc, inc) * 7 [63]
- Round 10: 63 sc [63]
- Round 11: 4 sc, inc, (8 sc, inc) * 6, 4 sc [70]
- Rounds 12–25: 70 sc (14 rounds) [70]
- Round 26: (5 sc, dec) * 10 [60]
- Round 27: (8 sc, dec) * 6 [54]
- Round 28: (7 sc, dec) * 6 [48]
- Round 29: (6 sc, dec) * 6 [42]
- Round 30: (5 sc, dec) * 6 [36]
- Round 31: (4 sc, dec) * 6 [30]
- Round 32: (3 sc, dec) * 6 [24]
Fasten off with a slip stitch, leave a long tail for sewing, and weave in ends.
2. Legs (Make 2)
Use White yarn. Stuff lightly just to give shape up to around Round 10.
- Round 1: 6 sc in MR [6]
- Round 2: 6 inc [12]
- Round 3: 12 inc [24]
- Rounds 4–8: 24 sc (5 rounds) [24]
- Round 9: (2 sc, dec) * 6 [18]
- Round 10: 18 sc [18]
- Round 11: (1 sc, dec) * 6 [12]
- Round 12: 12 sc [12]
- Round 13: Press the top edges flat and crochet 6 sc through both layers to close [6].
Fasten off, leaving a short tail (approx. 3-4 cm).
3. Body
Use White yarn. Stuff as you go. The body starts by crocheting a foundation chain to form an oval, joining the legs in Round 3.
- Round 1: Ch 11. Starting in the 2nd ch from hook: inc, 8 sc, 4 sc in the last stitch. Working along the opposite side of the chain: 8 sc, inc [24]
- Round 2: (1 sc, inc) * 12 [36]
- Round 3: Join legs: 6 sc working through both the first leg and body stitches, 6 sc across body, 6 sc through both the second leg and body stitches, 18 sc along body [36]
- Round 4: (5 sc, inc) * 6 [42]
- Round 5: (1 sc, inc) * 21 [63]
- Rounds 6–7: 63 sc (2 rounds) [63]
- Round 8: 2 dec, 26 sc, 2 dec, 2 sc, dec, (4 sc, dec) * 4, 1 sc [54]
- Round 9: 54 sc [54]
- Round 10: (3 sc, dec) * 2, 7 sc, (dec, 3 sc) * 2, 27 sc [50]
- Round 11: 27 sc, dec, 16 sc, dec, 3 sc [48]
- Rounds 12–16: 48 sc (5 rounds) [48]
- Round 17: (6 sc, dec) * 6 [42]
- Round 18: 42 sc [42]
- Round 19: (5 sc, dec) * 6 [36]
- Round 20: 36 sc [36]
- Round 21: (4 sc, dec) * 6 [30]
- Round 22: 30 sc [30]
- Round 23: (3 sc, dec) * 6 [24]
Fasten off with a sl st. Sew the head onto the body at this stage.
4. Carrot Nose
Use Orange yarn.
- Ch 9. Join with a sl st to form a ring. Work in continuous rounds.
- Rounds 1–4: 9 sc (4 rounds) [9]
- Round 5: (1 sc, dec) * 3 [6]
- Round 6: 3 dec [3]
Stuff lightly to shape. Sew the nose onto the head between Rounds 21 and 26.
5. Facial Sculpting & Details
- Eye Sculpting: Anchor thread at Round 31 on the side of the head. Bring the needle out underneath one eye. Insert 1 stitch upward, bring out back at Round 31, and pull lightly to create an eye socket depth. Repeat for the second eye.
- Eyebrows: Embroider soft diagonal eyebrows above the eyes using thin dark brown thread.
6. Buttons (Make 2)
Use Gray yarn.
- Round 1: 7 sc in MR. Sl st to first st to close.
Fasten off, leaving a tail for sewing. Sew both buttons onto the front center of the snowman’s belly.
7. Twig Arms (Make 2)
Use Brown yarn. Stuffing is optional.
Small Branch:
- Round 1: 6 sc in MR [6]
- Rounds 2–5: 6 sc (4 rounds) [6]
Sl st, cut the yarn, and set aside.
Main Branch:
- Round 1: 7 sc in MR [7]
- Rounds 2–7: 7 sc (6 rounds) [7]
- Round 8 (Joining Small Branch): 3 sc catching loops of both small branch and main branch, 4 sc along main branch [7]
- Round 9: 3 sc in remaining free loops of the small branch, 4 sc along main branch [7]
- Rounds 10–14: 7 sc (5 rounds) [7]
Fasten off with a sl st, leaving a sewing tail. Sew arms to the body about 6–7 stitches below the neck connection.
8. Christmas Trees for Headband (Make 2)
Start with Brown yarn.
- Round 1: 6 sc in MR [6]
- Rounds 2–4: 6 sc (3 rounds) [6]
Change to Green yarn:
- Round 5: 6 inc [12]
- Round 6: 12 inc [24]
- Round 7: (3 sc, inc) * 6 [30]
- Round 8: BLO 30 sc [30]
- Round 9: (3 sc, dec) * 6 [24]
- Round 10: (2 sc, dec) * 6 [18]
- Round 11: BLO 18 sc [18]
- Round 12: (7 sc, dec) * 2 [16]
- Round 13: (6 sc, dec) * 2 [14]
- Round 14: BLO (5 sc, dec) * 2 [12]
Stuff the tree firmly with fiberfill at this point.
- Round 15: 12 sc [12]
- Round 16: 6 dec [6]
- Round 17: BLO 6 sc [6]
- Round 18: 3 dec [3]
Fasten off, weave ends through remaining stitches, and pull tight.
Tree Top (Star Element):
Attach Yellow yarn to the top of the tree (grabbing loops from both sides). Work a 5-dc cluster stitch into 1 stitch to create a small topper star. Fasten off.
Snow Trim on Trees:
Attach White yarn to the remaining front loops of Round 16 and work single crochets around to create a snow rim. Repeat this process for the front loops of Round 13, Round 10, and Round 7.
9. Headband Strap
Use Red yarn.
- Ch 39. Starting in 2nd ch from hook, work 38 double crochet (dc) stitches.
Sl st, fasten off, and weave in ends. Sew the red headband onto the head of the snowman and attach the two mini Christmas trees securely on top.
10. Striped Scarf
Alternate colors between Red and White every 2 rows. Work in turning rows.
- Row 1: Ch 4, start in 2nd ch from hook: 3 sc, ch 1, turn [3]
- Row 2: 3 sc, ch 1, turn [3]
- Row 3: 3 sc, ch 1, turn [3]
Continue repeating Row 2 until the scarf reaches approximately 28 cm (11 inches) long. Tie around the snowman’s neck!
Final Touches
Adjust the scarf, ensure the carrot nose is angled nicely, and check that the headband sits firmly on top of the head. Your handmade Christmas snowman amigurumi is complete and ready to bring holiday cheer!