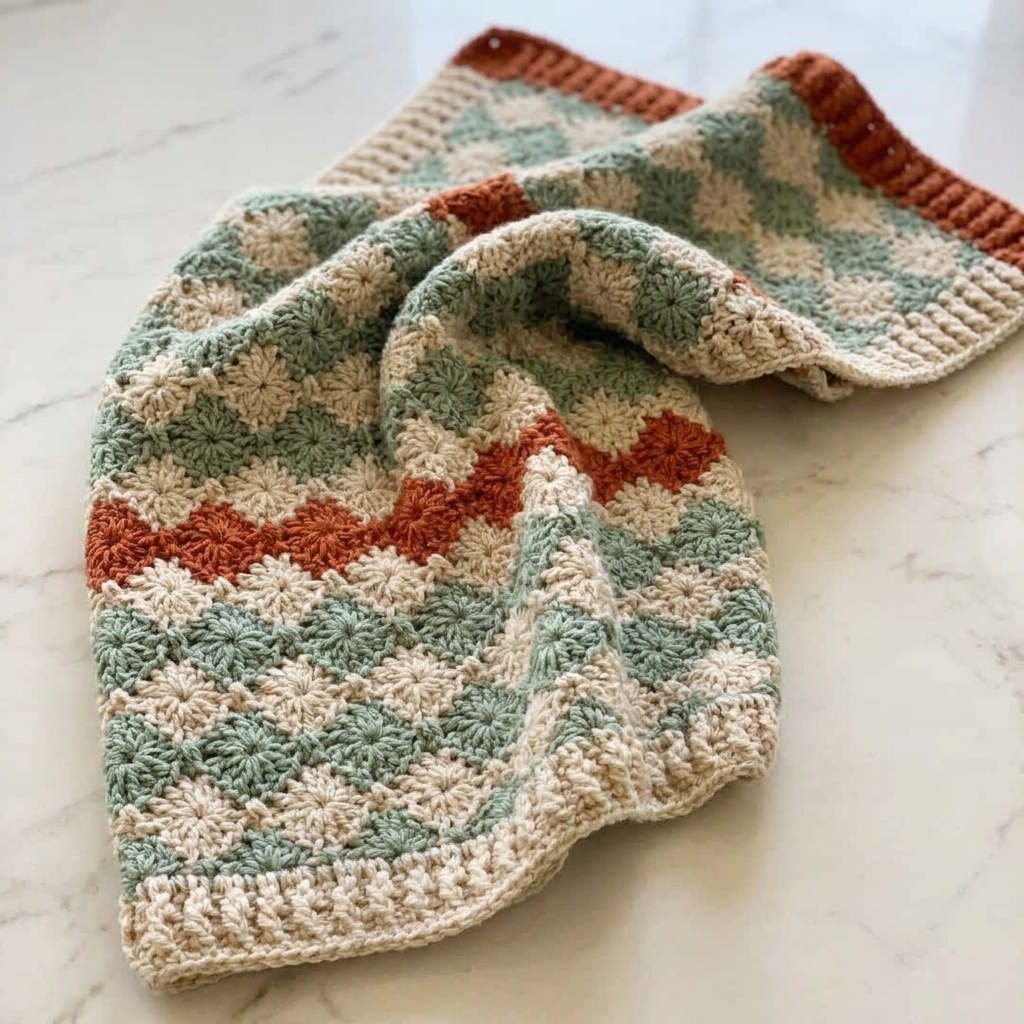
Harlequin Stitch Crochet: The Complete Step-by-Step Guide
If you’ve ever scrolled past a crochet blanket covered in interlocking diamonds and wondered how on earth it was made, there’s a good chance you were looking at harlequin stitch crochet. It’s one of those stitches that looks far more complicated than it actually is — a handful of clustered double crochets, a rhythm you repeat, and suddenly you’ve got a fabric covered in rows of pointed diamonds that almost look woven rather than crocheted.
This guide walks through everything you need to actually sit down and make it: what the stitch is, the materials and abbreviations you’ll want on hand, the full row-by-row pattern, the mistakes almost everyone makes on their first swatch, and what to make once you’ve got the rhythm down. Whether you’re prepping for a baby blanket, a set of hot pads, or just want to add a new textured stitch to your repertoire, this is the harlequin stitch crochet tutorial to bookmark.
What Is the Harlequin Stitch?
The harlequin stitch takes its name from the harlequin — the classic pantomime and commedia dell’arte character known for a mask and a costume covered in bright, interlocking diamond shapes. That’s exactly the effect this stitch produces in fabric: rows of pointed, diamond-like clusters that tile together edge to edge.
It belongs to a small family of related crochet stitches that all use the same core idea — clustering multiple double crochets into a single point, then linking those points together in the row above. The two stitches most often mentioned in the same breath as harlequin stitch are:
- Catherine’s Wheel Stitch, which creates a more circular, spoke-like motif rather than a pointed diamond
- Starburst Stitch, which shares the clustered-dc construction but produces a busier, more radiating look
Of the three, harlequin stitch is generally considered the most approachable, mostly because its repeat is more predictable once you’re past the first few rows. That doesn’t mean it’s a true beginner stitch — you’ll want to be comfortable with double crochet and basic cluster stitches before you start — but it’s a very reasonable “first textured stitch” for someone ready to move past solid single and double crochet fabric.
Structurally, harlequin stitch is a four-row repeat worked over a multiple of 8 stitches (plus a couple of extra chains to set up the edges). The catch is that the first six rows don’t all look like that four-row repeat — they’re the “setup” that gets your diamonds properly staggered before the pattern locks into its rhythm. Almost everyone who’s tried this stitch says the same thing: rows one through six take real concentration, and after that, your hands basically know what to do.
Is Harlequin Stitch Beginner-Friendly?
Mostly intermediate, with a few beginner-friendly qualities working in its favor:
What makes it harder: You’ll be working cluster stitches (multiple double crochets pulled together into one stitch), which means tracking a stitch count that changes shape depending on where you are in the row. The first six rows also each look slightly different from one another, so you can’t just memorize one row and repeat it right away.
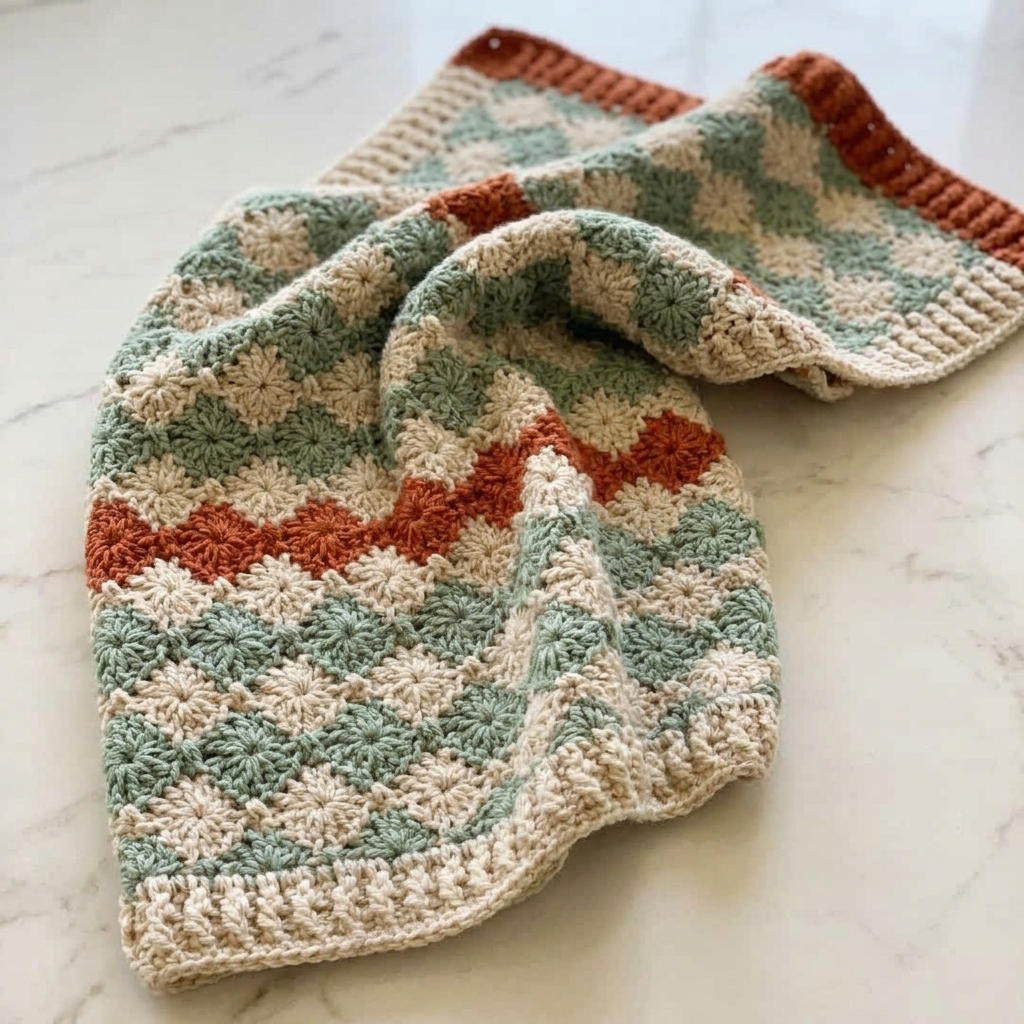
What makes it easier: Once you’re past those first six rows, it becomes genuinely repetitive — the same four rows, over and over, for as long as your project needs. It’s also a reversible stitch, meaning there’s no “wrong side” to keep track of, which removes one common source of confusion in textured crochet.
If you’ve made any stitch that uses a cluster — a popcorn stitch, a bobble, a shell — you have the core skill already. The main adjustment is patience through the setup rows.
What You’ll Need: Yarn, Hook, and Color Choices
Yarn: Medium weight (worsted, US #4) yarn is the standard choice for harlequin stitch. It shows the diamond texture clearly without the fabric becoming too dense or stiff. Cotton yarn is a popular pick for hot pads and dishcloths because of its structure and stitch definition; acrylic or a wool blend works well for blankets and wearables.
Hook size: An H/8 (5mm) hook is a common starting point for worsted weight yarn, though you should always swatch and adjust up or down to hit your gauge.
One color or many? This is where harlequin stitch really earns its name. Worked in a single color, it still reads as a lovely textured fabric — the diamonds show up through light and shadow alone. But this stitch was practically made for color-blocking. Because the diamonds form in distinct rows, you can:
- Alternate two colors for a classic checkerboard-adjacent look
- Use three or four colors in sequence for a genuinely harlequin-costume effect
- Keep the background neutral and only change color for the diamond centers
A common approach across published harlequin stitch patterns is to change color at the start of specific rows within the four-row repeat, so that each “band” of diamonds reads as its own color while the connecting stitches stay in a base shade.
Stitches and Abbreviations You Need to Know
- ch — chain
- st(s) — stitch(es)
- sk — skip
- sc — single crochet
- dc — double crochet
- yo — yarn over
- rep — repeat
- sp — space
Special stitches (clusters):
dc3tog (half-cluster): [Yarn over, insert hook into the indicated stitch, yarn over and pull up a loop, yarn over and pull through 2 loops] three times, working each repetition into the position specified in the pattern. You’ll now have 4 loops on your hook. Yarn over and pull through all 4 loops at once. This is the “half diamond” you’ll see at the start and end of rows, and sometimes at row edges throughout the piece.
dc6tog (full cluster): Work the same [yarn over, insert hook, yarn over, pull up a loop, yarn over, pull through 2 loops] motion a total of six times across two adjacent stitches or spaces (typically three repetitions into one point, then three into the next), leaving all the loops on your hook as you go. You’ll have 7 loops on the hook. Yarn over and pull through all 7 at once. This cluster is what forms the solid, pointed diamond centers in the middle of your fabric.
Both clusters look intimidating written out, but they’re just double crochet with the final pull-through delayed until you’ve built up several stitches on your hook — the same logic as a bobble stitch, just bigger.
Understanding the Foundation Chain
Harlequin stitch is worked over a multiple of 8 stitches, plus 2 extra chains for the turning and edge stitch. That means your starting chain should follow this formula:
Foundation chain = (8 × number of repeats) + 2
So for a small swatch with 4 repeats across, you’d chain (8 × 4) + 2 = 34. For a baby blanket-sized panel with 10 repeats, you’d chain (8 × 10) + 2 = 82. Always add a couple of extra chains to your test swatch if you’re unsure of your gauge — it’s much easier to have a stitch or two of wiggle room than to run short mid-row.
Harlequin Stitch Crochet Pattern: Step-by-Step Instructions
This pattern is written in US terms. Remember: rows 1 through 6 are your setup, and rows 7 onward simply repeat the pattern established in rows 3 through 6.
Foundation Row: Chain a multiple of 8, plus 2. Single crochet in the 2nd chain from the hook and in each chain across. Turn. (Your stitch count should be a multiple of 8, plus 1.)
Row 1: Ch 1 (does not count as a stitch). Sc in the first stitch. *Skip the next 3 stitches, work 1 dc3tog in the next stitch, ch 1, work a second dc3tog into that same stitch, skip the next 3 stitches, sc in the next stitch; repeat from * across. Turn.
You’ve now created a row of small “V” shapes — a half-cluster, a chain-1 gap, and another half-cluster, all sitting inside single crochet “posts.”
Row 2: Ch 3 (counts as first dc). Sc into the first ch-1 space from the row below. *Ch 3, work 1 dc6tog by taking 3 of the 6 loops from the top of the left-hand half-cluster below and 3 from the top of the right-hand half-cluster below (essentially joining the two “V” points into one solid diamond), ch 3, sc into the next ch-1 space; repeat from * across, ending with a dc3tog worked into the final half-cluster only. Turn.
This is the row where your diamonds start to visually “close up.” Take it slowly your first time through — this is the row most crocheters find themselves re-reading.
Row 3 (change color here if you’re color-blocking): Ch 1. Sc in first stitch. *Skip to the top of the next dc6tog cluster, work a dc3tog, ch 1, dc3tog into that same stitch (splitting the cluster below into two new half-points, offset from the row below), sc into the next chain-3 space; repeat from * across. Turn.
Row 4: Repeat Row 2 exactly — sc into the ch-1 spaces, dc6tog to join adjacent half-clusters, chains in between.
Row 5 (change color again here, if desired): Repeat Row 3.
Row 6: Repeat Row 2/Row 4.
From here, Rows 3 through 6 repeat indefinitely — that’s your four-row repeat. Every time you work Row 3 (or its repeat), you’re offsetting the diamonds by half a repeat from the row below, which is what creates the interlocking look rather than a plain stacked grid.
Finishing: After your last full repeat, work one final row of single crochet across all stitches and spaces to square off the top edge evenly, then fasten off. Weave in all ends, and block your finished piece — this stitch has a lot of texture, and blocking helps the diamonds sit flat and even.
Color-Changing Tips for Clean Diamonds
- Change colors on the last yarn-over of the last stitch of the row before the new color starts, drawing the new color through the final two loops. This keeps the color transition sitting neatly at the row line instead of showing a stray stitch in the old color.
- Don’t cut your yarn if you’re alternating just two colors every couple of rows — carry the unused color loosely up the side edge instead, which saves you from weaving in dozens of ends.
- Test your color repeat on a swatch first. Because this stitch has a six-row setup before the repeat locks in, your first “true” color band might land differently than you expect. A small swatch tells you exactly how many rows of each color you’ll need for the effect you want.
- High contrast reads best from a distance, but low-contrast, tonal color combinations (like two shades of the same blue) let the texture do more of the talking — a nice option if you find bold color-blocking a bit much.
Common Mistakes and How to Fix Them
My edges are pulling in tight. This is one of the most frequently reported issues with this stitch. If your side edges feel noticeably tighter than the rest of the fabric, try adding one extra chain at the start of rows that call for a ch-3 turning chain — this gives the edge stitch a little more room and stops the fabric from cupping inward.
I’m losing count of my stitches by the end of the row. Because the “stitch count” doesn’t stay flat across a row (clusters eat up several stitches at once, chain spaces don’t count as stitches, etc.), it helps to count in repeats rather than individual stitches. After every repeat of “cluster, chain, sc,” pause and confirm you’re at a clean multiple before moving forward, rather than trying to count every single stitch all the way to the end.
My diamonds look lopsided or uneven. This is almost always a tension issue in the cluster stitches specifically — if you pull the first double crochet of a cluster tighter than the rest, that one leg will look shorter than its neighbors. Try to keep your tension even across all three (or six) legs of every cluster, and don’t rush the final pull-through.
I can’t tell which stitch is the “top” of the cluster below. This is the single most common stumbling block in row 2 and its repeats. Clusters have a wide base and narrow top — look for the point where all the loops converge, not the wider stitches at the bottom, and work your next-row stitch into that top point.
My gauge swatch came out smaller than expected. This is a fairly dense, textured stitch, and it will use noticeably more yarn per square inch than plain double crochet fabric. Budget more yarn than you think you’ll need, and always swatch before committing to a full blanket-sized project.
Harlequin Stitch vs. Catherine’s Wheel vs. Starburst: What’s the Difference?
All three stitches share the same DNA — clustered double crochets forming a repeating motif — but they read differently in finished fabric:
- Harlequin stitch produces sharp, pointed diamonds that interlock edge to edge, closely mirroring the diamond pattern on a harlequin costume.
- Catherine’s Wheel stitch groups clusters into a more circular, spoke-like shape, often with a more open, lacy chain structure between the “wheels.”
- Starburst stitch uses a similar clustering technique but with a busier, more radiating repeat, and tends to read as denser and more textured than harlequin stitch.
If you’re choosing between the three for a project, harlequin stitch is generally the easiest entry point: fewer chain spaces to track than Catherine’s Wheel, and a more predictable four-row repeat than starburst.
Project Ideas: What to Make With Harlequin Stitch
- Baby blankets — a perennial favorite for this stitch, since the diamond texture reads beautifully in soft pastel or gender-neutral color palettes
- Hot pads and trivets — worked in cotton, the dense cluster stitches provide real heat resistance along with texture
- Scarves and cowls — worked with the diamond rows running vertically instead of horizontally for a different visual effect
- Pillow covers — a bold color-blocked panel of harlequin stitch makes a striking front panel for a simple envelope pillow
- Tote bags — the sturdy, dense fabric holds its shape well, which makes it a nice fit for bag panels
- Wall hangings — for crocheters who want to treat the stitch as a piece of textile art rather than a functional item
Because the stitch is reversible, it’s also a good candidate for anything that will be seen from both sides — a blanket draped over furniture, a scarf, or a bag with no clear “inside.”
Video Tutorial or Written Pattern: Which Should You Use?
Given how much the first six rows rely on visually identifying “the top of the cluster below,” many crocheters find that watching a video for the setup rows and then switching to a written pattern for the repeat works best. If you’re a highly visual learner, look up a video specifically for the row where clusters are joined (the row-2-style rows above) — seeing the hook go into the top of the stitch below clears up in seconds what can take several re-read paragraphs to describe in text. Once you’re through the setup and into the four-row repeat, most crocheters find they no longer need to reference anything at all.
Gauge and Sizing Your Project
Because harlequin stitch is denser than plain single or double crochet, expect your gauge to run smaller (more stitches and rows per inch) than a plain stitch in the same yarn and hook. A commonly cited gauge for worsted weight yarn with a 5mm hook is in the neighborhood of 15 stitches and 7 rows per 4 inches in pattern, though this varies significantly by individual tension, so always swatch.
To calculate the chain you need for a specific finished width:
- Work a swatch of at least one full repeat (8 stitches) plus your foundation, and measure its width.
- Divide your desired finished width by the swatch’s width per repeat to get the number of repeats you need.
- Multiply that number of repeats by 8, then add 2, for your foundation chain.
For length, remember that your first six rows behave differently from the repeat, so measure your gauge based on a full completed section of the four-row repeat rather than the setup rows alone.
Adjusting Harlequin Stitch for Different Yarn Weights
The instructions above assume worsted weight yarn, but the stitch scales reasonably well up and down if you know what to expect at each weight:
Fingering or sport weight: Harlequin stitch worked in a finer yarn produces a much more delicate, lace-like diamond that suits shawls, baby items, or heirloom-style pieces. Expect the clusters to be fiddlier to work since the loops are smaller and closer together — a smaller hook (D/3 – E/4, roughly 3–3.5mm) will help you keep tension consistent. Because thinner yarn shows every tension inconsistency more clearly, this is not the easiest weight to learn the stitch on; if you’re new to harlequin stitch, practice a swatch or two in worsted weight first, then move down in weight once the rhythm feels automatic.
Bulky or super bulky: At the opposite end, bulky yarn turns harlequin stitch into a dramatic, oversized diamond texture that works well for statement blankets or floor cushions. The tradeoff is that the dc6tog cluster becomes a genuinely heavy stitch to pull through — with seven loops of thick yarn on the hook at once, some crocheters find it easier to work the final pull-through in two smaller stages (pull through the first few loops, then the rest) rather than fighting to get all seven through in a single motion.
Mixing yarn weights within one project: If you want a graduated effect — a blanket that’s denser at one end and more open at the other, for instance — you can shift yarn weight and hook size mid-project as long as you keep your stitch multiple (8 + 2) constant. Just expect the row height and diamond size to change accordingly, which affects your overall finished dimensions.
Reading Harlequin Stitch Charts
Written instructions aren’t the only way this stitch gets published — you’ll also come across harlequin stitch presented as a symbol chart, especially in pattern books or non-English-language sources. A few things make chart-reading easier once you already understand the written version:
- Cluster symbols are typically drawn as several angled lines converging to a single point at the top — visually, this matches exactly what a dc3tog or dc6tog looks like once it’s crocheted, which makes the chart symbol easier to recognize than it might sound.
- Chain spaces appear as a small oval or loop between stitch symbols, representing the ch-1 or ch-3 gaps in the pattern.
- Charts are read bottom to top, and typically alternate direction (right-to-left, then left-to-right) to match how you’d actually turn your work at the end of each row — the same logic as the written row-by-row instructions, just represented visually instead of in words.
If you’re someone who finds written repeat instructions (“repeat from * across”) harder to follow than a visual, it’s worth searching out a charted version of this same stitch once you understand the mechanics — the two formats describe an identical stitch, just through different notation.
Blocking and Caring for Harlequin Stitch Projects
Because this is such a dense, textured stitch, blocking makes a noticeably bigger difference here than it does for plain single or double crochet fabric:
- Wet blocking (fully soaking the finished piece, then pinning it to shape while damp) tends to give the most dramatic improvement, evening out any inconsistencies between your setup rows and your later, more practiced repeats.
- Steam blocking is a faster option for acrylic or acrylic-blend yarns that don’t tolerate a full soak as well, though you should always check your yarn label first, since some synthetic fibers can be damaged by direct heat.
- Pin the points of each diamond outward as you block, rather than just pinning a straight rectangle — this helps the cluster stitches sit at their sharpest and most defined, which is really the whole visual point of this stitch.
- Washing finished projects: once blocked, this stitch holds up well to normal washing, but hand-washing or a gentle cycle is generally safer for anything with a lot of color-blocking, since it reduces the risk of dye transfer between colors over repeated washes.
Frequently Asked Questions
Is the harlequin stitch reversible? Yes. Because it’s built almost entirely from double crochet clusters and chains rather than stitches with a distinct front and back (like a front-post or back-post stitch), there’s no clearly “right” or “wrong” side — both faces of the fabric look intentional.
How many colors do I need for harlequin stitch? None — it looks great worked in a single color, since the texture itself catches light and shadow. That said, two to four colors are the most common choice for crocheters who want the diamonds to visually pop.
Why does my harlequin stitch swatch look different from the photo I’m following? Small tension differences show up more in cluster stitches than in plain single or double crochet, since several stitches are being pulled together into one point. A slightly looser or tighter gauge than the original designer used can noticeably change how sharp or rounded your diamonds look — this is completely normal and mostly a matter of taste once you find your own consistent tension.
Can I use this stitch for garments, or is it just for blankets? It works for garments, though the density and structure make it better suited to structured pieces (a cardigan panel, a bag, a stiffer vest) than a soft, drapey sweater. If you want a garment with more movement, consider a lighter weight yarn and a larger hook to loosen the fabric slightly.
What’s the easiest way to remember the four-row repeat once I’ve learned it? Most crocheters describe it as: one row of small V-shapes and single crochets, one row of joining those V-shapes into solid diamonds — repeated twice, with a color change if desired at the start of the “V” row. Once you’ve made it through the first full repeat by counting carefully, your hands tend to remember the rhythm faster than your eyes recognize it on the page.
Final Thoughts
Harlequin stitch crochet rewards patience in exactly one place — those first six setup rows — and then hands you a genuinely soothing four-row repeat for the rest of your project. It’s dense, textured, fully reversible, and looks considerably more advanced than the skills it actually requires. If you’ve been eyeing this stitch in blanket photos and wondering if it’s within reach, it is: swatch it once with a clear head, get through the setup rows without rushing, and the rest of the fabric will come together far more easily than the first row suggested it would.