How to Crochet an Adorable Baby Seal Amigurumi (Free Pattern + Step-by-Step Guide)
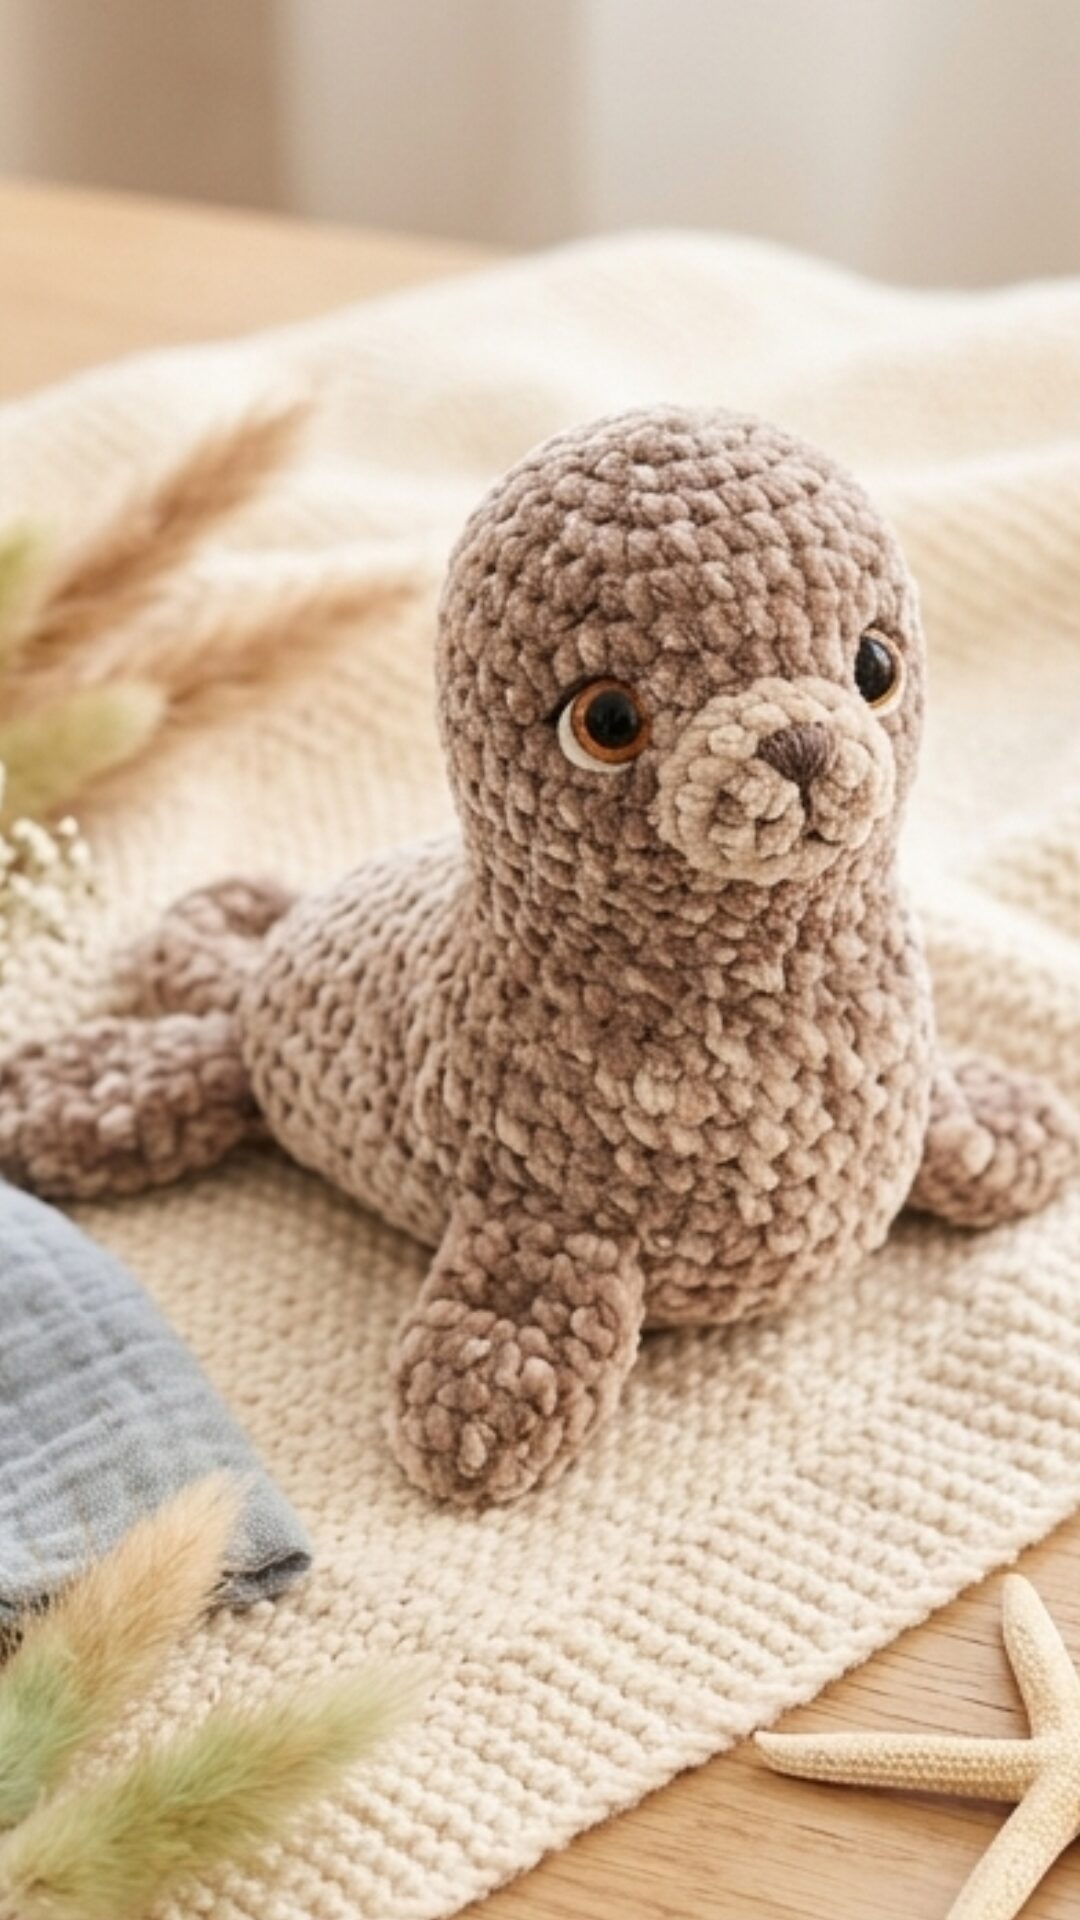
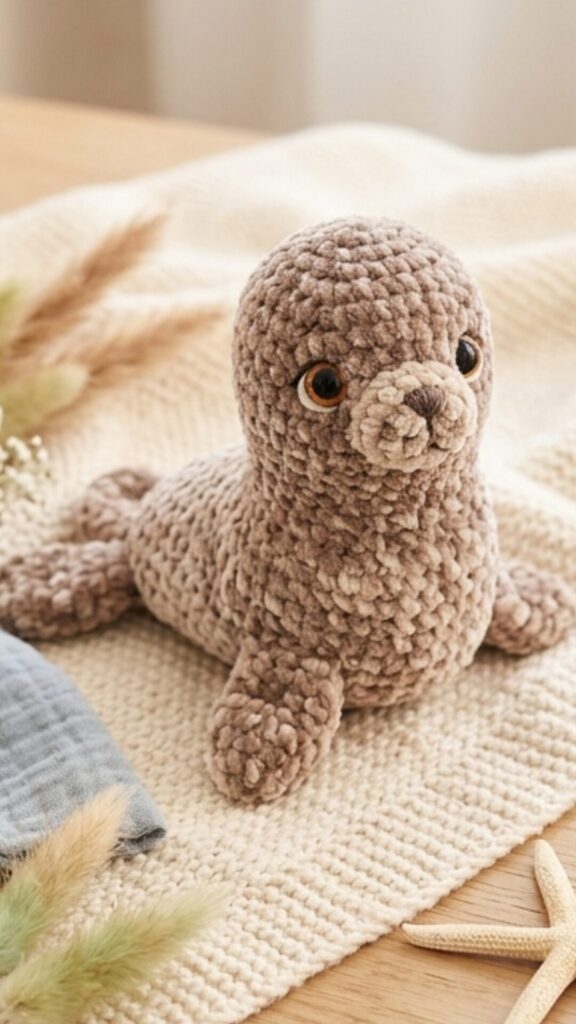
Adorable Baby Seal Amigurumi
If you have been scrolling through crochet Pinterest boards lately, chances are you have already fallen in love with the trend of ultra-soft, velvet-textured amigurumi animals. This free baby seal crochet pattern is exactly that: a chubby, soulful-eyed little seal worked entirely in chunky chenille yarn that gives it that irresistible bobbled, plush texture you see in boutique toy shops.
In this post you will find everything you need to make your own from scratch — materials list, abbreviations, full round-by-round pattern for every piece, and a detailed assembly guide. Whether you are making it as a nursery decor piece, a gift, or just for yourself, this seal is a joy to make.
Why Chenille Yarn Makes All the Difference
The magic of this seal — that rich, textured, almost fur-like surface — comes entirely from the yarn choice. Chunky chenille (also sold as velvet yarn) has a pile construction that creates natural bobbles and ridges as you crochet, mimicking the look of a real seal’s coat without any post-work.
Standard DK or worsted yarn will produce a perfectly nice amigurumi, but it will look completely different. If you want to replicate the toy in this tutorial, chenille is non-negotiable. Look for 100% polyester chunky chenille in a taupe, mocha, or warm greige colourway — around 300 g total.
Tips for working with chenille:
- It is hard to see individual stitches — use stitch markers every 6 stitches to track your counts.
- Chenille tends to split at the tip. Use a blunt-nosed hook (size 4.5 mm recommended) rather than a sharp tapered one.
- Tension is more forgiving than with cotton. A slightly loose tension actually enhances the fluffy texture.
- After assembly, run a stiff bristle brush over the surface to raise the pile and restore that fresh, velvety finish.
Materials You Will Need
- Chunky chenille / velvet yarn — approx. 300 g in taupe / mocha
- 4.5 mm crochet hook (or size to match gauge)
- 14–16 mm brown safety eyes × 2 (the amber-iris style gives the most lifelike result)
- Polyester fibrefill stuffing
- Stitch markers
- Tapestry / yarn needle
- Black embroidery floss (for the nose and mouth)
Gauge: 10 sc × 10 rows = approx. 8 cm. Exact tension is not critical for amigurumi — just ensure your fabric is tight enough that stuffing does not show through.
Finished size: Approximately 25 cm long.
Skill level: Intermediate — confident beginners comfortable with magic rings, increases, decreases, and working in continuous rounds will manage this pattern well.
Abbreviations & Stitch Reference
This pattern uses US crochet terms throughout.
- MR — Magic ring
- sc — Single crochet
- inc — Increase: work 2 sc into the same stitch
- dec — Invisible decrease: insert hook through front loops of next 2 stitches, yarn over, pull through both front loops, yarn over, pull through 2 loops on hook
- sl st — Slip stitch
- ch — Chain
- BLO — Back loop only
- st(s) — Stitch(es)
- R — Round
- [x] × n — Repeat instruction x a total of n times
Work in continuous rounds throughout. Do not join or turn at the end of each round unless the pattern specifically instructs you to. Place a stitch marker at the first stitch of each round and move it up as you go.
The Pattern
Part 1: Head (make 1 — start here)
The head is worked from the top down, then closed after the muzzle and eyes are attached.
- R1: MR, 6 sc into ring. [6 sts]
- R2: [inc] × 6. [12]
- R3: × 6. [18]
- R4: × 6. [24]
- R5: × 6. [30]
- R6: × 6. [36]
- R7–11: sc around, 5 rounds even. [36]
- R12: × 6. [30]
- R13: × 6. [24] — Attach safety eyes between R8–9, approx. 6 sts apart. Sew and attach muzzle (see Part 5) before continuing to close.
- R14: × 6. Stuff head firmly. [18]
- R15: × 6. [12]
- R16: [dec] × 6. Fasten off, leave a long tail for sewing. [6]
Part 2: Body (make 1)
The body is fuller and more oval than the head, tapering at the base where the tail flippers will attach.
- R1: MR, 6 sc into ring. [6]
- R2: [inc] × 6. [12]
- R3: × 6. [18]
- R4: × 6. [24]
- R5: × 6. [30]
- R6: × 6. [36]
- R7: × 6. [42]
- R8–14: sc around, 7 rounds even. [42]
- R15: × 6. [36]
- R16: × 6. [30]
- R17: × 6. Begin stuffing firmly. [24]
- R18: × 6. [18]
- R19: × 6. Finish stuffing. [12]
- R20: [dec] × 6. Fasten off, leave long tail. [6]
Part 3: Front Flippers (make 2)
These are paddle-shaped with a lightly stuffed lower section and a flattened upper arm that gets sewn flat against the body.
- R1: MR, 6 sc. [6]
- R2: [inc] × 6. [12]
- R3: × 6. [18]
- R4–5: sc around, 2 rounds even. [18]
- R6: × 6. [12]
- R7–10: sc around, 4 rounds even. Lightly stuff the paddle section only. Leave upper arm hollow. [12]
- R11: Flatten the opening, then sc through both layers across. Fasten off, leave long tail. [6]
Part 4: Rear Tail Flippers (make 2, joined)
Make two separate flipper paddles then join them into a single tail unit before sewing to the body base.
- R1: MR, 5 sc. [5]
- R2: [inc] × 5. [10]
- R3: × 5. [15]
- R4–5: sc around. Lightly stuff. [15]
- R6: × 5. [10] — Fasten off the first flipper with a long tail. Do not fasten off the second.
- Join: On the second flipper, ch 2, then sl st into the first flipper’s opening. Work 10 sc around the first flipper, 2 sc across the chain, 10 sc around the second flipper, 2 sc across the chain on the other side. [24 sts total] Work 2 more rounds even. Fasten off with a long tail for sewing.
Part 5: Muzzle (make 1)
The muzzle is a separate piece stitched onto the face — this is what gives the seal its dimensional, protruding snout.
- R1: MR, 5 sc. [5]
- R2: [inc] × 5. [10]
- R3: × 5. [15]
- R4: sc around. Leave the opening, stuff lightly. Do not close. Sew flat onto the lower-front of the head before you finish closing the head. [15]
Nose embroidery: With black embroidery floss, stitch a small inverted-Y or filled triangle at the centre of the muzzle for the nose. Add two or three straight stitches curving gently downward for the mouth.
Assembly Guide
Take your time with assembly — this is what brings the seal to life. Lay all pieces out before you start and dry-fit their positions.
- Sew the muzzle flat onto the lower-front of the head, centred. Stuff lightly before fully closing the seam.
- Embroider the nose (inverted Y) and mouth (soft curved lines) over the muzzle centre with black floss.
- Confirm that both safety eyes are secured through all layers between R8–9, spaced approximately 6 stitches apart. (Do this before closing the head — once the head is stuffed it is too late.)
- Sew the head to the top-front of the body, angled slightly upward so the seal appears to look ahead. Pass the needle through multiple stitches on both pieces for a strong, secure join.
- Attach the front flippers flat against the lower sides of the body, angled slightly forward and downward, at approximately R10–12 on the body.
- Sew the joined rear tail flipper unit to the very base and back of the body. The two paddles should splay out symmetrically like a fan.
- Weave in all yarn ends securely. Use the tip of your needle to tease chenille fibres over any visible join lines to camouflage the seams.
- Brush the finished toy gently with a stiff-bristled brush to raise the pile and restore the velvet texture.
Pro Tips for the Best Results
- Stuff firmly. Chenille yarn is soft and needs firm stuffing inside to hold its shape. Under-stuffed amigurumi made with this yarn go floppy quickly.
- Use the invisible decrease throughout. The standard decrease creates a visible hole in chenille — the invisible method (through front loops only) keeps the surface smooth.
- Sew on a flat surface. Lay the body flat and pin the flippers in place before sewing — this ensures they are symmetrical.
- Safety eye size matters. The 14–16 mm brown safety eyes with the amber printed iris ring are what create that lifelike, soulful expression. Smaller solid black eyes will give a very different look.
- Block with steam. A light pass of steam over the finished seal relaxes the chenille fibres and gives the surface a beautifully even, plush finish.
Frequently Asked Questions
Can I use a different yarn weight?
Yes, but the result will look quite different. DK weight with a 3.0 mm hook will produce a smaller, flatter-textured seal. If you want the specific bobbled, velvety surface shown in the photos, chunky chenille is the only yarn that delivers it.
How long does this pattern take?
For an experienced crocheter, expect 8–12 hours total, spread across multiple sessions. The head and body each take about 2–3 hours. Chenille is slower to work with than cotton or acrylic because stitch visibility is lower — budget extra time if this is your first chenille project.
Is this pattern safe for babies?
The pattern uses safety eyes, which have a locking washer on the back. However, no toy with safety eyes should be given to children under 3 years old, as eyes can potentially be pulled loose. For very young children, consider embroidering the eyes with black yarn instead.
What if I can’t find chenille yarn locally?
Chunky chenille yarn is widely available online under brand names like Bernat Blanket, Lion Brand Pound of Love Velvet, Premier Yarns Anti-Pilling Everyday Chunky, or various craft store house brands. Search for ‘chunky velvet yarn’ or ‘chenille crochet yarn’ and look for a ply that describes itself as bulky or chunky weight.
Final Thoughts
This baby seal amigurumi is one of those projects that genuinely surprises you at the end — you spend a few hours making what looks like a series of simple oval shapes, attach them together, and then suddenly you have this incredibly expressive little creature sitting on your table staring back at you. The chenille yarn does most of the aesthetic heavy lifting, and the large safety eyes add a personality that photographs beautifully.
If you make this pattern, we would love to see it! Tag your finished seal on Instagram and Pinterest with #babysealamigurumi and #chenilleamigurumi so others can find inspiration from your work.
Happy hooking!