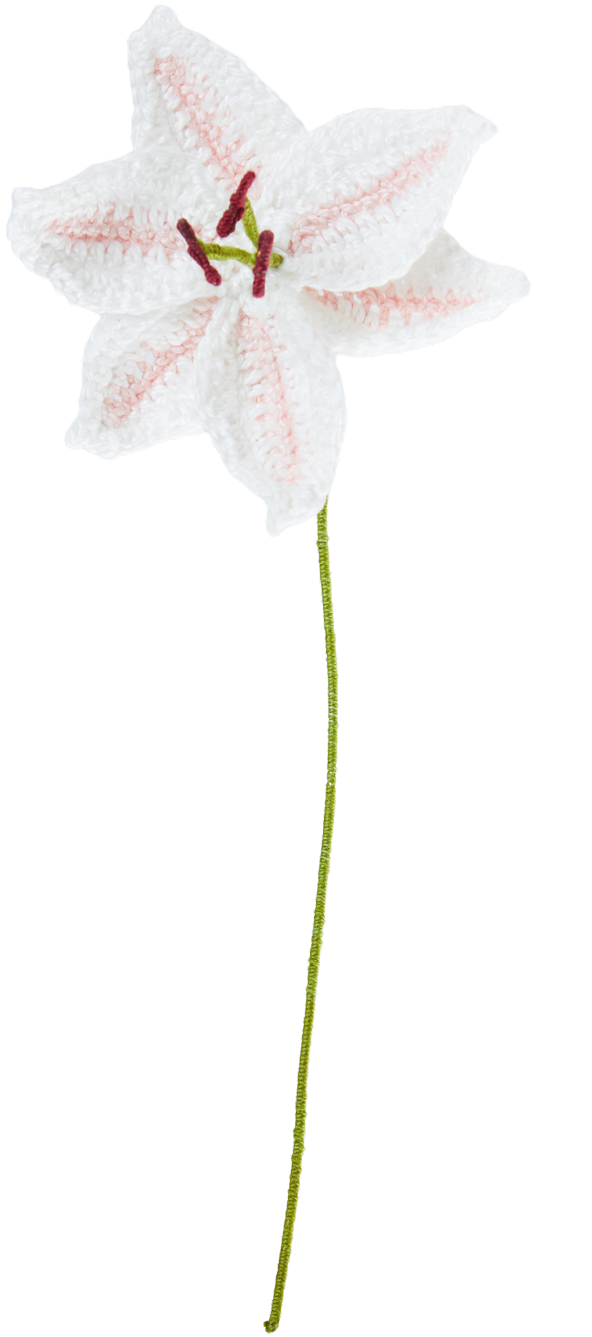
Crochet Your Serene Lily Today!
Welcome to Crochetto, where creativity blossoms! Today, we’re thrilled to bring you a beautiful pattern for crafting a stunning crochet lily. This elegant flower, with its delicate petals and vibrant hues, is perfect for adding a touch of handmade charm to your home decor, creating a unique gift, or simply enjoying the meditative process of bringing yarn to life. Follow our clear, step-by-step instructions to create your very own everlasting bloom.
Craft Your Beautiful Lily: Materials & Techniques
To ensure your lily turns out just as beautiful as you imagine, gather your materials and familiarize yourself with the essential crochet techniques.

Tool Kit
- Skein of DMC Pearl Cotton Size 3
- 2.5mm Crochet Hook
- Sewing Needle
- 1mm Craft Wire
- 0.5mm Craft Wire
- Super Glue
Design Size
Your finished lily will measure approximately 11 cm x 25 cm / 4.3″ x 9.8″.
Color Guide
Select your beautiful DMC Pearl Cotton colors according to this guide:
| Code N° | Color | N° Skeins |
|---|---|---|
| A | 818 | x 1 |
| B | White | x 1 |
| C | 815 | x 1 |
| D | 581 | x 1 |
Essential Techniques
Chain Stitch (CH)
The foundation of many crochet projects, the chain stitch creates a flexible base.

Slip Stitch (SL)
Often used to join rounds, move across stitches without adding height, or finish off work.

Single Crochet (US) / Double Crochet (UK) (SC)
A fundamental stitch, creating a dense, firm fabric.
Single Crochet Decrease (SC DEC)
This technique reduces the number of stitches in a row, shaping your piece.
- Insert your hook into the next stitch. Loop the yarn around the groove of the hook, and pull it through the stitch. There are now two loops on your hook.
- Repeat step 1. You now have three loops on the hook.
- Loop the yarn around the hook again and pull it through all three loops on your hook. You have now made one decrease.
Magic Loop
Also known as a magic ring or adjustable ring, it creates a tightly closed center for working in the round.
Lily Crochet Pattern Instructions
Your lily is made up of six petals which are worked flat before being sewn together in two layers. Short lengths of craft wire are wrapped in cotton pearl to form three stamens which are then attached through the centre of the lily. The flower is then attached to a length of craft wire wrapped in cotton pearl and fixed with a small amount of super glue.
Important Notes Before You Begin
To make the instructions easier to read, we will use some simple abbreviations:
- SC1: make one single crochet stitch
- SC2: make two single crochet stitches
- SC3: make three single crochet stitches
- SC DEC: make one single crochet decrease
- CH: chain
- DC: double crochet
- SL: slip stitch
- HDC: half double crochet (not listed in abbreviations, but used in pattern, good to note for clarity if I were allowed to add it)
Petal (make 6)
- Using the DMC pearl cotton in Colour A, make a foundation chain of 10 chain stitches.
- CH1, (this is your turning chain, do this at the start of each row unless instructed otherwise), beginning in the second chain from the hook, SL2, SC8.
- Increase row: Change to Colour B. Work a second SC into the last stitch, turn your work 180 to work along the opposite edge of the foundation chain. SC1 into first stitch (this will be the third SC stitch in this space), HDC1, DC3, HDC2, SC3, CH2, skip 1, SL1 into the first CH you just made, SC3, HDC2, DC3, HDC1, SC1. (22 stitches.) Do not join in the round.
- Instead of working in the round, you will work back across the stitches you just worked.
- Increase row: CH2, beginning in the third stitch from the hook, HDC2, DC2, DC 2 into the next stitch, HDC2, SC4, CH2, skip 1, SL1 into the first CH you just made, SC4, HDC2, DC2 into the next stitch, DC2, HDC3, HDC4 into back into the first stitch of the row, work a SL into the top of the CH. (30 stitches.)
- Cut your yarn approx. 10cm/4″ from the last stitch. Pull on the loop on your hook until the end pops through – you have now secured your last stitch.
Stamen (make 3)
- Take a 10cm length of 0.5mm craft wire, and apply a small amount of super glue to the middle 3cm. Take a short length of Colour C and wrap it tightly around this 3cm section of craft wire. Cut Colour C.
- Fold the craft wire in the middle of the wrapped section, pinch the wire together 1.5cm away from the end of the fold and press it down so that your wire forms a capital ‘T’ shape.
- Apply a small amount of super glue at the point where the vertical section of wire meets the horizontal. Take a length of Colour D and continue to wrap tightly. When only 1cm of wire remains uncovered, apply a small amount of super glue and wrap Colour D until you reach the end. Cut Colour D.
Assembly and Finishing
- Take three of the petals and stitch the flatter ends together with the tip of the petals facing outwards. Join the remaining 3 petals together in the same way.
- Cut a 26cm length of 1mm craft wire. Fold the wire over approx. 1cm from the end, pass both ends of the wire through the centre of the first set of petals and twist the wire around itself underneath the petals to secure it.
- Position the second trio of petals on top of the first trio, offset them so that all 6 petals can be viewed from above, stitch in place.
- Take each of the 3 stamens in turn and push them through the centre of the petals and bring them out so they sit parallel against the longer section of craft wire.
- Apply a small drop of super glue to the wire, directly underneath the flower. Take Colour D and wrap it tightly around the wires.
- When only 1cm of wire remains uncovered, apply a small amount of super glue and wrap Colour D until you reach the end. Cut Colour D.
- Weave in any loose ends.
We hope you enjoyed crafting this beautiful crochet lily! Your finished flower is a testament to your skill and creativity, bringing a touch of everlasting beauty into your space. Share your creations with us on social media—we love to see your unique interpretations! For more delightful patterns and inspiration, be sure to explore the wonderful world of Crochetto.