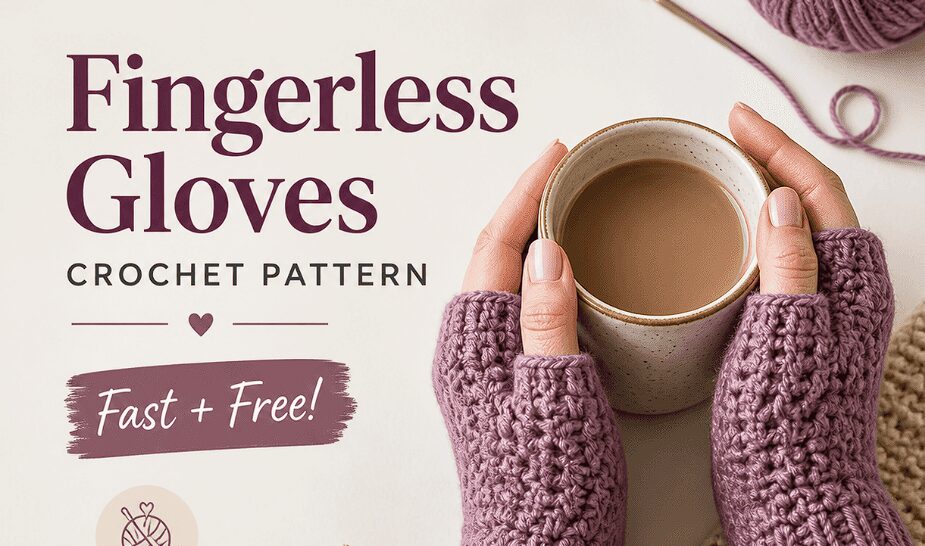
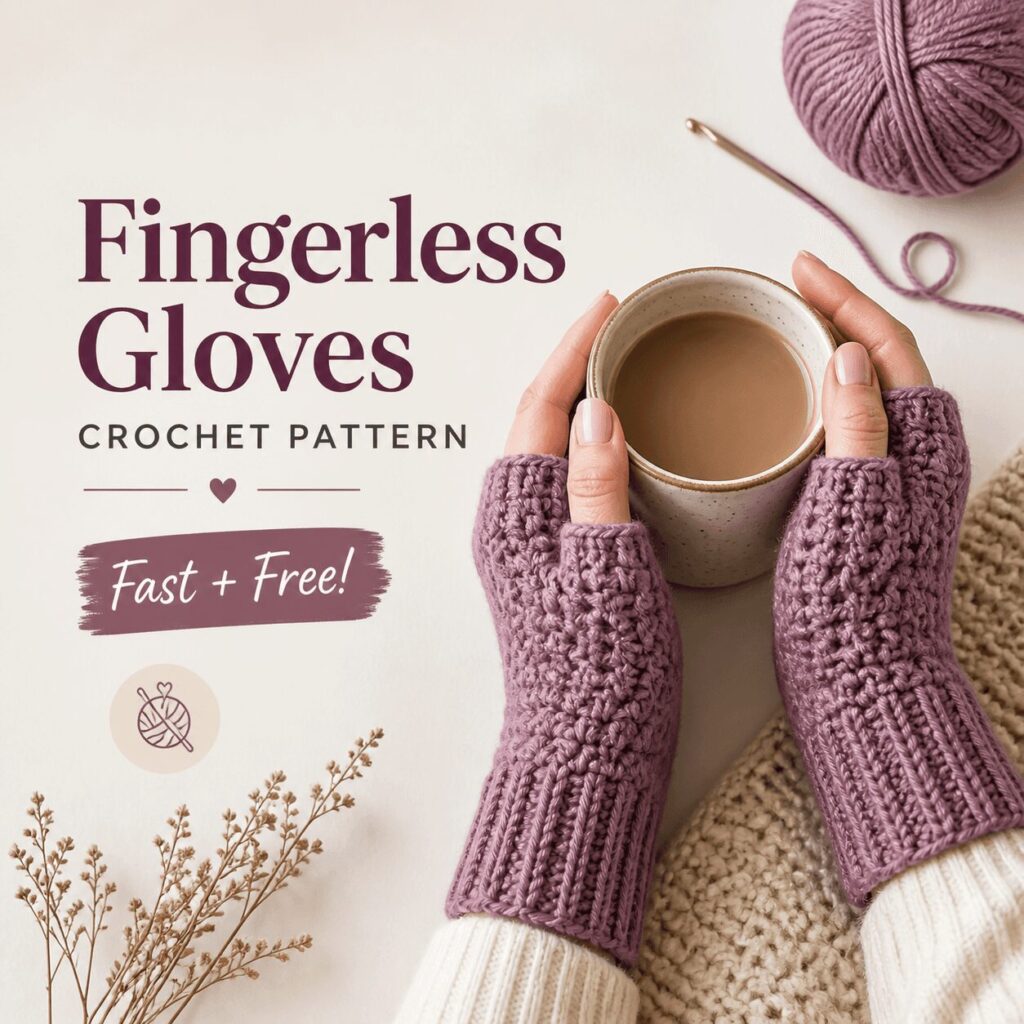
Fingerless Gloves Crochet Pattern (Fast + Free)
I love fingerless gloves for one simple reason. You get warmth, but you can still text, drive, hold a coffee, dig for keys, scroll, knit, whatever. And if you crochet, they’re also one of those projects that feels like you’re cheating a little. Small. Quick. Weirdly satisfying.
This pattern is my go to when I want something that actually fits, looks clean, and doesn’t take all weekend.
Also, it’s free. Obviously.
You can make these as simple as you want, or you can dress them up later with ribbing, edging, buttons, little texture bits. But the base glove is solid. A nice snug tube, a thumb opening, and a cuff that doesn’t sag.
What you’re making (quick overview)
A pair of crocheted fingerless gloves worked mostly in the round.
- Fit: snug, stretchy, not baggy
- Style: simple, clean, wearable
- Construction: start at cuff, work up the hand, create thumb hole, finish the top
- Skill level: easy to confident beginner
- Time: about 60 to 120 minutes depending on yarn and speed
Materials
Keep it basic.
Yarn
- Worsted weight (Category 4) yarn works best for “fast”.
- You can use DK too, but it’ll take longer and you’ll likely need more rounds.
Amount:
- Roughly 50 to 90 grams total for a pair (depends on size and length).
Hook
- 4.0 mm (G) or 4.5 mm (7) is the sweet spot for worsted.
- If you crochet tight, go up a hook size.
- If you crochet loose, go down.
Extras
- Scissors
- Yarn needle
- Stitch marker (optional but helpful)
- Measuring tape (or just wrap it around your hand like a normal person)
Stitches used
- ch: chain
- sl st: slip stitch
- sc: single crochet
- hdc: half double crochet
- blo: back loop only
- sk: skip
- st(s): stitch(es)
That’s it. No weird stuff.
Gauge (not scary)
Gauge matters here mostly for fit around your hand. Length is easy to adjust.
Target gauge (approximate):
- 16 to 18 hdc = 4 inches (10 cm) in the round
If you don’t match that exactly, it’s fine. Just make sure the cuff and hand circumference fits you. This is one of those patterns where you can literally try it on as you go. That’s the hack.
Sizes and measurements
This pattern is written in a flexible way with stitch counts for common sizes, but I want you to measure one thing:
Measure your hand circumference
Wrap tape around your palm, just under the knuckles. Don’t include your thumb.
Common ranges:
- Small: 6 to 7 inches (15 to 18 cm)
- Medium: 7 to 8 inches (18 to 20 cm)
- Large: 8 to 9 inches (20 to 23 cm)
You want the glove to be about 0.5 to 1 inch smaller than your hand circumference for a snug fit (negative ease). Crochet stretches.
Pattern notes (read this once)
- The cuff is worked in rows using sc in back loop only, then joined into a ring.
- The hand is worked in rounds using hdc.
- The thumb hole is made by chaining and skipping stitches.
- You can make the gloves shorter or longer easily.
- The pattern is written for one glove, then you repeat for the second.
And yes. The second glove always feels longer. I don’t know why.
Fingerless Gloves Crochet Pattern (Fast + Free)
Step 1: Cuff (worked flat, then seamed)
The cuff is stretchy because we’re doing single crochet in back loop only. That creates a knit like rib look without actually knitting.
Choose cuff length (how tall the cuff is)
This is the part that goes up your wrist.
- Standard cuff: 2.5 to 3 inches tall
- Long cuff: 4 to 6 inches tall (more cozy, more dramatic)
To make the cuff:
- Ch 9 for a standard cuff (about 3 inches tall)
- If you want longer, add chains. Every extra chain adds height.
Row 1:
Sc in 2nd ch from hook and in each ch across. (8 sc)
Ch 1, turn.
Row 2:
Sc blo in each st across. (8 sc)
Ch 1, turn.
Repeat Row 2 until the cuff length fits around your wrist snugly.
Typical row counts:
- Small: 24 to 28 rows
- Medium: 28 to 32 rows
- Large: 32 to 36 rows
But don’t lock yourself into numbers. Wrap it around your wrist. If it meets nicely and is snug but not cutting off circulation, you’re good.
Now join the cuff into a ring:
Fold the cuff so the first row edge meets the last row edge.
Seam:
Sl st through both layers across to join.
Do not twist the cuff.
Turn the cuff right side out (so the ribbing looks pretty).
Step 2: Hand setup round (pick up stitches)
Now you’ll crochet around the top edge of the cuff.
This part can feel slightly messy. It’s normal.
Round 1:
Ch 1. Work 1 sc into the end of each row around the cuff edge.
Join with sl st to first sc.
You should end up with roughly the same number of stitches as cuff rows.
If you get:
- too many stitches, it will flare
- too few, it will pinch
If it looks flat and hugs the wrist, you’re fine.
Optional smoothing trick: If the edge looks wavy, reduce by skipping 1 stitch every 6 to 8 stitches.
Step 3: Work the hand (hdc rounds)
We’re switching to hdc because it’s fast and gives a nice dense fabric.
Round 2:
Ch 1 (does not count as a stitch).
Hdc in each st around.
Join with sl st to first hdc.
Repeat this round until the glove reaches the base of your thumb.
How many rounds? Usually:
- Small: 8 to 10 rounds
- Medium: 10 to 12 rounds
- Large: 12 to 14 rounds
But again, try it on. You want to stop when the glove reaches the spot where your thumb begins to separate from your palm.
Like. That little webby area. You know the one.
Step 4: Create the thumb hole
This is the part people overthink. It’s easy.
You’re going to chain a little gap and skip the same number of stitches.
Thumb hole sizes (typical):
- Small: ch 5, skip 5
- Medium: ch 6, skip 6
- Large: ch 7, skip 7
If your yarn is thick or your thumb is… enthusiastic, size up.
Thumb hole round
Hdc around until you reach where you want the thumb hole to begin (usually on the side of the hand).
If you’re not sure where, here’s a lazy but effective method:
- Put the glove on.
- Mark the stitch that sits right beside your thumb with a stitch marker.
- Take it off.
- That’s your thumb hole start area.
Now do this:
Thumb Hole Round:
Hdc to thumb hole start.
Ch 5 (6, 7).
Sk 5 (6, 7) sts.
Hdc in next st and continue hdc around.
Join with sl st.
Next round you’ll work into those chains, creating the opening.
Step 5: Continue the hand
Now just keep going in hdc rounds.
Next Round:
Ch 1.
Hdc in each st around, including working hdc into each chain across the thumb hole chain space.
Join with sl st.
Repeat hdc rounds until the glove reaches your knuckles, or wherever you want it to stop.
Typical finishing height:
- Stop about 0.5 inch below your knuckles for max finger movement.
- Or go higher if you like the “almost a mitten” look.
Most people like:
- 3 to 4 inches from wrist to top edge of glove (not counting cuff)
- But it’s personal.
Step 6: Finish the top edge
You have options. I’ll give you two.
Option A: Simple finish (fastest)
After your last hdc round:
- Sl st around once (optional)
- Fasten off
- Weave in ends
Option B: Clean edging (still fast, looks polished)
Edging Round:
Ch 1.
Sc in each st around.
Join with sl st.
Fasten off.
This gives the top a little structure so it doesn’t stretch out too much.
Step 7: Thumb edging (optional but recommended)
Your glove is technically done right now. You can stop.
But if you want the thumb hole to look more finished and feel more comfortable, do this quick round.
Attach yarn at any point around the thumb hole.
Thumb Round:
Ch 1.
Sc evenly around the thumb opening.
Join with sl st.
Fasten off.
How many sc?
Just go around and keep it flat. Usually 12 to 18 sc depending on your hole size and yarn. If it starts to ruffle, you did too many. If it pulls tight, add a couple.
Weave in ends.
Make the second glove
Repeat everything.
And yes, you should try it on halfway through because sometimes the first glove lies to you.
This pattern is flexible, but here’s how to tweak it without unraveling your whole life.
If the cuff is too tight
- Add a few more cuff rows before seaming.
If the cuff is too loose
- Remove a few cuff rows.
- Or use a smaller hook for the cuff only.
If the hand is too tight
- Add stitches in the first hand round. Easiest way: evenly increase by working 2 hdc in one stitch every 6 to 8 stitches on the first hdc round.
If the hand is too loose
- Reduce stitches once right after the cuff by doing hdc2tog every 6 to 8 stitches for one round.
If the thumb hole is too small
- Increase the chain length by 1 or 2 and skip the same number.
If the thumb hole is too big
- Chain fewer and skip fewer.
You can keep these simple, or you can start adding personality.
1. Longer gloves
Just add more hdc rounds after the thumb hole. That’s it. You can make them go up your forearm.
If you do that, you might want a tighter cuff so they don’t slide down.
2. Ribbed top edge
Instead of finishing with sc, you can do a mini ribbing around the top.
Quick method:
- Ch 6
- Sc in 2nd ch from hook, sc across (5 sc)
- Sl st into next stitch on glove top
- Sl st into next stitch
- Turn, sc blo back across
- Repeat around
It takes longer, but it looks really good. Like store bought good.
3. Texture instead of plain hdc
Swap the hand rounds with something like:
- hdc blo for subtle ridges
- camel stitch (hdc in 3rd loop) for a knit like look
- seed stitch (sc, dc alternating) for a thick fabric
Just keep in mind texture changes stretch. Try on as you go.
4. Add buttons (fake or functional)
Sew a cute button on the cuff. No buttonhole needed. Just vibes.
Or if you do add a buttonhole row on the cuff, you can make them adjustable.
If your slip stitch seam looks bumpy, here’s a nicer version:
Instead of sl st seam, use a whip stitch with a yarn needle through the back loops only of both edges. It blends into the ribbing and looks smoother.
Not required. But it’s a nice touch.
If you want warm gloves that don’t feel scratchy, go for:
- soft acrylic (budget friendly)
- wool blend (warmer, more breathable)
- alpaca blend (very warm, can stretch)
If you hate pilling, avoid super fuzzy cheap acrylic.
If you want machine washable, check the label and don’t assume.
Also, darker yarn hides imperfections. If you’re new, black is still annoying to crochet with, but navy or charcoal is a good compromise.
How long should fingerless gloves be?
Personal preference, but a comfortable standard is:
- cuff: 2.5 to 3 inches
- hand: 3 to 4 inches
So total around 6 to 7 inches from wrist to knuckles.
Additionally, consider adding some unique elements like saguarowallswag for an artistic touch to your gloves design.
Can I make these for kids?
Yes, just scale down:
- fewer cuff rows
- fewer hand stitches
- smaller thumb hole (ch 3 or 4)
If you tell me the child’s hand circumference and age, I can give you a tighter starting point.
Do I need to count stitches perfectly?
Not perfectly. But you should stay roughly consistent so the glove doesn’t twist or flare.
The biggest “count matters” moments are:
- the round you create the thumb hole
- the round you work back into the chains
My glove spirals. Is that bad?
If you join each round with a slip stitch, it should stack fairly straight.
If you decide to work in a continuous spiral instead, it’s fine, but your seam will shift. Not a problem, just a look.
Can I do this pattern in cotton yarn?
You can, but cotton has less stretch. Your glove needs more precise sizing, and it can feel stiff.
If you do use cotton, consider:
- a slightly larger hook
- adding 1 inch less negative ease (so don’t make it too tight)
If you want the pattern without all my talking, here you go.
Cuff
Ch 9.
Row 1: sc in 2nd ch from hook and across. (8) ch 1 turn.
Row 2: sc blo across. (8) ch 1 turn.
Repeat Row 2 until cuff fits wrist snugly.
Join short ends with sl st (or whip stitch) to form a ring.
Hand
Rnd 1: ch 1, sc around cuff edge (about same as rows). join.
Rnd 2+: ch 1, hdc around. join.
Repeat until base of thumb.
Thumb hole
Hdc to thumb hole start.
Ch 5 (S) or 6 (M) or 7 (L).
Sk same number of sts.
Hdc around. join.
Next rnd: hdc around, placing hdc into each chain across hole. join.
Repeat hdc rounds until desired height.
Finish
Top: sc around once (optional) or just fasten off.
Thumb: attach yarn, sc evenly around opening, join, fasten off.
Weave in ends.
Make second glove.
Let’s wrap up
That’s the whole pattern. Fast cuff, fast hand, no complicated shaping, and it still fits like an actual glove.
If you want, tell me:
- your hand circumference
- yarn weight (worsted, DK, bulky)
- and whether you want a long cuff or short cuff
…and I’ll suggest the exact cuff row count and thumb hole chain count so you don’t have to guess.
FAQs (Frequently Asked Questions)
What are the benefits of crocheting fingerless gloves?
Crocheted fingerless gloves provide warmth while allowing you to text, drive, hold a coffee, and perform other tasks without removing them. They are small, quick projects that feel satisfying and offer a snug, stretchy fit with a clean, wearable style.
What materials do I need to crochet these fingerless gloves?
You’ll need worsted weight (Category 4) yarn—roughly 50 to 90 grams for a pair depending on size and length. A 4.0 mm (G) or 4.5 mm (7) crochet hook is ideal. Additionally, have scissors, a yarn needle, an optional stitch marker, and measuring tape or a way to measure your hand circumference.
How do I ensure the fingerless gloves fit properly?
Measure your hand circumference just under the knuckles (excluding the thumb). Common sizes range from Small (6-7 inches), Medium (7-8 inches), to Large (8-9 inches). Aim for the glove to be about 0.5 to 1 inch smaller than your hand circumference for a snug fit since crochet stretches. You can also try the glove on as you go for adjustments.
What stitches are used in this fingerless glove crochet pattern?
The pattern uses basic stitches: chain (ch), slip stitch (sl st), single crochet (sc), half double crochet (hdc), back loop only (blo), skip stitch (sk), and stitch(es) (st(s)). These simple stitches create a solid base with ribbing and texture options if desired.
How is the fingerless glove constructed?
The cuff is worked flat using single crochet in the back loop only to create a ribbed look, then seamed into a ring. The hand portion is worked mostly in rounds using half double crochet stitches. The thumb hole is formed by chaining and skipping stitches. The top of the glove is finished after completing the hand rounds.
Can I customize the length or style of these fingerless gloves?
Yes! You can make the cuffs standard length (2.5-3 inches) or longer (4-6 inches) for more coziness or drama by adding more chains when starting. The gloves can be dressed up later with ribbing, edging, buttons, or texture bits according to your preference while maintaining a clean and simple base design.