
How to Crochet the Elegant Willow Granny Square: A Step-by-Step Guide
How to Crochet the Elegant Willow Granny Square: A Step-by-Step Guide
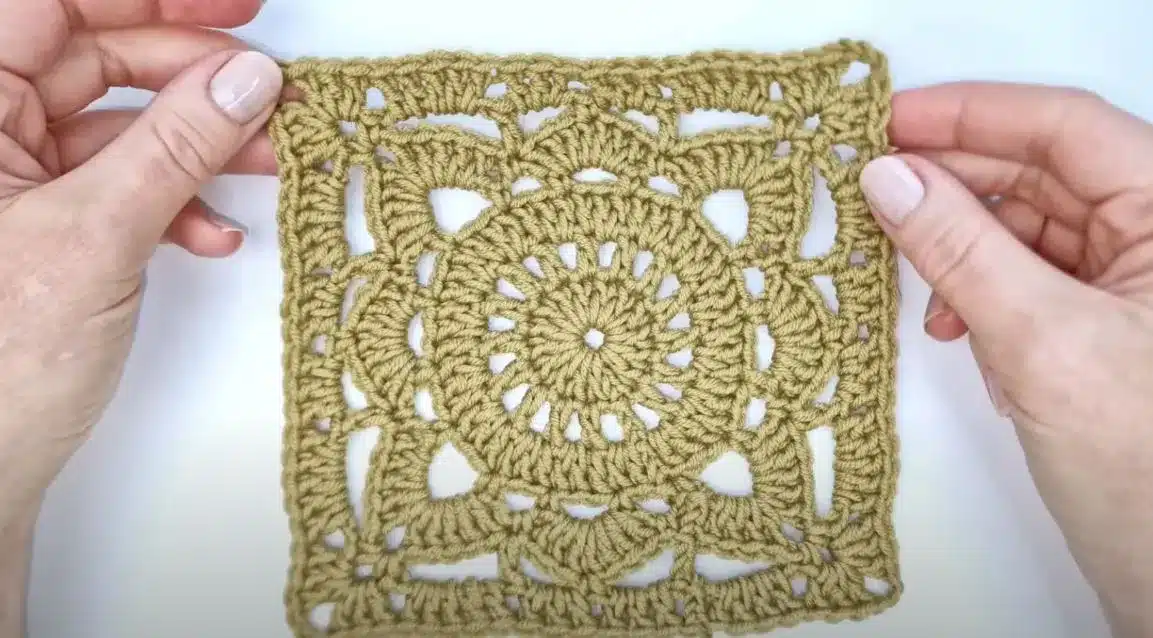
Welcome, crafters! There are few things as timeless and versatile in the world of crochet as a granny square. Today, we’re diving into a particularly beautiful variation: the Willow Granny Square. With its delicate, lacy design that transitions from a circle to a square, it’s perfect for creating stunning blankets, elegant pillows, market bags, and more.
This tutorial breaks down the pattern into clear, manageable rounds, using standard US crochet terms. Whether you’re looking to learn a new stitch or add a gorgeous square to your repertoire, you’re in the right place.
Let’s grab our hooks and get started!
What You’ll Need
- Yarn: A DK or light worsted weight yarn works beautifully. The project in the tutorial uses Drops Merino Extra Fine (a DK weight yarn).
- Crochet Hook: A 4.5 mm hook is used in the tutorial, but be sure to use a hook that corresponds to your yarn weight.
- Scissors
- Yarn Needle: For weaving in those ends.
Abbreviations (US Terms)
- ch: chain
- sl st: slip stitch
- sc: single crochet
- dc: double crochet
- st(s): stitch(es)
- sp: space
The Pattern
Round 1: The Foundation
We begin by creating a central ring.
- Make a slip knot and ch 4.
- Join with a sl st to the first ch to form a ring.
- Ch 3 (this counts as your first dc).
- Work 15 more dc into the center of the ring.
- Join with a sl st to the top of the beginning ch-3.
(You should have a total of 16 dc, including the initial ch-3.)
Round 2: Creating Spaces
This round builds the foundation for our lacy details.
- Ch 4 (this counts as 1 dc and a ch-1 sp).
- Work 1 dc into the next st.
- Ch 1.
- Repeat steps 2 and 3 all the way around.
- To finish the round, ch 1 and join with a sl st to the 3rd ch of the beginning ch-4.
(You should have 16 dc and 16 ch-1 spaces.)
Round 3: Filling It In
Now, we’ll build up the body of the circle.
- Ch 3 (counts as your first dc).
- Work 2 dc into the first ch-1 sp from the previous round.
- Work 1 dc into the next st.
- Repeat steps 2 and 3 all the way around.
- Join with a sl st to the top of the beginning ch-3.
(You should have a total of 48 sts.)
Round 4: Squaring Off
This is the magic round where our circle starts to become a square.
- Ch 1 and make 1 sc in the same first st.
- Corner: Ch 5, skip the next 2 sts, 1 sc in the next st.
- Side: Ch 3, skip the next 2 sts, 1 sc in the next st. Repeat this two more times. (You will have 3 ch-3 side spaces).
- Repeat steps 2 and 3 three more times to form the remaining corners and sides.
- To finish, after your last side section, join with a sl st to the very first sc you made.
(You should have 4 ch-5 corner spaces and 3 ch-3 spaces on each of the 4 sides.)
Round 5: The Willow Branches
Here we add the beautiful fan details that give the square its name.
- Sl st into the first ch-5 corner space.
- Corner: Ch 3 (counts as 1 dc), work 4 dc into the same space. Ch 3, then work 5 more dc into the same corner space.
- Side: 1 sc into the next ch-3 sp. Work 7 dc into the following ch-3 sp. 1 sc into the final ch-3 sp on this side.
- Repeat steps 2 and 3 for the remaining three sides.
- Join with a sl st to the top of the beginning ch-3.
Round 6: The Lacy Framework
This round creates the openwork frame for our final border.
- Ch 3 (counts as 1 dc). Ch 5, then work 1 sc into the ch-3 corner space. Ch 3, and work 1 more sc into the same corner space. Ch 5.
- Skip the next 5 sts, work 1 dc into the sc from the previous round.
- Ch 3, skip the next 3 sts, work 1 sc into the 4th (center) dc of the 7-dc fan.
- Ch 3, skip the next 3 sts, work 1 dc into the next sc.
- You have now reached the next corner. Repeat steps 1-4 for the remaining three sides.
- To finish the round, after your last dc, join with a sl st to the 3rd ch of the very first ch-8 you made (the ch-3 that counts as a dc + the ch-5).
Round 7: The Final Border
The last round fills in the framework to create a solid, beautiful edge.
- Sl st into the first ch-5 space.
- Ch 3 (counts as 1 dc), then work 4 more dc into the same ch-5 sp.
- Corner: Work 3 dc, ch 3, 3 dc all into the ch-3 corner space.
- Work 5 dc into the next ch-5 sp.
- Work 3 dc into the next ch-3 sp.
- Work 3 dc into the next ch-3 sp.
- You’ve reached the next ch-5 space before the corner. Repeat steps 4-6 along the next three sides, and work the corner as described in step 3.
- Join with a sl st to the top of the beginning ch-3.
Finishing Your Square
- Fasten Off: Cut your yarn, leaving a 6-inch tail. Yarn over and pull the tail completely through the loop on your hook to secure it.
- Weave in Ends: Use your yarn needle to weave the starting and ending tails into the back of your work for a clean, professional finish.
- Block (Optional but Recommended): To give your square a perfectly straight and defined shape, you can block it. Wet the square, gently squeeze out the excess water, pin it into a perfect square shape on a blocking mat, and let it air dry completely.
And there you have it! A stunning Willow Granny Square, ready to become part of your next beautiful project.
What will you create with your squares? Share your ideas and projects in the comments below! Happy crocheting