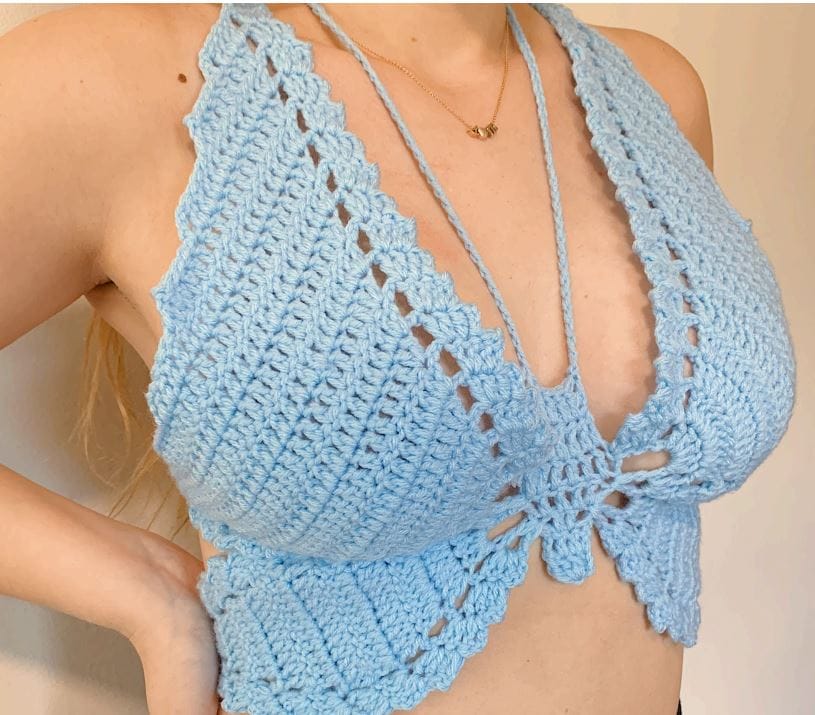
Mae’s Butterfly Top
D E S I G N E D B Y M A E C R O C H E T S
Measurements (inches)

| Size | XS | S | M | L | XL | 2X | 3X | 4X | 5X |
| Upper Wing Coverage Width | 5.5″ | 6.5″ | 7.5″ | 8.5″ | 9.5″ | 10.5″ | 11.5″ | 12.5″ | 13.5″ |
| Upper Wing Coverage Height | 5″ | 5.5″ | 6.25″ | 7″ | 7.5″ | 8.25″ | 9″ | 9.5″ | 10.25″ |
FINISHED MEASUREMENTS
Hello! After two years of growth and learning, I’ve revamped this pattern! I’ve added more sizes for inclusivity and created a beginner-friendly YouTube video to help you make this gorgeous butterfly top.
While this pattern isn’t my original design, I aim to enhance it and provide a trustworthy resource. Many scam patterns exist, so I’ve provided a free, written pattern for beginners to create their first garment and for small business owners to sell their creations.
Copyright: All photos and patterns are the intellectual property of Mae Crochets, LLC. They cannot be resold or reposted in any manner.
MATERIALS
- Size F/3.75mm Crochet Hook
- Weight 4 Cotton Yarn – 140 (170, 200, 230, 260) (320, 370, 410, 450) yards
- Scissors
GAUGE
- 15 sts x 9 rows (4″ x 4″/10cm x 10cm) of double crochets
YARN RECOMMENDATIONS
- Lion Brand Pima Cotton
- Sugar N’ Cream Cotton
ABBREVIATIONS
- ch – chain
- dc – double crochet
- f/o – fasten off
- inc – increase double crochet (see special stitches)
- sk – skip
- slst – slip stitch
- st(s) – stitch(es)
SPECIAL STITCHES
- Increase Double Crochet (inc): Place two double crochets in one stitch.
ADDITIONAL NOTES
- The pattern is worked from the middle of the top (butterfly body) and then the wings.
- Numbers in parentheses () at the end of rows show the total double crochet stitches.
- Turning chains (ch) do not count as a stitch.
- “Row # – #” means repeat the instructions for the specified rows.
- This pattern uses US Terminology.
PATTERN
Butterfly Body (Middle of Top)
- Row 1: Ch 4. Place 4 dc in the 1st ch that you made. (4)
- Row 2 – 3: Ch 3, turn. Dc across. (4)
- Row 4: Ch 3, turn. Inc, dc across until one sts is left, inc. (6)
- Row 5: Repeat row 4. (8)
- Row 6: Turn. Slst into the 2nd st from your hook. Ch 3, dc in the same st as your ch 3, dc across until one st remains. Leave that st unworked. (6)
- Row 7: Ch 3, turn. Dc across. (6)
Neck Straps
- Ch 100 (adjust as needed). Turn. Starting in the 2nd ch from the hook, slst down the ch.
- Once you reach the top of the butterfly body, slst across to the first st from row 7. Ch 100 (or same count as the first strap). Repeat from * to * until you reach the body. Slst into the body. F/o.
Butterfly Wings (x2)
- Attach yarn to the top of the 5th row of the butterfly body, at the stitch we slst over that has no dc (see the image on the right).
- Row 1: Ch 5. Dc in the same st the yarn was attached. Ch 5, dc between body rows 4 & 5. Ch 2, dc in the same st. Ch 3, dc between body rows 3 & 4. Ch 2, dc in the same st. (See the second image on the right)
- Row 2: Ch 3, turn. Place 4 dc in the first ch space, ch 1. Place 3 dc in the next ch space, ch 1 repeat from * to * 1 more time. Place 5 dc in the next ch space, ch 1. Place 3 dc in the last ch space. Lastly, place 1 more dc at the top of the ch 3 at the end of the row (part of the ch 5 of the previous row). (19)
- Row 3: Turn. Slst in the 2nd st, slst in the 3rd st. Ch 3, inc two times – once in the st the ch 3 is, and once in the next st. (4). Ch 2, sk the ch space, inc in the next 5 sts (10). Ch 2, sk ch space, place 3 dc in the middle st of the next three sts (3). Ch 2, sk ch space, inc in the next 3 sts (6). Ch 2, sk ch space, inc in the next 2 sts, leaving the last two sts unworked (4). (27)
Butterfly Wings Continued
Sizes: XS(S, M, L, XL) (2X, 3X, 4X, 5X)
Upper Wing
- Row 4: Turn. Slst in the 2nd st, slst in the 3rd st. Ch 3, inc two times (4). Ch 2, sk ch space, inc, dc repeat from * to * 2 more times (9). Ch 2, sk ch space, place 3 dc in the middle st of the next three sts (3). Ch 2, sk ch space, repeat from * to * 5 times (15). Ch 2, inc in the next 2 sts, leaving the last two unworked (4). (35)
- Row 5 – (6, 6, 8, 8) (10, 12, 12, 14): Turn. Slst in the 2nd st, slst in the 3rd st. Ch 3, inc two times (4). Ch 2, sk ch space, inc in the first st, dc across until one st left before the next ch space, inc. Ch 2, sk ch space, place 3 dc in the middle st of the next three sts (3). Ch 2, sk ch space, inc, dc across until one st left before the next ch space, inc. Ch 2, inc in the next 2 sts, leaving the last two unworked (4).
- Row 6 (8, 8, 10, 10) (12, 14, 14, 16): Turn. Slst in the 2nd st. Ch 3, inc two times (4). Ch 2, sk ch space, inc, dc across until one st left before the next ch space, inc. Ch 2, sk ch space, inc in the next 2 sts (4). (27 (31, 31, 35, 35) (39, 43, 43, 47))
- Row 7 (9, 9, 11, 11) (13, 15, 15, 17): Turn. Slst in the 2nd st, slst in the 3rd st. Ch 3, inc two times (4). Ch 2, sk ch space, inc, dc across until the next ch space. Ch 2, sk ch space, inc in the next 2 sts (4).
- Row 8 (10, 10, 12, 12) (14, 16, 16, 18): Turn. Slst in the 2nd st, slst in the 3rd st. Ch 3, inc two times (4). Ch 2, sk ch space, dc across until one st left before the next ch space, inc. Ch 2, sk ch space, inc in the next 2 sts (4).
Continue alternating between the last two rows until you have a total of 9 (11, 13, 15, 17) (21, 23, 25, 27) rows and 30 (34, 36, 40, 42) (48, 52, 54, 58) sts.
- Row 10 (12, 14, 16, 18) (22, 24, 26, 28): Turn. Slst across 3 times starting in the 2nd st, slst in the next ch space, slst 2 more times. You should be in the second st after the first ch space. Ch 3, dc across until one st remains before the ch space, inc. Ch 2, sk ch space, inc in the next 2 sts (4). (26 (30, 32, 36, 38) (44, 48, 50, 54))
- Row 11 (13, 15, 17, 19) (23, 25, 27, 29): Turn. Slst in the 2nd st, slst in the 3rd st. Ch 3, inc two times (4). Ch 2, sk ch space, inc in the first st after the ch space, dc across until 5 sts remain. Leave the rest of the sts unworked.
- Row 12 (14, 16, 18, 20) (24, 26, 28, 30): Turn. Slst into the next 5 sts starting in the 2nd st. Ch 3, dc across until one st remains before the ch space, inc. Ch 2, sk ch space, inc in the next 2 sts (4).
Continue alternating between the last two rows until you have a total of 14 (16, 18, 20, 22) (26, 28, 30, 32) rows.
- Row 15 (17, 19, 21, 23) (27, 29, 31, 33): Turn. Slst in the 2nd st, slst in the 3rd st. Ch 3, inc two times. (4)
- Row 16 (18, 20, 22, 24) (28, 30, 32, 34): Turn. Slst across 3 times starting in the 2nd st. Place another slst in the top of the ch 3. Ch 170 (190, 200, 220, 240) (260, 280, 300, 320) (this will be one of the strands that will cross in the back, you can adjust the length accordingly). Starting in the 2nd ch from the hook, slst across the ch. Slst in the st the ch started from, f/o.
Lower Wing
- Attach yarn to the outer dc sts in the middle 3 sts from row 6 (see photo for details).
- Row 5 (7, 7, 9, 9) (11, 13, 13, 15): Ch 3, place 3 dc in the same st (3). Ch 2, sk ch space, dc across until the next ch space. Ch 2, sk ch space, inc in the next 2 sts (4). (16 (20, 20, 24, 24) (28, 32, 32, 34))
- Row 6 (8, 8, 10, 10) (12, 14, 14, 16) – 9 (13, 13, 17, 17) (21, 25, 25, 27): Turn. Slst in the 2nd st, slst in the 3rd st. Ch 3, inc two times (4). Ch 2, sk ch space, sk first st, dc across until one st left before the next ch space. Ch 2, sk ch space, inc in the next 2 sts (4).
- Row 10 (14, 14, 18, 18) (22, 26, 26, 28): You should have only one st left in the middle of the two ch spaces. Turn. Slst in the 2nd st, slst in the 3rd st. Ch 3, inc two times (4). Ch 1, sk the next 2 ch spaces. Inc in the next 2 sts (4). (8)
- Row 11 (15, 15, 19, 19) (23, 27, 27, 29): Turn. Slst across 3 times starting in the 2nd st. Ch 3, dc in the same space. Ch 1, sk ch space, inc. (4 – ch 3 counts as a stitch this row) F/o.
- Repeat the butterfly wing instructions for the other side of the butterfly’s body. Weave in all the ends.
Wearing the Top
There are many ways you can tie this top to fit your body. Here’s one suggestion:
- The straps attached to the top of the butterfly body tie around your neck.
- The other straps cross over the back and go through the widest opening of the upper wing.
- Then, the straps cross again through the widest opening of the lower wing.
- Finally, tie the two strands together.
(See pictures below for visual guidance.)
Finishing Up
Hide all ends, and you’re finished!