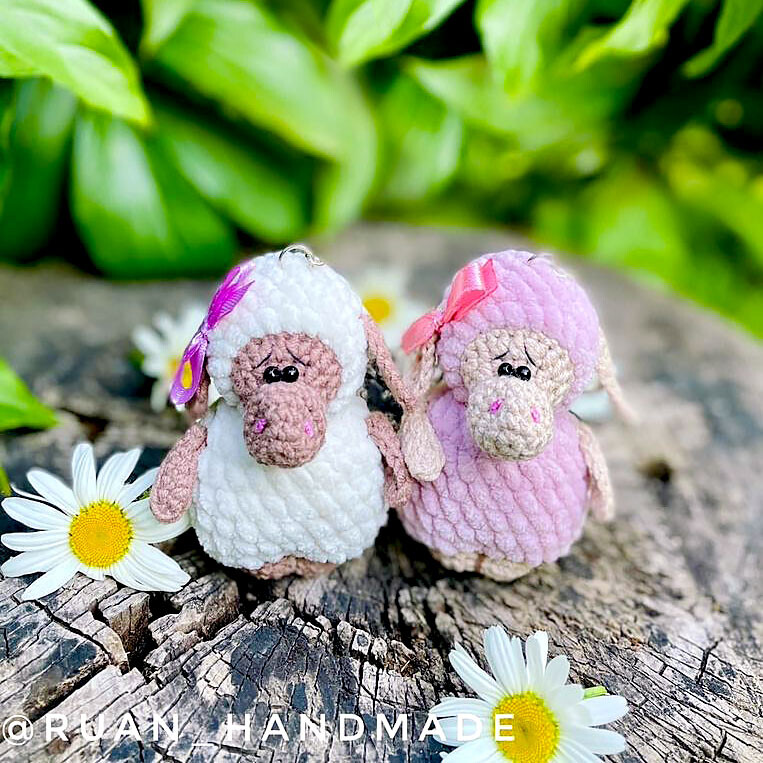
Amigurumi Sheep Keychain Crochet Pattern
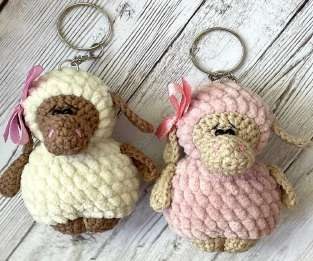
This adorable amigurumi sheep keychain combines smooth cotton yarn for the sweet face, arms, ears, and feet with ultra-soft chenille plush yarn for the fluffy wool. Originally written in Russian shorthand by designer Anna Rubtsova (@ruan_handmade), every single round and assembly step has been expanded into plain, beginner-friendly US crochet instructions with stitch counts and gentle reminders.
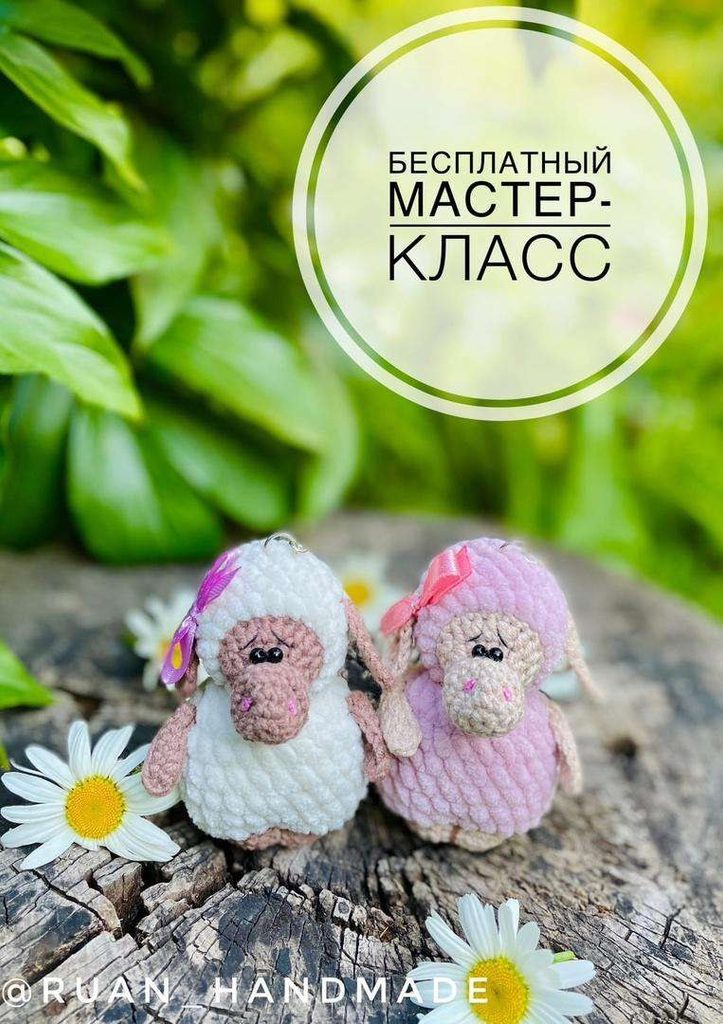
Pattern Overview (US Terms)
- Skill Level: Beginner (Amigurumi Basics)
- Terminology: Standard US Crochet Terms
- Recommended Hook Size: 1.7 mm (US Steel #6 / 1.75 mm) for cotton face/limbs and 2.5 mm (US B-1 / C-2) for plush wool
- Yarn Weight: Fine / Sport (#2) cotton blend (e.g., YarnArt Jeans) and Super Bulky (#6) chenille plush (e.g., Himalaya Dolphin Baby or Lavita Velur)
- Finished Size: Approximately 3 to 3.5 inches (8-9 cm) tall depending on tension
- Estimated Time: 2-3 hours
UK to US Term Conversions Applied
This pattern was translated from original UK crochet terminology into standard American (US) terms so you can follow along without confusion:
| Original UK Term | Converted US Term | Beginner Note |
|---|---|---|
| 1.7 mm hook (metric) | US Steel #6 (1.75 mm) | Used with Fine (#2) cotton-blend yarn to keep stitches tight so stuffing does not show through. |
| 2.5 mm hook (metric) | US B-1 (2.25 mm) or C-2 (2.75 mm) | Used with Super Bulky (#6) chenille plush yarn for the wooly head and body. |
Materials You Will Need
- Fine / Sport (#2) cotton-blend yarn in light brown or beige for the face, legs, arms, and ears (e.g., YarnArt Jeans)
- Super Bulky (#6) chenille plush yarn in cream, white, or pink for the wooly head and body (e.g., Himalaya Dolphin Baby or Lavita Velur)
- 1.7 mm crochet hook (closest US: Steel #6 / 1.75 mm) for the cotton yarn
- 2.5 mm crochet hook (closest US: B-1 / 2.25 mm or C-2 / 2.75 mm) for the plush yarn
- Black sewing thread and matching sewing thread for attaching the head
- Pink embroidery thread or fine crochet thread (Iris) for the nostrils
- Two 3 mm black bead eyes
- Polyester fiberfill stuffing (hollowfiber)
- Keychain ring hardware
- Thin decorative ribbon for a bow
- Yarn needle, sewing needle, scissors, and pins or knitting needles for holding pieces in place
US Beginner Stitch Guide
Review these basic stitches before starting. Every instruction below is already written out in full plain English.
- Magic Ring (MR) (UK: Magic Ring (КА)): An adjustable starting loop that pulls tight so there is no hole at the center of your amigurumi.
- Chain (ch) (UK: Chain (В.п.)): Yarn over and pull through the loop on your hook to create a foundation chain stitch.
- Single Crochet (sc) (UK: Double Crochet / dc (Сбн)): Insert hook into the stitch, yarn over, pull up a loop (2 loops on hook), yarn over, and pull through both loops.
- Single Crochet Increase (inc) (UK: Double Crochet Increase (Пр)): Work 2 single crochet stitches into the exact same stitch to make your piece wider.
- Single Crochet Decrease (dec) (UK: Double Crochet Decrease (Уб)): Combine 2 stitches into 1 (invisible decrease recommended: insert hook into front loops of next 2 stitches, yarn over, pull through 2 loops, yarn over, pull through remaining 2 loops).
- Half Double Crochet (hdc) (UK: Half Treble Crochet / htr (ПСН)): Yarn over, insert hook into stitch, yarn over, pull up a loop (3 loops on hook), yarn over, and pull through all 3 loops at once.
- Half Double Crochet Increase (hdc inc) (UK: Half Treble Increase (Пр ПСН)): Work 2 half double crochet stitches into the exact same stitch.
- Slip Stitch (sl st) (UK: Slip Stitch / ss (Сс)): Insert hook into stitch, yarn over, and pull the loop directly through both the stitch and the loop on your hook.
Step-by-Step Instructions
Head (Start with Fine #2 Yarn & 1.7 mm Hook)
Step 1 — Round 1
Create a Magic Ring and work 6 single crochet stitches into the ring. Gently pull the yarn tail to close the center hole tightly. Place a stitch marker in your 6th stitch so you know where each round ends.
Stitch count at end of step: 6 stitches
Pattern shorthand reference: 1) 6 сбн в КА (6)
Beginner Tip: Amigurumi is worked in continuous spirals without joining rounds. Always move your stitch marker up to the last stitch of each new round.
Head
Step 2 — Round 2
Work an increase (2 single crochet stitches) into each of the 6 stitches all the way around. You will end this round with 12 stitches.
Stitch count at end of step: 12 stitches
Pattern shorthand reference: 2) 6 пр (12)
Beginner Tip: Count your stitches carefully at the end of Round 2: 2, 4, 6, 8, 10, 12.
Step 3 — Round 3
Repeat the following sequence 6 times all the way around: work 1 single crochet into the next stitch, then work 2 single crochet stitches (an increase) into the following stitch. You will end with 18 stitches.
Stitch count at end of step: 18 stitches
Pattern shorthand reference: 3) (1 сбн, пр)х6 (18)
Step 4 — Rounds 4-5
For the next 2 rounds, work 1 single crochet into each stitch all the way around without any increases or decreases. You should still have 18 stitches at the end of each round.
Stitch count at end of step: 18 stitches per round
Pattern shorthand reference: 4-5) 18 сбн (18)
Step 5 — Round 6
Repeat the following sequence 6 times all the way around: work 1 single crochet into the next stitch, then work 1 decrease over the next two stitches. This shapes the muzzle and brings your count down to 12 stitches.
Stitch count at end of step: 12 stitches
Pattern shorthand reference: 6) (1 сбн, уб)х6 (12)
Beginner Tip: Try using an invisible decrease (working into the front loops only of the two stitches) to keep the muzzle smooth.
Step 6 — Round 7
Work 1 single crochet into each of the 12 stitches all the way around.
Stitch count at end of step: 12 stitches
Pattern shorthand reference: 7) 12 сбн (12)
Step 7 — Round 8
Work 1 single crochet in each of the next 4 stitches. Next, work 1 half double crochet increase (2 half double crochet stitches in the same stitch) into each of the next 4 stitches. Finish the round by working 1 single crochet in each of the last 4 stitches. You will have 16 stitches.
Stitch count at end of step: 16 stitches
Pattern shorthand reference: 8) 4 сбн, 4 пр ПСН, 4 сбн (16)
Beginner Tip: The 4 half double crochet increases create the raised brow and cheek area of the sheep’s face.
Step 8 — Round 9
Work 1 single crochet in each of the next 4 stitches. Then repeat the following sequence 4 times: work 1 half double crochet into the next stitch, followed by 1 half double crochet increase (2 half double crochet stitches) into the next stitch. Finish with 1 single crochet in each of the last 4 stitches. You will have 20 stitches.
Stitch count at end of step: 20 stitches
Pattern shorthand reference: 9) 4 сбн, (1 ПСН, пр ПСН)х4, 4 сбн (20)
Step 9 — Round 10
Work 1 single crochet into each of the 20 stitches all the way around. On the very last stitch, switch to your Super Bulky (#6) plush yarn and 2.5 mm hook before finishing the pull-through.
Stitch count at end of step: 20 stitches
Pattern shorthand reference: 10) 20 сбн (20)
Beginner Tip: To change yarn cleanly, insert your hook, pull up a loop with the old cotton yarn, then yarn over with the new plush yarn to finish the stitch.
Head (Switch to Plush #6 Yarn & 2.5 mm Hook)
Step 10 — Rounds 11-14
Using the plush yarn and 2.5 mm hook, work 1 single crochet into every stitch all the way around for 4 full rounds (80 stitches total across 4 rounds). Keep your stitch count at 20 per round.
Stitch count at end of step: 20 stitches per round
Pattern shorthand reference: 11-14) 20 сбн (20)
Beginner Tip: Plush yarn stitches can be harder to see, so feel for the V-shapes at the top of each stitch with your fingers and count every round.
Head
Step 11 — Round 15
Repeat the following sequence 5 times all the way around: work 1 single crochet in each of the next 2 stitches, then work 1 decrease over the next two stitches. You will have 15 stitches left.
Stitch count at end of step: 15 stitches
Pattern shorthand reference: 15) (2 сбн, уб)х5 (15)
Step 12 — Round 16
Begin stuffing the muzzle and head firmly with polyester fiberfill. Then repeat the following sequence 5 times all the way around: work 1 single crochet in the next stitch, then work 1 decrease over the next two stitches. You will have 10 stitches left.
Stitch count at end of step: 10 stitches
Pattern shorthand reference: 16) (1 сбн, уб)х5 (10)
Beginner Tip: Make sure to push stuffing gently into the brown muzzle so it keeps its cute rounded shape.
Step 13 — Round 17 (Finish Head)
Add any final bits of stuffing so the head is plump. Work 5 decreases all the way around to bring your count down to 5 stitches. Cut the yarn leaving a short tail, thread it onto a yarn needle, weave through the front loops of the remaining 5 stitches, pull tight to close the opening, and hide the tail inside the head.
Stitch count at end of step: 5 stitches
Pattern shorthand reference: 17) 5 уб (5)
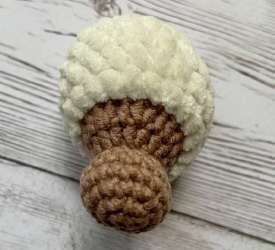
Legs & Body (Start with Fine #2 Yarn & 1.7 mm Hook)
Step 14 — Round 1
Using the same cotton yarn color as the face and your 1.7 mm hook, make a Magic Ring and work 6 single crochet stitches into the ring. Pull tight to close.
Stitch count at end of step: 6 stitches
Pattern shorthand reference: 1) 6 сбн в КА (6)
Legs & Body
Step 15 — Round 2
Work 1 increase (2 single crochet stitches) into each of the 6 stitches all the way around. You will have 12 stitches.
Stitch count at end of step: 12 stitches
Pattern shorthand reference: 2) 6 пр (12)
Step 16 — Round 3
Repeat the following sequence 6 times all the way around: work 1 single crochet in the next stitch, then 1 increase (2 single crochet) in the following stitch. You will have 18 stitches.
Stitch count at end of step: 18 stitches
Pattern shorthand reference: 3) (1 сбн, пр)х6 (18)
Step 17 — Round 4
Repeat the following sequence 6 times all the way around: work 1 single crochet in each of the next 2 stitches, then 1 increase (2 single crochet) in the following stitch. You will have 24 stitches.
Stitch count at end of step: 24 stitches
Pattern shorthand reference: 4) (2 сбн, пр)х6 (24)
Step 18 — Rounds 5-7
Work 1 single crochet into each of the 24 stitches all the way around for 3 rounds. On the last stitch of Round 7, switch to your Super Bulky (#6) plush yarn and 2.5 mm hook.
Stitch count at end of step: 24 stitches per round
Pattern shorthand reference: 5-7) 24 сбн (24)
Legs & Body (Switch to Plush #6 Yarn & 2.5 mm Hook)
Step 19 — Rounds 8-12
With the plush yarn and 2.5 mm hook, work 1 single crochet into each of the 24 stitches all the way around for 5 full rounds.
Stitch count at end of step: 24 stitches per round
Pattern shorthand reference: 8-12) 24 сбн (24)
Legs & Body
Step 20 — Round 13
Repeat the following sequence 6 times all the way around: work 1 single crochet in each of the next 2 stitches, then work 1 decrease over the next two stitches. You will have 18 stitches left.
Stitch count at end of step: 18 stitches
Pattern shorthand reference: 13) (2 сбн, уб)х6 (18)
Step 21 — Round 14
Stuff the body firmly with polyester fiberfill. Repeat the following sequence 6 times all the way around: work 1 single crochet in the next stitch, then work 1 decrease over the next two stitches. You will have 12 stitches left.
Stitch count at end of step: 12 stitches
Pattern shorthand reference: 14) (1 сбн, уб)х6 (12)
Step 22 — Round 15 (Finish Body)
Top off the stuffing if needed, then work 6 decreases all the way around to leave 6 stitches. Pull the remaining ring closed with a yarn needle. Hide and cut the yarn if you plan to sew the head on with matching sewing thread, or leave a long plush tail for sewing.
Stitch count at end of step: 6 stitches
Pattern shorthand reference: 15) 6 уб (6)
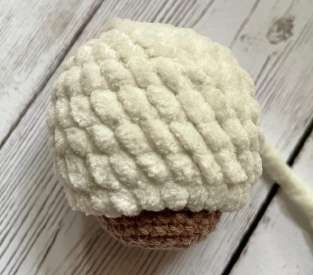
Arms (Make 2)
Step 23 — Row 1 (Oval)
Using the cotton yarn and 1.7 mm hook, chain 8. Starting in the 2nd chain from your hook, work 1 single crochet in each of the next 6 chains. Work 3 single crochet stitches all into the last chain to turn the corner. Now working down the opposite underside of the foundation chain, work 1 single crochet in each of the next 6 stitches, then slip stitch to the first stitch to finish. Fasten off, leaving a long tail for sewing. Make 2 arms.
Stitch count at end of step: 15 stitches + 1 sl st
Pattern shorthand reference: 8 вп, начиная со 2 петли 6 сбн, 3 сбн в последнюю петлю, 6 сбн, сс
Beginner Tip: Working around both sides of a chain creates a neat oval shape without needing to sew seams.
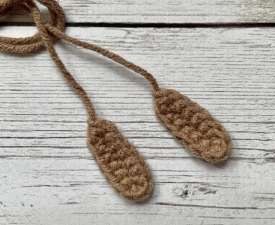
Ears (Make 2)
Step 24 — Row 1 (Oval)
Using the cotton yarn and 1.7 mm hook, chain 8. Starting in the 2nd chain from your hook, work 1 single crochet in each of the next 6 chains. Work 3 half double crochet stitches all into the last chain to create a slightly wider, rounded ear tip. Working down the opposite side of the chain, work 1 single crochet in each of the next 6 stitches, then slip stitch to finish. Fasten off, leaving a long tail for sewing. Make 2 ears.
Stitch count at end of step: 15 stitches + 1 sl st
Pattern shorthand reference: 8 вп, начиная со 2 петли 6 сбн, 3 ПСН в последнюю петлю, 6 сбн, сс
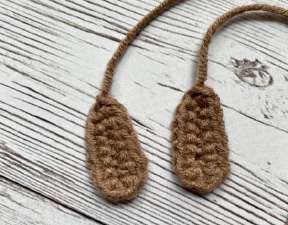
Assembly: Position & Sew Head to Body
Step 25 — Head Attachment
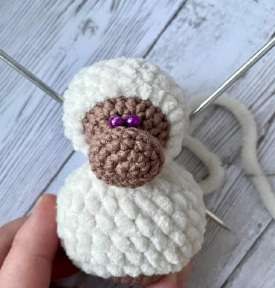
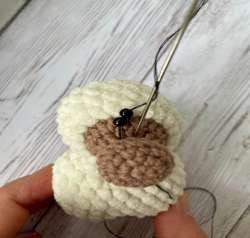
First, mark the eye positions on the face using pins in Round 8 at the base of the 2nd and 3rd half double crochet increases. Place the head centered on top of the body, secure it temporarily with knitting needles or long pins, and sew the head firmly to the body using matching sewing thread.
Pattern shorthand reference: Намечаем место для глаз (в 8 ряду у основания 2 и 3 прибавки из ПСН), располагаем голову по центру, наживляем спицами, пришиваем.
Beginner Tip: Sewing with strong cotton or matching sewing thread makes the neck joint extra sturdy for a keychain.
Assembly: Sculpt the Legs
Step 26 — Leg Sculpting
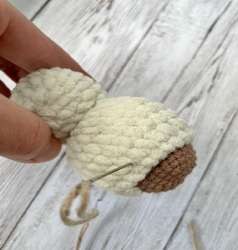
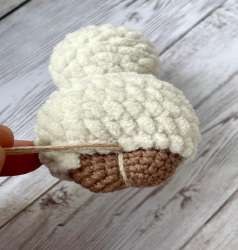
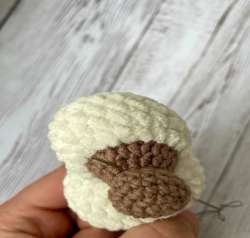
Thread a yarn needle with a length of contrasting Fine (#2) cotton yarn. Insert the needle at the back center of the body between Rounds 8 and 9, and bring it out at the front center between Rounds 8 and 9. Pull the yarn tight right down the middle of the brown base so it divides into two cute little legs. Tie 3 to 4 tight knots at the back and hide the yarn ends inside the body.
Pattern shorthand reference: Продеваем иголку сзади по центру между 8 и 9 рядами, выводим спереди, натягиваем нить, делаем 3-4 узла сзади.
Assembly: Attach Eyes & Embroider Eyebrows
Step 27 — Eyes & Eyebrows
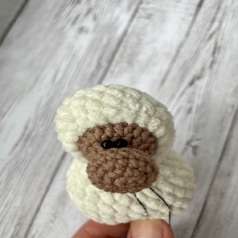
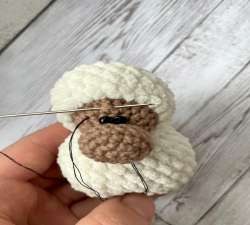
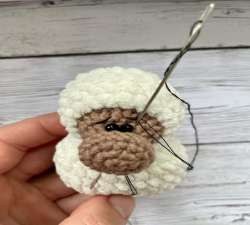
Thread a sewing needle with a doubled strand of black sewing thread. Insert the needle at the bottom of the muzzle between Rounds 9 and 10 and bring it out at Round 8 at the base of the 3rd half double crochet increase. Thread both 3 mm black bead eyes onto the thread, insert the needle at the base of the 2nd half double crochet increase, and bring it back down to the bottom of the muzzle 1 stitch away from your starting tail. Pull tight to sink the beads slightly and tie 3 to 4 knots. Using the same black thread, insert the needle from the bottom back up through the eye holes to embroider two slanted eyebrows, leaving 1 half double crochet stitch centered between them. Tie 2 to 3 gentle knots (do not pull tight), hide the ends inside the head, and trim.
Pattern shorthand reference: Оформляем двойной швейной нитью черного цвета: бусины 3 мм в 8 ряду у основания 2 и 3 прибавки из ПСН, затем вышиваем бровки.
Assembly: Sculpt Muzzle & Embroider Nostrils
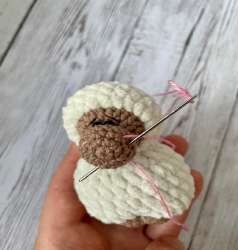
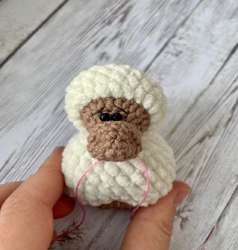
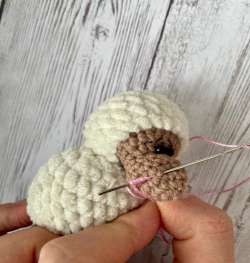
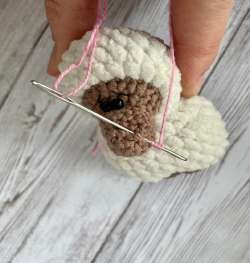
Step 28 — Muzzle & Nostrils
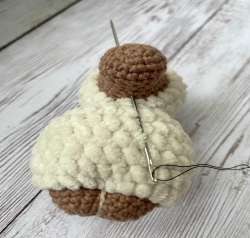
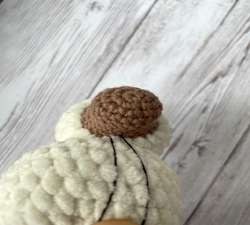
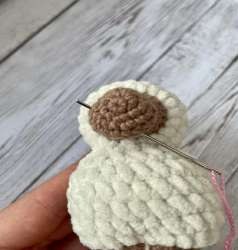
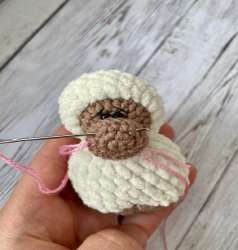
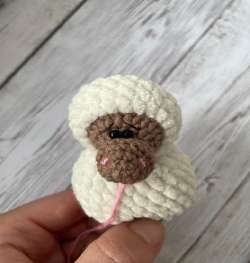
Using pink embroidery thread (or fine Iris cotton), insert the needle from the bottom of the muzzle between Rounds 6 and 7. Bring it out on the top left of the muzzle between Rounds 3 and 4. Make a horizontal stitch about 1 single crochet wide, then skip 3 to 4 stitches to the right and make a second 1-stitch-wide stitch, bringing the needle back down to the bottom 1 stitch away from your starting tail. Pull tight to indent the nose slightly and tie 2 to 3 knots. Using the same pink tails, embroider two tiny nostrils with a French knot or bullion (rococo) stitch, tie a couple of gentle knots without pulling tight, and hide the ends inside the head.
Pattern shorthand reference: Вводим нить снизу между 6 и 7 рядами, выводим между 3 и 4 рядами, делаем стежки, стягиваем и вышиваем ноздри стежком рококо.
Assembly: Sew Arms & Ears
Step 29 — Arms & Ears
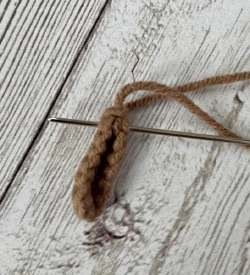
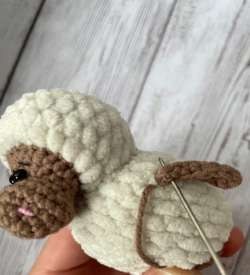
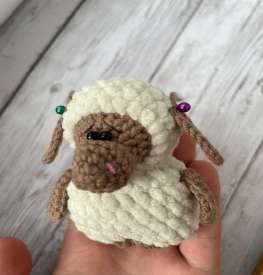
Fold the top edge of each arm in half and sew the two top stitches together (keeping the slip stitch centered). Sew each arm to the sides of the body right below the head using about 2 stitches, knot securely, and hide the yarn tails inside the body. Next, pin the ears onto the sides of the head and sew them securely in place.
Pattern shorthand reference: Складываем ручку пополам, сшиваем две петельки, пришиваем к игрушке двумя стежками. Пришиваем ушки.
Finishing Your Project
- Attach a metal keychain ring to the top center of the sheep’s head using a jump ring or a few loops of strong thread.
- Tie a small bow from thin satin ribbon and sew or glue it onto the top side of the sheep’s head next to one ear for extra charm.
- If gifting to a baby or toddler, replace the 3 mm bead eyes with embroidered French knots or yarn eyes so there are no small parts.